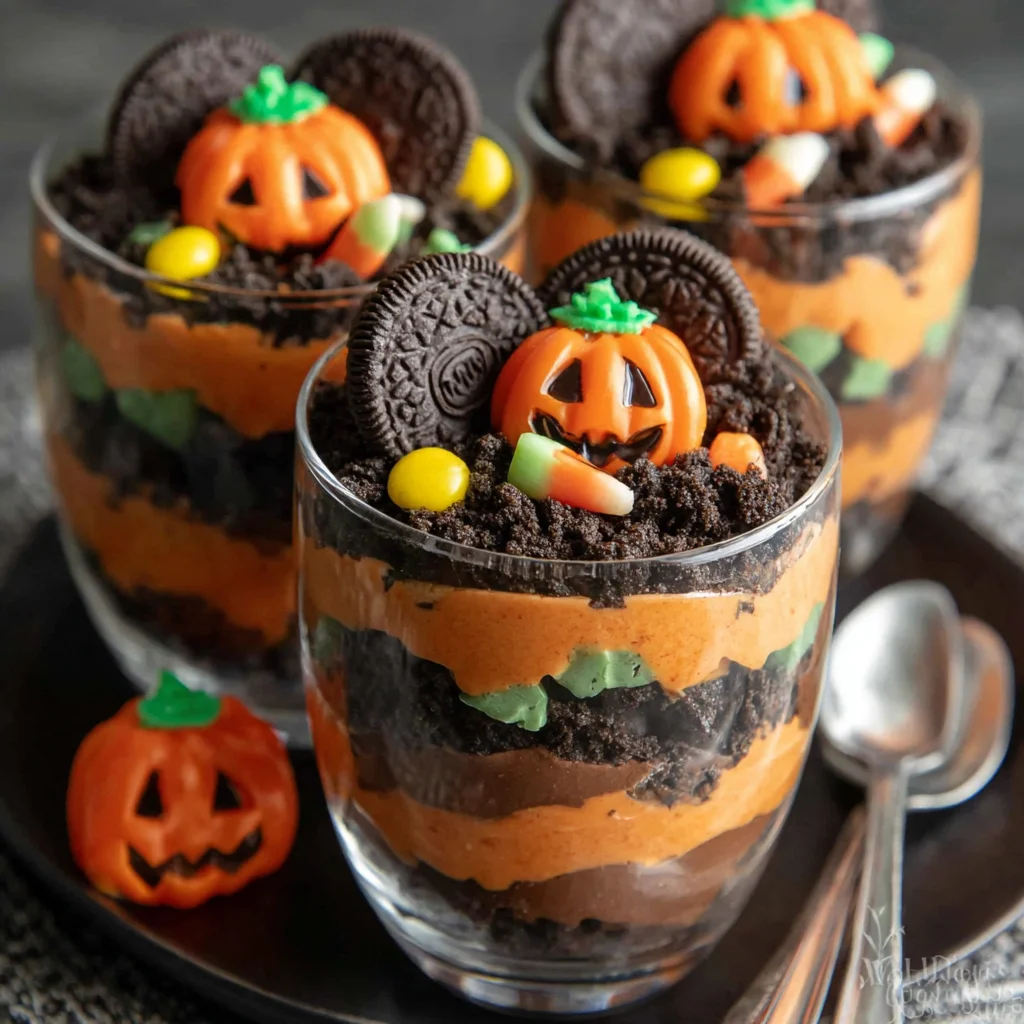
Get ready to dig into a deliciously spooky dessert that’s perfect for your Halloween gatherings! These Halloween Dirt Cups are not only incredibly easy to make, but they’re also guaranteed to be a hit with both kids and adults. Forget the complicated, time-consuming Halloween recipes; this one is a breeze, requiring minimal effort while delivering maximum impact. Imagine the delighted gasps as your guests uncover layers of chocolatey goodness, culminating in a creepy-crawly surprise. From the simple cookie crumb base to the creamy pudding filling, topped with gummy worms and plastic spiders, these Halloween Dirt Cups offer a delightful textural contrast and a taste that’s both rich and satisfying. They are the epitome of a fun, easy, and delicious Halloween dessert that will leave everyone wanting more. This recipe is perfect for a quick Halloween dessert, last-minute party treat or even a fun family activity! Prepare to be amazed by how easy it is to create these hauntingly delicious Halloween Dirt Cups!
Why You’ll Love This Halloween Dirt Cups Recipe
There are so many reasons why you’ll absolutely adore this Halloween Dirt Cups recipe. First and foremost, it’s incredibly easy! Even the least experienced baker can whip up a batch of these spooky delights in minutes. No fancy techniques, no complicated equipment – just simple mixing and layering. This makes it a perfect recipe for busy parents, last-minute party hosts, or anyone who wants a delicious dessert without the hassle. Second, the customization options are endless! Feeling creative? Add sprinkles, mini chocolate chips, or even different types of candies to personalize your cups. Want a more intense chocolate flavor? Use dark chocolate sandwich cookies instead of milk chocolate. The flexibility of this recipe allows you to cater to every taste and preference. Third, the presentation is undeniably captivating. The layered effect mimics real dirt, creating a fun and festive Halloween atmosphere. Your guests will be impressed by the clever design and deliciousness, making these cups the star of your Halloween spread. Finally, and perhaps most importantly, they’re irresistibly delicious! The combination of crunchy cookie crumbs, creamy pudding, and chewy gummy worms is a delightful symphony of textures and flavors that will leave everyone wanting more. It’s the perfect blend of sweet and slightly spooky that truly embodies the spirit of Halloween. Consider this recipe a delicious shortcut to a truly memorable Halloween celebration. It’s a recipe that guarantees a fun and tasty experience for everyone involved.
Why You Should Try This Halloween Dirt Cups Recipe
Beyond the ease and deliciousness, there are numerous compelling reasons to give this Halloween Dirt Cups recipe a try. It’s the perfect make-ahead dessert, allowing you to prepare it hours (or even a day) in advance. This is particularly useful for busy Halloween parties or events where you want to minimize last-minute stress. Plus, it’s a fantastic recipe to involve kids in the kitchen. The simple steps make it a fun and educational activity, teaching children basic cooking skills while also igniting their creativity. The chance to decorate their own cups with gummy worms and spiders adds an element of playful engagement. This recipe is a great way to spend quality time with your family while making a delicious treat. Beyond being a fantastic Halloween dessert, these Dirt Cups can be adapted for other occasions. Change the toppings to match the theme; sprinkles for birthdays, mini marshmallows for winter holidays – the possibilities are endless. You’ll discover a versatile recipe that extends far beyond just Halloween. Ultimately, this Halloween Dirt Cups recipe offers a unique balance of simplicity, customization, and deliciousness, making it a recipe you’ll want to keep in your repertoire long after Halloween is over. Its ease of preparation, engaging visual appeal, and undeniably delightful taste make it a perfect recipe for both experienced bakers and novice cooks alike. For a memorable and flavorful Halloween, there’s simply no better choice.
Ingredients and Utensils for Your Halloween Dirt Cups
- Chocolate Sandwich Cookies: One 16-ounce package of your favorite chocolate sandwich cookies. The classic Oreos work perfectly, but feel free to experiment with other brands or flavors for a unique twist. Keyword: Chocolate Cookies
- Unsalted Butter: ½ cup (1 stick) of unsalted butter, melted. Unsalted butter provides more control over the sweetness of your finished product. Keyword: Melted Butter
- Cream Cheese: 1 (8-ounce) package of cream cheese, softened to room temperature. Softened cream cheese will blend more smoothly and easily. Keyword: Cream Cheese Frosting
- Powdered Sugar: ½ cup of powdered sugar, for the cream cheese mixture. This adds sweetness and a light, fluffy texture. Keyword: Powdered Sugar
- Vanilla Extract: 1 teaspoon of vanilla extract. This enhances the overall flavor profile, adding a touch of warmth and sweetness. Keyword: Vanilla Extract
- Chocolate Pudding: 1 cup of chocolate pudding, either instant or pre-made. Instant pudding is convenient, but pre-made offers a richer, smoother texture. Keyword: Chocolate Pudding
- Gummy Worms: A generous amount of gummy worms, for the creepy-crawly topping. The more, the merrier! Keyword: Gummy Worms
- Plastic Spiders (Optional): Small plastic spiders, for an extra spooky touch. Keyword: Halloween Decorations
- Chocolate Shavings (Optional): Chocolate shavings, for additional decoration. Keyword: Chocolate Shavings
Utensils You’ll Need:
- Food Processor or Ziploc Bag: For crushing the cookies efficiently. A food processor will give you a finer crumb, while a ziploc bag and rolling pin will offer a slightly coarser texture.
- Mixing Bowls: At least two mixing bowls, one for the cookie crumbs and one for the cream cheese mixture.
- Spatula or Whisk: For mixing the ingredients smoothly and effectively.
- Measuring Cups and Spoons: For precise measurements of the ingredients.
- Serving Cups or Glasses: Individual serving cups or glasses to create the dirt cup layers. Clear cups work best to showcase the layered effect.
- Spoon or Ice Cream Scoop: To easily layer the ingredients into the cups.
Detailed Steps for Making Spooky Halloween Dirt Cups
Step 1: Crush the Cookies
Begin by crushing your chocolate sandwich cookies into fine crumbs. You can do this using a food processor for a more consistent texture, or by placing the cookies in a zip-top bag and crushing them with a rolling pin. Aim for a consistent crumb consistency for a better presentation. Ensure the crumbs are evenly sized for a uniform base.
Step 2: Combine Crumbs and Butter
In a medium-sized mixing bowl, combine the crushed cookie crumbs with the melted, unsalted butter. Mix thoroughly until all the crumbs are evenly moistened. This mixture forms the “dirt” layer of your Halloween Dirt Cups. Make sure all the crumbs are coated in butter to ensure they bind together properly.
Step 3: Prepare the Cream Cheese Mixture
In a separate bowl, beat together the softened cream cheese, powdered sugar, and vanilla extract until smooth and creamy. This mixture forms the creamy layer between the cookie base and pudding layer. For a smoother texture, ensure the cream cheese is completely softened before mixing. You can also use an electric mixer for this step if you prefer.
Step 4: Layer the Ingredients
Now comes the fun part! Divide the cookie crumb mixture evenly among your serving cups. Press it down firmly to create a solid base. Next, add a layer of the cream cheese mixture on top of the cookie crumbs. Spread it evenly. Finally, top with a layer of chocolate pudding. Ensure each layer is evenly distributed for a visually appealing result.
Step 5: Decorate and Chill
The final step is the most creative! Decorate your Halloween Dirt Cups with gummy worms, plastic spiders, and chocolate shavings, arranging them to create a spooky and fun presentation. Let your creativity run wild! Once decorated, refrigerate the cups for at least 30 minutes to allow the layers to set and the flavors to meld. Chilling ensures the layers hold their shape and the dessert is perfectly refreshing.
Tips and Variations for Your Halloween Dirt Cups
Ingredient Alternatives:
- Gluten-Free Option: Use gluten-free chocolate sandwich cookies to make these Halloween Dirt Cups suitable for those with gluten sensitivities. Many brands now offer gluten-free alternatives. Check out our other gluten-free recipes!
- Vegan Option: Substitute the butter with vegan butter and the cream cheese with a vegan cream cheese alternative. Be sure to check the labels to ensure the ingredients are suitable for a vegan diet.
- Flavor Variations: Experiment with different types of cookies, pudding, and toppings. Try using Oreo-flavored pudding or adding other candies like M&Ms or sprinkles. Peanut butter cups could add an interesting twist.
Tips to Avoid Common Mistakes:
- Don’t over-crush the cookies: You want crumbs, not powder. Too much crushing will create a dense, compact base.
- Ensure the butter is melted completely: This is crucial for binding the cookie crumbs together. Lumps of butter will make the base uneven.
- Soften the cream cheese properly: This is key for creating a smooth, creamy layer. Hard cream cheese will be difficult to blend and result in a lumpy texture.
- Chill the cups sufficiently: This is important for preventing the layers from separating or becoming soggy.
Nutritional Information and Health Benefits of Halloween Dirt Cups
While Halloween Dirt Cups are undeniably a treat, it’s worth noting their nutritional value. A single serving (assuming approximately 1/4 of the recipe) likely contains approximately 300-350 calories, with varying amounts of protein, fat, and carbohydrates depending on the specific brands of ingredients used. The primary source of calories comes from the chocolate cookies and pudding, contributing significantly to the sugar and fat content.
Nutritional Benefits (with caveats):
- Calcium (from cream cheese): Cream cheese provides a small amount of calcium, essential for healthy bones and teeth.
- Antioxidants (from chocolate): Dark chocolate (if used) offers some antioxidants, which may contribute to overall health, but this is heavily dependent on the amount of dark chocolate used.
Important Note: Halloween Dirt Cups are a dessert and should be enjoyed in moderation as part of a balanced diet. They are not a significant source of essential nutrients. For a healthier alternative, you could reduce the amount of sugar or use whole wheat cookies, however this would significantly alter the flavour and texture of the final product.
FAQs about Halloween Dirt Cups
How long do Halloween Dirt Cups last in the refrigerator?
Can I make Halloween Dirt Cups ahead of time?
What are some other creative toppings for Halloween Dirt Cups?
Are these Halloween Dirt Cups gluten-free?
Can I freeze Halloween Dirt Cups?
Conclusion: Embrace the Spooky Delight of Halloween Dirt Cups
These Halloween Dirt Cups are more than just a dessert; they’re a fun, interactive experience perfect for sharing with friends and family. The simplicity of the recipe, coupled with the endless possibilities for customization, makes it an ideal treat for any Halloween gathering. From the ease of preparation to the satisfying blend of textures and flavors, these cups deliver on all fronts. So, ditch the complicated baking projects this Halloween and opt for this effortless yet impressive recipe. Don’t forget to share your creations with us! Post pictures on social media and tag us. Check out our Pinterest page for more spooky recipe inspiration! And be sure to check out our other delicious recipes on recipesliana.com for more culinary adventures throughout the year! Let us know in the comments below how your Halloween Dirt Cups turned out!
Spooky Delicious Halloween Dirt Cups
Ingredients
Equipment
Method
- Crush chocolate sandwich cookies into fine crumbs. You can use a food processor or a ziplock bag and rolling pin.
- In a mixing bowl, combine the crushed cookies and melted butter. Mix until well combined.
- In a separate bowl, beat together the softened cream cheese, powdered sugar, and vanilla extract until smooth and creamy.
- Layer the cookie crumbs in small cups or glasses, pressing down gently to form a base.
- Spoon the chocolate pudding over the cookie crumb layer.
- Top with the cream cheese frosting, spreading evenly.
- Decorate with gummy worms, plastic spiders, and chocolate shavings (if using).
- Refrigerate for at least 30 minutes before serving to allow the flavors to meld and the dessert to chill.