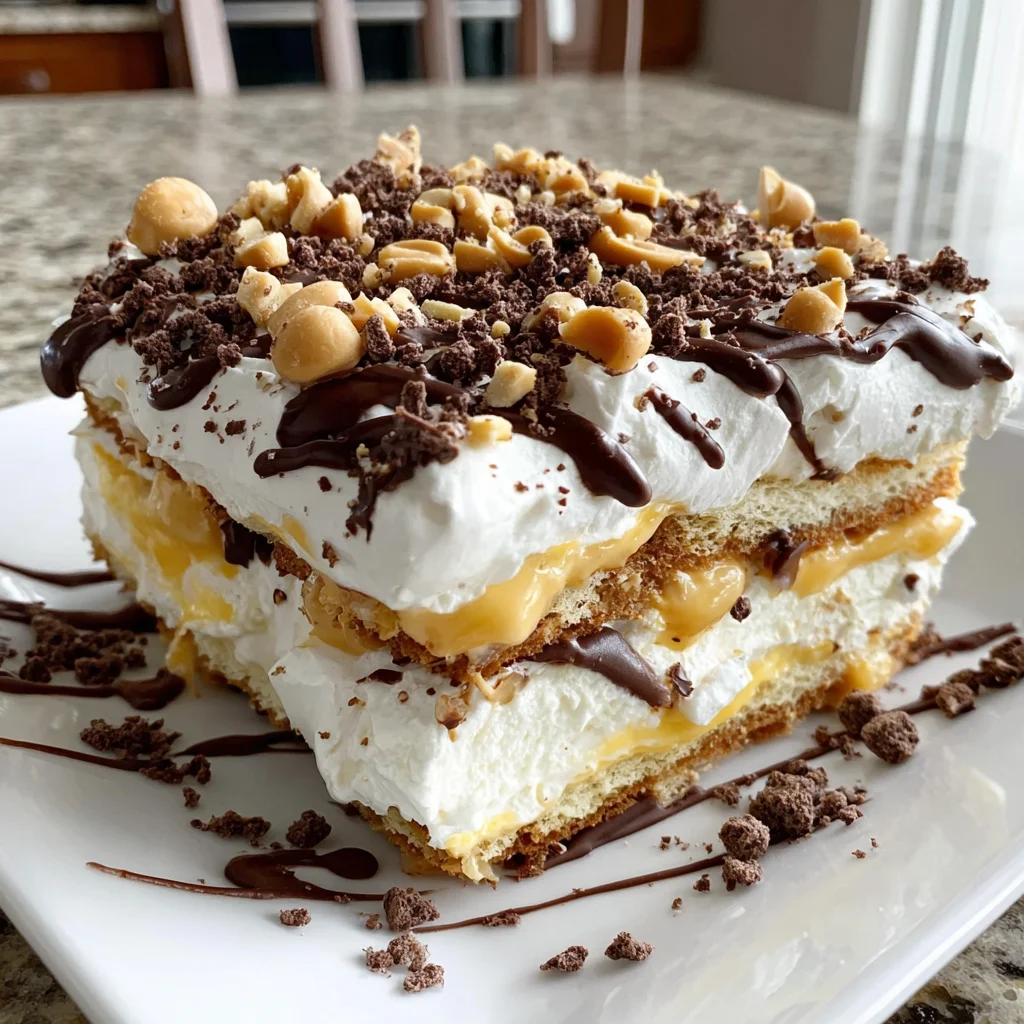
If there’s one dessert that captures the essence of childhood comfort while feeling sophisticated enough for an adult gathering, it’s the Eclair Cake. But we’re not just making the classic version today; we’re elevating it with the ultimate flavor duo: peanut butter and chocolate. Introducing the spectacular, crowd-pleasing, and incredibly easy Peanut Butter Chocolate Eclair Cake.
This dessert requires zero oven time, making it the perfect cool treat for summer holidays, potlucks, or simply when you need a decadent fix without heating up the kitchen. Layers of buttery graham crackers transform overnight into a soft, cake-like texture, sandwiching a luscious, airy peanut butter pudding filling, all crowned with a glossy, rich homemade chocolate glaze. Get ready to ditch the baking sheets this no-bake masterpiece is about to become your new signature dessert. Let’s dive into how you can create this unbelievable Peanut Butter Chocolate Eclair Cake with minimal effort and maximum flavor.
Why You’ll Fall Head Over Heels for This Easy Peanut Butter Chocolate Eclair Cake (300-500 words)
The standard eclair cake is a classic for a reason, but adding creamy, salty-sweet peanut butter into the mix transforms it into a completely different league of dessert. This specific recipe for Peanut Butter Chocolate Eclair Cake is designed for guaranteed success, even for novice cooks. The magic lies in the texture: the contrast between the firm, homemade chocolate glaze and the impossibly soft, cloud-like peanut butter filling is sheer perfection.
The Perfect Flavor Combination: Peanut Butter and Chocolate
It’s no secret that peanut butter and chocolate are a match made in culinary heaven. The richness of the cocoa topping perfectly balances the sweet, nutty depth of the peanut butter pudding. Unlike some overly sweet no-bake desserts, the slight savoriness of the peanut butter cuts through the sugar, creating a complex and incredibly addictive flavor profile. Every bite delivers that satisfying crunch-turned-chew from the graham crackers, followed by a rush of creamy, decadent filling.
Effortless Elegance: No Baking Required
The best part? This entire showstopper is prepared right on your countertop. The biggest time commitment is the overnight chill, which, frankly, is done by the refrigerator! If you are short on time or dealing with scorching summer weather, this Peanut Butter Chocolate Eclair Cake is the ultimate solution. You get a dessert that looks like it took hours of careful preparation but only requires about 20 minutes of active assembly time. This makes it an ideal option for busy weeknights or unexpected guests.
Creamy, Dreamy Texture
The filling is the star here. By combining instant pudding, cold milk, rich peanut butter, and thawed whipped topping, we create a filling that is exceptionally light, yet structurally sound. It holds its shape when sliced but melts delightfully in your mouth. This isn’t just a thick pudding layer; it’s an airy, mousse-like experience. When combined with the softened graham crackers which absorb moisture during the chilling process to mimic the texture of cake the result is truly unique and satisfying. For those who love simple, decadent, and easy treats, you might also enjoy making some Oreo Fudge, another fantastic no-bake option that satisfies those chocolate cravings.
Why You Should Try Making This Peanut Butter Chocolate Eclair Cake Today (300-500 words)
If you’re looking for a reliable, go-to recipe that never fails to impress, this is it. Beyond the fantastic taste, the structural benefits and make-ahead capability of this Peanut Butter Chocolate Eclair Cake make it a necessity in your recipe repertoire. It solves many common dessert dilemmas and offers incredible versatility.
A Potluck and Party Essential
Need a dish to pass that travels well and feeds a crowd? The 9×13 inch pan size makes this cake perfect for gatherings, capable of serving 12 to 15 people generous slices. Because it must be served cold, it stays fresh and firm for hours, unlike traditional cakes that might dry out. Its layered structure is robust, meaning you don’t have to worry about elaborate decorations or careful transportation. Simply pop the lid on the dish, and you are ready to go. Everyone loves the combination, guaranteeing that your dish will be the first one empty.
Master the Art of Make-Ahead Desserts
In the culinary world, desserts often require a last-minute flurry of activity. Not so with this Eclair Cake. It requires a minimum of 8 hours, and ideally 12-24 hours, of chilling time. This means you can assemble the entire cake the day before your event, freeing up precious time on the day of the party. Preparing dessert ahead of time allows the flavors to meld beautifully and ensures the graham crackers have fully softened, reaching their optimal cake-like consistency. This crucial chilling period is what elevates a simple layered dessert into a truly remarkable no-bake cake.
Budget-Friendly and Pantry Staple Ingredients
You don’t need exotic ingredients or specialty flours to make this recipe shine. The components graham crackers, instant pudding mix, peanut butter, and common baking staples for the glaze are affordable and easily accessible at any grocery store. This makes the Peanut Butter Chocolate Eclair Cake a fantastic choice when baking for large events or when you simply want a satisfying treat without a hefty grocery bill.
If you are a fan of quick, simple, and peanut-butter-loaded treats, you might also be interested in trying a no-bake peanut butter pie, which offers a similar level of creamy satisfaction with minimal fuss. However, the unique texture provided by the graham cracker layers in this eclair cake remains unparalleled.
The Components: Ingredients and Necessary Utensils for Your Peanut Butter Chocolate Eclair Cake (700-900 words)
Success in this no-bake recipe hinges on having the right measurements and preparing your ingredients correctly. While the ingredient list is short, precision is key, especially with the pudding and the glaze.
Detailed Ingredients List
Ensure all cold ingredients are truly cold, and your whipped topping is fully thawed before starting.
For the Base and Layers:
- 2 (14.4 oz) boxes of graham crackers: You need approximately 24 full sheets. Use classic honey graham crackers for the best flavor profile.
For the Peanut Butter Filling:
- 2 (3.4 oz) packages instant vanilla pudding mix (or French vanilla): It is absolutely essential that this is instant pudding, not the cook-and-serve variety. French vanilla adds a richer flavor.
- 3 cups cold whole milk: The milk must be very cold (straight from the refrigerator). Cold milk is necessary for the instant pudding to set quickly and correctly, ensuring a thick, stable filling.
- 1 cup creamy peanut butter: We recommend traditional creamy peanut butter (like Jif or Skippy) rather than natural separation-style peanut butter. The added stabilizers help the filling maintain its structure.
- 1/2 cup powdered sugar (optional): While the pudding and whipped topping provide sweetness, the powdered sugar helps stabilize the peanut butter mixture and ensures a smoother, less gritty texture. We highly recommend including it.
- 1 (8 oz) container frozen whipped topping, thawed (such as Cool Whip): Ensure it is completely thawed but still cold. This is the ingredient that provides the airy, mousse-like quality to the filling.
For the Rich Chocolate Topping/Glaze:
This simple homemade glaze elevates the cake far above the standard store-bought frosting.
- 1/2 cup granulated sugar: Provides the structure and sweetness for the glossy finish.
- 1/4 cup unsweetened cocoa powder: Use high-quality cocoa powder for the deepest chocolate flavor.
- 1/4 cup milk (or water): Acts as the liquid base for the glaze. Milk yields a slightly richer, creamier texture.
- 1/4 cup unsalted butter (4 tablespoons): Adds richness and crucial shine to the glaze.
- 1 teaspoon vanilla extract: Enhances the overall chocolate flavor and depth.
Essential Utensils and Tools for Success
While this recipe doesn’t require complex machinery, having the right tools on hand makes the assembly process seamless and ensures the best final texture.
Required Kitchen Equipment:
- 9×13 Inch Baking Dish (Glass or Ceramic): This is the ideal size for achieving the correct height and layer ratio.
- Large Mixing Bowl: Necessary for whisking the pudding and folding in the whipped topping.
- Whisk (Wire or Electric Mixer): A wire whisk works perfectly for instant pudding, ensuring all lumps are dissolved and achieving the necessary thickness quickly.
- Small Saucepan: Specifically needed for preparing the homemade chocolate glaze.
- Rubber Spatula: Essential for gently folding the whipped topping (avoiding deflation) and spreading the filling evenly.
- Measuring Cups and Spoons: Accuracy in measurements, especially for the milk and pudding, is paramount to setting the cake correctly.
Tip on Whipped Topping:
If you prefer a truly homemade touch, you can substitute the 8 oz whipped topping with 2 cups of heavy whipping cream whipped to stiff peaks, sweetened with 1/4 cup powdered sugar. This makes the filling even richer and more natural, though the Cool Whip version provides unmatched stability for this specific type of no-bake cake.
Peanut Butter Prep Note:
Don’t skip the step of softening the peanut butter. Even 30 seconds in the microwave dramatically improves its ability to incorporate smoothly into the cold pudding mix, preventing stubborn lumps that can ruin the smooth texture of the filling. This minor preparation step saves significant mixing time and guarantees a perfect, uniform Peanut Butter Chocolate Eclair Cake filling.
Detailed Recipe Steps: Mastering the Assembly of the Peanut Butter Chocolate Eclair Cake (800-900 words)
Follow these steps precisely to ensure your no-bake dessert sets properly and achieves that iconic eclair cake texture. Remember, the key to this recipe is the layering and the long chilling period.
1. Prepare the Baking Dish and Base Layer
Use a sturdy 9×13 inch baking dish. This step establishes the foundation of your cake. Take your graham crackers and lay a single layer across the bottom of the dish. It is highly likely you will need to break several crackers into smaller pieces (halves, thirds) to fill in any gaps completely. The goal is a solid, continuous layer of graham cracker base. Set this prepared dish aside.
Practical Tip for Perfect Layers:
Measure your dish and estimate how many full crackers fit before you start breaking them. Usually, four full crackers fit across the width and about six down the length, but this can vary slightly by brand. Lay them out loosely first, then fill the voids.
2. Prepare the Peanut Butter Pudding Base
In a large mixing bowl, combine the two packages of instant vanilla pudding mix and the 3 cups of very cold whole milk. Begin whisking immediately and vigorously. Whisk continuously for about 2 minutes. The mixture will start thin and then suddenly thicken dramatically. Stop whisking as soon as it achieves a thick, gelatinous consistency. Over-whisking can sometimes cause the pudding to break down later.
In a separate, small, microwave-safe bowl, microwave the 1 cup of creamy peanut butter for about 30 seconds. This step is crucial for smooth incorporation. Stir the warmed peanut butter until it is easily pourable.
Add the warmed peanut butter and the optional 1/2 cup of powdered sugar (if using) into the thickened pudding mixture. Stir well. You need to ensure the peanut butter is fully integrated and the mixture is entirely uniform no streaks of plain vanilla pudding or solid chunks of peanut butter should remain.
3. Fold in the Whipped Topping Gently
Take your container of thawed whipped topping. Using a large rubber spatula, gently fold the whipped topping into the peanut butter pudding mixture. The goal here is to maintain the volume and airiness of the whipped topping. Do not stir or whisk aggressively. Use a motion that scoops the mixture from the bottom and folds it over the top until just combined. Stop folding the moment you no longer see white streaks of whipped topping. This delicate folding process creates the light, airy filling crucial to a great Peanut Butter Chocolate Eclair Cake.
4. Assemble the First Layers
- Spread exactly half of the peanut butter filling evenly over the initial graham cracker base layer in the prepared baking dish. Use your spatula to reach the corners.
- Add a second, complete layer of graham crackers directly on top of the filling. Again, break pieces as necessary to fill all gaps.
5. Complete the Cake Assembly
- Spread the remaining half of the peanut butter filling evenly over the second graham cracker layer.
- Place one final, complete layer of graham crackers on top of the final layer of filling. This top cracker layer will be covered by the glaze.
Cover the dish lightly with plastic wrap and place it in the refrigerator while you move on to Step 6. Keeping the cake chilled prevents the filling from softening too much before the glaze is applied.
6. Prepare the Quick Chocolate Glaze
In a small saucepan, combine the granulated sugar, cocoa powder, 1/4 cup milk (or water), and the 1/4 cup butter. Place the saucepan over medium heat.
Stir continuously! This prevents the cocoa powder and sugar from scorching on the bottom of the pan. Continue heating until the butter is completely melted and the sugar feels dissolved (rub a small amount between your fingers it should feel smooth). Bring the mixture to a gentle boil and allow it to cook for 1 full minute, stirring occasionally.
Remove the pan immediately from the heat. Stir in the vanilla extract.
7. Glaze and Chill the Cake (The Most Important Step)
Allow the chocolate glaze to cool slightly. This is critical. If the glaze is too hot, it will melt the whipped topping underneath the top graham cracker layer. Let it sit on the counter for about 5 to 10 minutes, stirring occasionally, until it has thickened slightly but is still pourable.
Pour the slightly cooled chocolate glaze evenly over the top layer of graham crackers. Use a spatula to gently spread the glaze, ensuring the entire surface is covered right up to the edges. Do not press hard, as this will displace the filling.
Cover the dish tightly with plastic wrap. Ensure the plastic wrap does not touch the glaze surface if possible (you can use toothpicks to tent it if desired, but tight coverage is key for moisture retention). Refrigerate the Peanut Butter Chocolate Eclair Cake for a minimum of 8 hours, or preferably overnight (12-24 hours). The extended chilling time is absolutely necessary for the graham crackers to absorb the moisture from the filling and achieve the classic soft, cake-like eclair texture.
8. Serve and Store
Once fully chilled and set, remove the cake from the refrigerator, slice into squares, and serve. Store leftovers covered tightly in the refrigerator. This cake tastes best within 3-4 days of preparation.
Tips, Troubleshooting, and Delicious Variations for Your Peanut Butter Chocolate Eclair Cake (500-600 words)
While this no-bake recipe is inherently simple, a few professional tips can ensure perfect results every time. Plus, we explore ways to adapt this recipe to suit different dietary needs or flavor preferences.
Troubleshooting Common Eclair Cake Issues
1. My Graham Crackers are Soggy (or Too Hard!)
If the crackers are soggy, you likely didn’t cover the cake tightly enough, or you didn’t let the glaze cool enough before pouring (introducing excess heat). If the crackers are still too hard after 8 hours, they need more time! Patience is key. If your graham crackers are exceptionally dry, you can lightly brush the top of the first and second cracker layers with a small amount of milk before adding the filling. However, this is usually unnecessary if you follow the chilling instructions.
2. My Glaze Melted the Filling
This is the most common mistake. If the chocolate glaze is too hot, the heat conducts through the thin graham cracker layer and melts the whipped topping/pudding mixture. Always allow the glaze to cool for 5-10 minutes until it thickens slightly before pouring. It should be warm, not steaming hot.
3. The Peanut Butter Filling is Runny
The stability of the filling depends entirely on the instant pudding setting correctly. Did you use cook-and-serve pudding by mistake? Did you use enough cold milk? Ensure you use whole milk, as lower fat content sometimes inhibits proper setting. If the filling seems slightly soft, allow the mixture to rest for 5 minutes after whisking the milk and pudding, then fold in the whipped topping.
Exciting Variations to Customize Your Cake
The beauty of this Peanut Butter Chocolate Eclair Cake is its adaptability. Feel free to swap ingredients to create a unique dessert experience.
Vegan/Dairy-Free Adaptation
To make this dessert friendly for dairy restrictions, substitute the whole milk with a creamy, full-fat plant-based milk (like oat milk or soy milk). Use dairy-free instant pudding mix (ensure it thickens with the substitute milk) and swap the dairy butter in the glaze for a solid vegan butter stick. Use a vegan whipped topping (many brands like TruWhip or CocoWhip are excellent substitutes).
Gluten-Free Version
Easily achieve a gluten-free cake by swapping traditional graham crackers for gluten-free graham cracker substitutes. The rest of the ingredients are generally safe, but always check labels on the pudding mix.
Flavor Swaps
- Nutella Eclair Cake: Substitute half of the creamy peanut butter with creamy Nutella (hazelnut spread).
- Espresso Glaze: Add 1/2 teaspoon of instant espresso powder to the cocoa and sugar mixture when preparing the glaze for a mocha twist.
- Crunchy Peanut Butter: If you love texture, use crunchy peanut butter instead of creamy. Be aware that this may slightly reduce the stability of the filling.
Presentation Tips
Before serving, you can lightly dust the glaze with powdered sugar, drizzle a small amount of melted peanut butter over the top, or add crushed peanuts for extra texture. For more visual inspiration on plating this and other delicious treats, be sure to check out our Pinterest board.
Nutritional Values and Sweet Benefits of Peanut Butter Chocolate Eclair Cake (400-600 words)
While this delicious Peanut Butter Chocolate Eclair Cake is undoubtedly a dessert meant for indulgence, understanding the components can help you enjoy it mindfully. Nutritional information will vary based on specific brands used (especially for peanut butter and whipped topping), but we can provide general estimates for a typical serving size.
Estimated Nutritional Breakdown (Per 1/15th Serving):
This is a rich, satisfying dessert, meaning it is high in fats and carbohydrates. Given the size of the ingredients, a single slice (assuming 15 servings from a 9×13 pan) generally falls within the following ranges:
- Calories: 350 – 450 kcal
- Total Fat: 20g – 25g
- Saturated Fat: 8g – 12g
- Carbohydrates: 40g – 50g (primarily from sugar and graham crackers)
- Protein: 7g – 9g
- Fiber: 1g – 2g
Note on Carbohydrates and Sugar:
The primary source of carbohydrates comes from the sugar in the instant pudding, the granulated sugar in the glaze, and the graham crackers. This high-carb content makes this cake an excellent energy source for active individuals, especially when consumed as a post-activity treat.
Benefits of Key Ingredients
Even in a dessert, certain ingredients bring valuable nutrients to the table:
Peanut Butter Power
The use of peanut butter in this Peanut Butter Chocolate Eclair Cake is not just for flavor; it provides significant nutritional benefits:
Protein and Healthy Fats
Peanut butter is an excellent source of plant-based protein, which aids in satiety and muscle maintenance. It also contains monounsaturated and polyunsaturated fats (the “good fats”) that are beneficial for heart health when consumed in moderation.
Essential Minerals
Peanut butter is rich in several essential minerals, including magnesium (important for muscle and nerve function) and phosphorus (crucial for bone structure).
Milk and Calcium
The whole milk used to prepare the pudding contributes calcium, which is vital for bone health, and Vitamin D (if fortified). Even in dessert form, these components provide nutritional value that many baked goods lack.
Serving Suggestion: Due to its richness, this dessert is best enjoyed in moderation. A single slice makes for a highly satisfying treat, perfect for capping off a light meal or sharing at a festive occasion. Remember that balance is the key to enjoying all foods, including delightful desserts like this Eclair Cake.
FAQs About Peanut Butter Chocolate Eclair Cake
How long does Peanut Butter Chocolate Eclair Cake need to chill?
The cake requires a minimum of 8 hours of chilling time, but for the very best, softest, cake-like texture, it is highly recommended to chill it overnight (12 to 24 hours). The extended time allows the graham crackers to fully absorb moisture from the creamy peanut butter filling.
Can I use crunchy peanut butter instead of creamy peanut butter in this Peanut Butter Chocolate Eclair Cake recipe?
Yes, you can substitute crunchy peanut butter for creamy, but be aware that the filling may not be quite as structurally stable or smooth. Using creamy peanut butter is preferred for the classic light eclair texture. If using crunchy, ensure you still briefly microwave it to mix it thoroughly into the pudding base.
Does the chocolate glaze have to be cooled before pouring?
Yes, cooling the chocolate glaze is absolutely critical. If you pour the hot glaze directly onto the top layer of graham crackers, the heat will melt the whipped topping in the filling underneath, causing the cake to lose its creamy structure. Allow it to cool for 5 to 10 minutes until warm but not hot.
How long will this Peanut Butter Chocolate Eclair Cake last in the refrigerator?
When stored covered tightly in the refrigerator, the cake will remain fresh and delicious for 4 to 5 days. It tends to taste best within the first two days after the initial chilling period, as the graham crackers will have the perfect, soft bite.
Can I freeze the Peanut Butter Chocolate Eclair Cake?
While you can technically freeze this no-bake cake, the texture of the whipped topping filling and the softened graham crackers can change slightly upon thawing, sometimes becoming watery or spongy. If freezing, wrap it tightly and consume within 1 month, allowing it to thaw slowly overnight in the refrigerator.
Conclusion: Your New Favorite No-Bake Dessert
The Peanut Butter Chocolate Eclair Cake is more than just a dessert; it’s a commitment to easy, crowd-pleasing comfort food. We’ve layered the nostalgia of graham crackers with the irresistible pairing of rich chocolate and creamy peanut butter, resulting in a towering treat that requires nothing more than a whisk and a refrigerator.
This recipe succeeds because of its simplicity and the guaranteed outcome: a soft, mousse-like filling, a tender, cake-like base, and a shiny, fudgy glaze. Whether you are hosting a summer barbecue, contributing to a holiday spread, or simply seeking a deeply satisfying sweet fix, this Peanut Butter Chocolate Eclair Cake delivers every single time.
Don’t be intimidated by the chilling time that wait is the secret ingredient that transforms simple layers into a masterpiece. Once you slice into that first square, seeing the defined layers of cracker, filling, and glaze, you’ll know the effort was worth it. If you are exploring other recipes that provide maximum comfort with minimal fuss, be sure to check out our creamy lasagna soup for another satisfying meal idea.
We encourage you to try this recipe, share your creations, and let us know in the comments how much you enjoyed this magnificent no-bake dessert. Happy layering!
Peanut Butter Chocolate Eclair Cake (No-Bake)
Ingredients
Equipment
Method
- Select a 9x13 inch baking dish. Lay a single, even layer of graham crackers across the bottom of the dish, breaking pieces as necessary to fill gaps completely. Set aside.
- Prepare the Peanut Butter Pudding Base: In a large mixing bowl, whisk together the instant vanilla pudding mix and the cold milk for approximately 2 minutes until the mixture begins to thicken. Briefly microwave the peanut butter (about 30 seconds) until slightly softened for easier blending.
- Add the softened peanut butter and the optional powdered sugar into the thickened pudding mixture. Stir well until the pudding is completely uniform and streak-free. Gently fold the thawed whipped topping into the peanut butter mixture using a spatula until just combined.
- Spread half of the peanut butter filling evenly over the graham cracker base layer. Add a second, complete layer of graham crackers directly on top of the filling.
- Spread the remaining half of the peanut butter filling evenly over the second graham cracker layer. Place one final, complete layer of graham crackers on top of the final layer of filling. Cover the dish lightly and place it in the refrigerator while you prepare the glaze.
- Prepare the Chocolate Glaze: In a small saucepan, combine the granulated sugar, cocoa powder, milk, and butter. Heat the mixture over medium heat, stirring continuously, until the butter is completely melted and the sugar is dissolved. Bring the mixture to a gentle boil and allow it to cook for 1 minute, stirring occasionally. Remove the pan from the heat and stir in the vanilla extract.
- Allow the chocolate glaze to cool slightly (about 5 to 10 minutes). Pour the slightly cooled chocolate glaze evenly over the top layer of graham crackers. Spread gently with a spatula if needed to ensure the entire surface is covered.
- Cover the dish tightly with plastic wrap and refrigerate the cake for a minimum of 8 hours, or preferably overnight. This extended chilling time is crucial for the graham crackers to soften and achieve the classic eclair cake texture. Slice and serve chilled.