There are certain cookies that instantly transport you back to childhood Christmases, and the classic Spritz Cookie is undoubtedly one of them. Derived from the German word “spritzen,” meaning “to squirt,” these delicate, buttery delights are made by pressing dough through a specialized tool the cookie press to create beautiful, intricate shapes. Unlike traditional roll-and-cut sugar cookies, the Spritz Cookie is designed to be effortlessly formed, resulting in uniform, crisp, and melt-in-your-mouth perfection.
This recipe provides the foundational, tender butter cookie that acts as the perfect canvas for holiday decorating or everyday enjoyment. It is specifically formulated for optimal use with a cookie press, ensuring the dough maintains the precise consistency needed to stick firmly to the baking sheet and hold its shape flawlessly. Forget frustrating batches of dough that won’t release we are diving deep into the science of the perfect pressed cookie, guaranteeing you success every time you bring out that shiny cookie press.
Whether you call them butter cookies, pressed cookies, or the famous Spritz Cookie, this recipe holds the key to making thin, crisp edges and that irresistible, pure vanilla flavor that defines this timeless treat. Get ready to transform simple ingredients into dazzling edible ornaments that taste as wonderful as they look.
Why You’ll Fall in Love with This Classic Spritz Cookie Recipe
The culinary landscape is packed with cookies, but the Spritz Cookie stands apart, especially when made using this time-tested method. You will quickly discover why this classic butter recipe has become a staple for generations of bakers, particularly during the festive season.
Unbeatable Texture and Flavor
The primary reason to choose this recipe is the incredible final product. These aren’t thick, chewy cookies; they are the definition of delicate. They possess a fine, tender crumb that practically dissolves on your tongue, followed by a pure, rich butter flavor. Because the dough is pressed thinly and baked quickly, the edges achieve a delightful crispness while the center remains soft and buttery. The flavor profile is clean and classic a simple, elegant foundation that allows you to truly taste the high-quality ingredients, specifically the softened butter and vanilla extract.
The Joy of the Cookie Press
While rolling and cutting dough can be therapeutic, the cookie press offers efficiency and diversity unmatched by hand-shaping. Mastering the cookie press means saying goodbye to fiddly cutters and wasted dough scraps. With a few clicks of the lever, you can produce dozens of perfectly uniform holiday shapes stars, wreaths, trees, and flowers in a fraction of the time. This recipe is specifically calibrated to the fat-to-flour ratio required for the dough to move smoothly through the press and adhere flawlessly to the ungreased metal sheet. This precision is what makes pressing the cookies easy and fun, not frustrating.
Effortless Decoration and Presentation
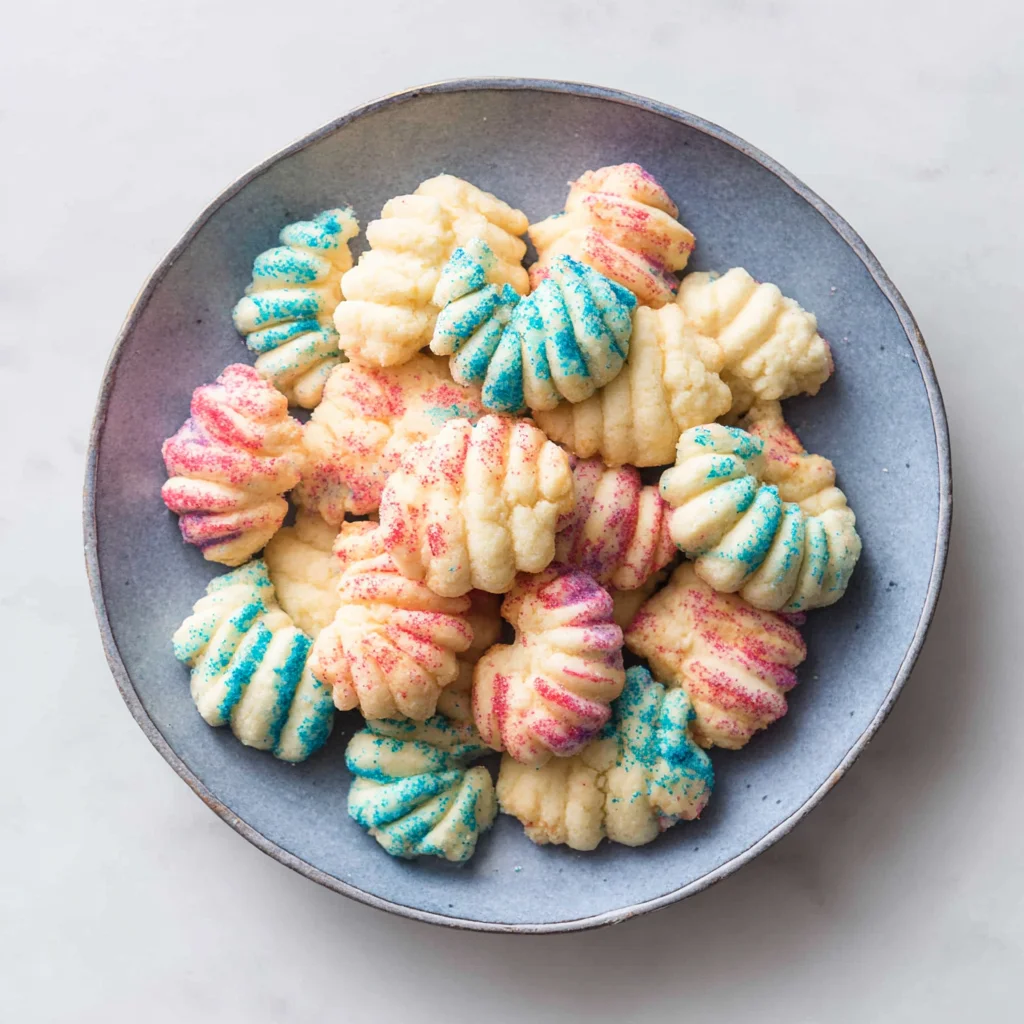
From an aesthetic standpoint, few cookies are as versatile or as charming as the Spritz Cookie. Their small, detailed size makes them ideal for intricate decoration. You can use colored sprinkles, coarse colored sugar, or simple drizzles of chocolate after baking. Because the dough is tinted easily, you can create green trees, red wreaths, and yellow stars without needing multiple colored icings. They look stunning stacked on a platter or packaged for gifting. For more holiday inspiration, check out how other simple desserts can be adapted for gifting, like this recipe for the joy of Christmas fudge.
A Quick Baking Marvel
Unlike many cookie recipes that require lengthy chilling periods or extended oven time, the Spritz Cookie bakes quickly (8 to 12 minutes). Once the dough is mixed and loaded into the press, you can go from dough ball to cooling rack in under 30 minutes. This speed makes it the ultimate choice for large-volume baking, cookie swaps, or when you need a beautiful batch of treats in a hurry. The simplicity of this recipe ensures that even novice bakers can achieve spectacular results, making it the perfect entry point into the world of delicate pressed cookies. Embrace the tradition and delight in the efficiency of making your very own Spritz Cookie batch.
Why You Must Try Making Spritz Cookie This Year
If you have been hesitant to pull out your cookie press, or if you’ve never attempted these classic pressed cookies before, this is your year. The rewards of baking these beautiful, buttery treats extend far beyond the taste; they truly elevate the baking experience and create lasting memories.
Nostalgia on a Plate: A Heritage Recipe
The Spritz Cookie holds deep roots in Scandinavian and German baking traditions. For many, the sight and smell of these cookies evoke powerful feelings of nostalgia, reminiscent of grandmothers and holiday gatherings. When you bake this classic recipe, you are participating in a culinary heritage. Using the cookie press, often a passed-down or specially purchased tool, connects you to those earlier generations of bakers who valued craftsmanship and beauty in their confections. This isn’t just a dessert; it’s edible history.
The Perfect Base for Flavor Customization
While the standard recipe calls for vanilla, the simplicity of the butter dough makes it incredibly easy to customize and adapt to your favorite flavors. Swap the vanilla for almond extract to replicate the traditional Danish butter cookie taste, or incorporate citrus zest (lemon or orange) for a bright, refreshing twist. You can divide the dough into three sections and flavor them separately almond, lemon, and vanilla all from one batch. Furthermore, the dough accepts food coloring beautifully. Imagine vibrant pink, deep blue, or festive green Spritz Cookie shapes tailored to any party theme, from summer florals to winter wonderlands. This adaptability ensures the Spritz Cookie never gets boring.
Mastering the Cookie Press: A Baker’s Milestone
Many aspiring bakers view the cookie press as an intimidating, specialized tool. This recipe is designed to help you master it. We provide precise instructions on dough preparation (the exact amount of flour and butter consistency is critical) and pressing technique (why the ungreased sheet is non-negotiable). Once you succeed with this recipe, you gain confidence in handling specialized baking tools, opening up a world of more complex cookie techniques. Achieving that perfect, clean release of a beautifully shaped cookie from the press is a genuinely satisfying baking milestone.
If you’re already feeling the holiday spirit, combining these buttery treats with other festive favorites is easy. They pair wonderfully with rich holiday sweets. You might even want to try making some other classic Christmas treats to complete your holiday platter. Baking the Spritz Cookie is not just about making a snack; it’s about embracing tradition, unleashing creativity, and achieving a level of delicate baking excellence that is sure to impress everyone who takes a bite.
Ingredients and Essential Utensils for the Perfect Spritz Cookie
The success of the Spritz Cookie rests entirely on the quality and temperature of your ingredients, as well as the use of specific, essential tools. Unlike drop cookies, which are forgiving, pressed cookies demand precise measurements and conditions for the dough to flow correctly through the press and adhere to the baking sheet.
Precise Ingredients: The Foundation of a Delicate Spritz Cookie
This recipe yields tender, buttery cookies perfect for holiday decorating or everyday enjoyment. It is specifically formulated for use with a cookie press.
| Item | Quantity | Notes |
|---|---|---|
| Unsalted Butter, softened | 1 cup (2 sticks) | Must be truly soft, but not melted. If the butter is too hard, the dough will be too stiff to press. If it’s oily or melted, the cookies won’t hold their shape or adhere properly. Aim for 68°F to 70°F (about 20°C). |
| Granulated Sugar | 2/3 cup | White, standard sugar. Provides structure and crispness. Do not substitute with brown sugar, which adds too much moisture. |
| Large Egg | 1 | Room temperature is ideal. A cold egg can seize the creamed butter, altering the dough texture. |
| Vanilla Extract | 1 teaspoon | Or use almond extract for a classic twist and a more pronounced “bakery” flavor. Quality matters here, as it’s the dominant flavor. |
| Salt | 1/4 teaspoon | Balances the sweetness and enhances the rich flavor of the butter. |
| All-Purpose Flour | 2 1/4 cups | Use the spoon-and-level method for accuracy. Too much flour results in stiff dough that breaks the press; too little results in a soft dough that won’t hold shape. |
Ingredient Deep Dive for the Perfect Spritz Cookie Dough:
- The Butter Dilemma: The softness of the butter is the single most critical factor in successful Spritz Cookie making. If your butter is too cold, the dough will be too dense for the press mechanism to push through easily. If your butter is too warm (starting to look oily or shiny), the dough will be too greasy to stick to the baking sheet, a fatal flaw for pressed cookies. Aim for butter that yields easily to gentle pressure, but still holds its shape.
- The Flour Factor: Accurate flour measurement is essential. Using a kitchen scale is the most accurate method, but if you rely on volume, always use the spoon-and-level method. This means spooning the flour lightly into your measuring cup until it overflows, and then scraping the excess off the top with a straight edge. Shaking or scooping the flour directly from the bag compacts it, adding up to 25% more flour than required, leading to dry, crumbly dough.
- Flavor Enhancers: While vanilla is traditional, the almond extract option is highly recommended if you want that distinctive, classic bakery butter cookie taste. You can also mix half a teaspoon of each, vanilla and almond, for a complex, balanced flavor profile.
Necessary Utensils and Tools
Making Spritz Cookie demands a few specialized tools, but they are all worth the investment for the professional results you’ll achieve.
- The Cookie Press (Focus Tool): A dedicated cookie press (mechanical or electric) is required. You cannot achieve the delicate shapes of a true Spritz Cookie without one. Familiarize yourself with the discs and how to properly load and prime your specific model before starting the pressing process.
- Stand Mixer or Handheld Electric Mixer: Essential for properly creaming the butter and sugar until light and fluffy (aeration is key for tenderness). A stand mixer with a paddle attachment makes the job effortless.
- Ungreased, Light-Colored Metal Baking Sheets: This is absolutely non-negotiable. Spritz cookies must adhere to the cold metal surface upon pressing to hold their shape and release correctly. Do not use dark, non-stick sheets, parchment paper, or silicone mats, as the dough will simply lift off with the press.
- Rubber Spatula: Necessary for scraping the bowl during creaming and for packing the dough tightly into the cookie press barrel.
- Measuring Cups and Spoons: For accurate ingredient quantities.
- Wire Cooling Rack: For cooling the delicate baked cookies completely.
The combination of precise, room-temperature ingredients and the non-stick surface of a simple, ungreased metal sheet ensures your Spritz Cookie experience will be delightful and successful.
Detailed Instructions for a Flawless Spritz Cookie Batch
Following these step-by-step instructions with attention to temperature and mixing time is the key to creating perfect, structural Spritz Cookie that hold their shape and bake to a light, golden perfection.
Step 1: Preparation and Gathering
- Preheat the Oven: Adjust your oven rack to the middle position and preheat your oven to 375°F (190°C). Proper positioning ensures even heating for these relatively thin cookies.
- Prepare Baking Sheets (CRUCIAL): Crucially, DO NOT grease the baking sheets, line them with parchment paper, or use silicone mats. Spritz Cookie require a plain, ungreased metal surface to properly adhere when pressed. The dough needs to stick to the sheet, not slide off, for the press mechanism to work correctly. If your kitchen is hot, you can chill the ungreased sheets for 10 minutes beforehand.
Step 2: Creaming the Butter and Sugar (Aeration is Key)
- In the bowl of a stand mixer fitted with the paddle attachment, or using a large bowl and a handheld electric mixer, place the softened butter and the granulated sugar.
- Beat these two ingredients together on medium speed for approximately 2 to 3 minutes, or until the mixture is light in color and fluffy in texture. This process, known as creaming, incorporates air, which is essential for the delicate texture of the finished Spritz Cookie.
- Make sure to occasionally scrape down the sides of the bowl. Any butter clinging to the bottom or sides won’t get properly incorporated, leading to inconsistencies in the dough.
Step 3: Incorporate Wet Ingredients (Maintaining Emulsification)
- Stop the mixer and add the room temperature large egg and the vanilla extract (or almond extract). Ensure the egg is at room temperature to prevent the butter mixture from seizing or curdling.
- Mix again on medium speed until the egg is fully incorporated into the creamed butter mixture, about 1 minute. The mixture may look slightly separated at first, but should come together smoothly, resembling a thick, creamy batter.
Step 4: Add Dry Ingredients (The Dough Consistency Test)
- In a separate medium bowl, whisk together the measured all-purpose flour and the salt. Whisking ensures the salt is evenly distributed throughout the dry ingredients, preventing pockets of high sodium.
- Reduce the mixer speed to low. Gradually add the flour mixture to the wet ingredients, adding about one third of the flour at a time.
- Mix only until the flour is just combined and no streaks of dry flour remain. The dough should be soft, pliable, and hold its shape. Be very careful not to overmix! Overmixing develops the gluten, resulting in tough, brittle cookies rather than tender Spritz Cookie. Stop mixing the moment the dry ingredients disappear.
Step 5: Loading the Cookie Press (Critical Step)
- Check Dough Temperature: If the dough is too soft or warm to handle (a common issue in warm kitchens or after extended mixing), chill it in the refrigerator for about 10 to 15 minutes. It should be pliable, but not sticky.
- Select your desired cookie disc shape (wreaths, trees, etc.) and lock it into the cookie press barrel according to your press manufacturer’s instructions.
- Using a rubber spatula or a small spoon, carefully fill the cookie press barrel with the dough. Pack the dough in tightly to remove any air pockets. Air pockets are the number one cause of frustrating, inconsistent pressing, as the press mechanism will “skip” over the empty space.
Step 6: Pressing the Cookies (The Non-Stick Principle)
- Place the base of the cookie press firmly against the ungreased baking sheet. The cool, plain metal surface is what allows the cookie to detach.
- Press the lever or turn the crank once, depending on your model. You should feel the dough adhere to the cool metal sheet and see the cookie shape release cleanly.
- Lift the cookie press straight up. If the cookie does not stick to the sheet, STOP. Either the dough is too warm (chill the dough for 5 minutes), or the sheet is contaminated (wipe the sheet clean with a dry towel and try again). You must get the adhesion right, or the whole batch will fail.
- Space the cookies approximately 1 to 2 inches apart on the baking sheets. They will not spread significantly, but a little space ensures even air circulation.
- If desired, immediately decorate the cookies before baking with colored sprinkles or colored sugar crystals. Once baked, the sugar won’t adhere well.
Step 7: Baking and Cooling
- Bake the cookies in the preheated 375°F (190°C) oven for 8 to 12 minutes. Baking time will vary based on the size and thickness of your pressed shapes.
- The cookies are finished baking when the edges are lightly set and the very bottom rim just begins to turn a faint golden brown color. They should remain pale in the center; do not overbake these delicate Spritz Cookie.
- Remove the baking sheets from the oven and allow the cookies to cool on the sheets for 2 to 3 minutes. They are very fragile when hot.
- Carefully transfer the slightly cooled Spritz Cookie to a wire cooling rack using a thin, flexible spatula.
- Allow the cookies to cool completely before serving or storing. Store cooled cookies in an airtight container at room temperature for up to one week.
Tips, Variations, and Troubleshooting for Spritz Cookie Success
Even with the perfect recipe, Spritz Cookie can sometimes be temperamental due to minute changes in kitchen temperature or humidity. Here are our expert tips to ensure every batch is perfect, along with ideas for creative variations.
Spritz Cookie Troubleshooting: Common Mistakes
1. The Dough Won’t Stick to the Sheet
This is the most frequent issue and has three main culprits:
- Grease/Lining: Are you using an ungreased, bare metal sheet? If there is any residue from previous baking, wipe the sheet down thoroughly with a dry paper towel.
- Dough Temperature: Is the dough too warm? If the butter is separating or feels greasy, the dough won’t adhere. Remove the dough from the press and chill it for 10-15 minutes, or simply chill your empty baking sheet.
- Air Pockets: Did you pack the press tightly? If not, the press won’t build enough pressure to properly “squirt” the dough onto the sheet. Unscrew the press and repack the dough firmly.
2. The Dough is Too Stiff or Crumbly
This almost always means too much flour was used. If you are halfway through pressing and the dough is snapping or breaking, try adding 1/2 teaspoon of milk or cream at a time to the remaining dough in your mixing bowl. Mix until just combined and pliable. Alternatively, your butter may have been too cold when you started creaming.
3. The Cookies Spread Too Much
If the cookies spread out significantly, the dough likely has too much fat relative to the flour (usually due to under-measuring flour or using butter that was too soft/melted). Try chilling the pressed cookies on the baking sheet for 10 minutes before baking to help them retain their shape.
Delicious Spritz Cookie Variations
Flavor Swaps: Beyond Vanilla
The base recipe is incredibly flexible. Experiment with different extracts:
- Almond & Nutty Flavors: Replace 1 teaspoon of vanilla with 1 teaspoon of pure almond extract for a Danish butter cookie flavor. For extra richness, consider adding 1/4 teaspoon of hazelnut extract.
- Citrus Zest: Add the zest of one lemon or one orange during Step 3 (with the egg). The oil from the zest creates a wonderfully bright, fresh Spritz Cookie perfect for spring or summer.
- Spice Flavors: Mix 1/2 teaspoon of ground cinnamon and a pinch of nutmeg into the flour mixture (Step 4) for a warm, spiced winter cookie.
Color and Decoration
To create vibrant holiday treats, add food coloring directly to the dough during Step 3. Gel food coloring works best, as it doesn’t add excess liquid. For example, use green gel for Christmas trees or red for heart shapes. Remember to decorate before baking!
Alternative Recipes (Gluten-Free and Vegan)
- Gluten-Free Spritz Cookie: Replace the all-purpose flour with a 1:1 gluten-free baking blend that includes xanthan gum. You may need to slightly decrease the flour quantity (use 2 cups instead of 2 1/4 cups) as GF flours tend to absorb moisture differently.
- Vegan Spritz Cookie: Substitute the dairy butter with a high-quality vegan butter block (not margarine spread, as it contains too much water). Replace the egg with a flax egg (1 tablespoon ground flaxseed mixed with 3 tablespoons water, rested for 5 minutes). Note that vegan butter tends to soften faster, so you must work quickly and keep the dough chilled.
By keeping these simple tips in mind, you can ensure your journey with the Spritz Cookie and the cookie press is a delightful one, resulting in a stack of gorgeous, uniform, and delicious cookies every time. If you enjoy making beautiful baked goods, you might also like these festive classic Christmas toffee bars.
Nutritional Values and Benefits of a Classic Spritz Cookie
While the Spritz Cookie is certainly a delightful indulgence, understanding the basic nutritional composition of this classic butter cookie can help you appreciate it as part of a balanced diet, especially during periods of celebratory eating.
Estimated Nutritional Breakdown (Per Cookie)
This estimation is based on approximately 60 standard-sized pressed cookies from the full recipe (which uses 1 cup butter, 2/3 cup sugar, and 2 1/4 cups flour). Note that precise values will vary based on cookie size and specific ingredients used:
- Calories: 60–80 kcal
- Total Fat: 4–5 g
- Saturated Fat: 2.5–3 g
- Cholesterol: 15 mg
- Sodium: 25 mg
- Total Carbohydrates: 6–8 g
- Dietary Fiber: < 1 g
- Total Sugars: 3–4 g
- Protein: 1 g
As expected for a classic butter cookie, the primary macronutrients are fats and carbohydrates. The key to enjoying these delicate treats is mindful portion control, especially given their rich butter content.
The Benefits of Quality Ingredients
Although the Spritz Cookie is a treat, the quality of its components does offer minor nutritional benefits when consumed in moderation:
- Butter (Healthy Fats and Vitamins): Using real, high-quality butter provides essential fat-soluble vitamins, including Vitamin A, D, E, and K2. While high in saturated fat, butter also contains beneficial short-chain fatty acids like butyrate, which is linked to improved gut health. Furthermore, fat is crucial for carrying flavor, making the experience of eating a Spritz Cookie far more satisfying than a low-fat alternative.
- Eggs (Protein and Choline): The egg used in the dough provides a small amount of high-quality protein and is a source of choline, an essential nutrient important for brain health and cell membrane structure. The egg also serves the vital structural purpose in the Spritz Cookie recipe, helping bind the flour and fat together to create the tender crumb structure.
- Flour (Energy): All-purpose flour is primarily a source of carbohydrates, providing quick energy. In moderation, these carbs fuel activities and the brain.
The real benefit of the Spritz Cookie is arguably less nutritional and more psychological. Baking and sharing these beautiful, traditional cookies contributes significantly to mental well-being, fostering connection, creativity, and the joy of shared traditions. They represent comfort and celebration, benefits that are just as important as vitamins in the context of a holiday or social gathering. Enjoying a perfectly crafted Spritz Cookie is part of a fulfilling life! For those interested in mixing traditions, pairing these classic butter cookies with the distinct flavor of homemade German marzipan treats is a delightful European baking adventure.
FAQs About Spritz Cookie Baking
Achieving perfect pressed cookies can lead to several common questions, especially regarding the cookie press technique and dough consistency. Here are the answers to the most frequent queries about the Spritz Cookie.
What is the difference between a Spritz Cookie and a sugar cookie?
The main difference lies in technique and texture. Sugar cookies typically involve rolling and cutting dough and often contain leavening agents like baking powder. Spritz Cookie dough is made specifically to be pressed through a cookie press, yielding a dough that is richer in butter, denser, and does not contain leavening, resulting in a delicate, crisp, and less chewy cookie.
Why are my Spritz Cookie falling off the baking sheet?
They are falling off because the dough is not adhering to the surface, which is essential for the press mechanism. This happens if the baking sheet is greased, lined with parchment or silicone, or if the dough is too warm and greasy. Ensure you are pressing firmly onto a cool, completely bare metal baking sheet. If the dough is too warm, chill it briefly.
Do I have to chill Spritz Cookie dough before pressing?
Generally, no. Unlike roll-out sugar cookie dough, Spritz Cookie dough is formulated to be used soft and at room temperature for smooth flow through the press. You should only chill the dough if your kitchen is very warm and the dough has become sticky or greasy, making it difficult to adhere to the sheet. Over-chilled dough is too stiff to press.
Can I make Spritz Cookie without a cookie press?
You can technically use a piping bag with a large star tip to mimic the effect of a pressed cookie, but the resulting cookie will be thicker and less uniform. For a true, delicate Spritz Cookie experience and the intricate shapes associated with the name, a dedicated cookie press is necessary.
How do I store baked Spritz Cookie?
Once fully cooled, store the Spritz Cookie in an airtight container at room temperature. They will remain fresh and crisp for up to one week. If you need to store them longer, you can freeze them (plain or decorated) in layers separated by wax paper for up to three months. Thaw them completely at room temperature before serving.
Can I add cocoa powder to the dough for chocolate Spritz Cookie?
Yes, you can! To make chocolate Spritz Cookie, substitute 1/4 cup of the all-purpose flour with 1/4 cup of high-quality unsweetened cocoa powder. Since cocoa powder is drying, you may need to add an extra teaspoon of milk or cream to achieve the perfect pressing consistency.
Conclusion: The Perfection of the Pressed Spritz Cookie
The Spritz Cookie is truly the gold standard of pressed holiday cookies. Its elegant simplicity, combined with the pure, tender flavor of classic butter and vanilla, makes it an indispensable addition to any baking repertoire. We have walked through the essential techniques from achieving the ideal soft, yet non-greasy dough consistency, to the absolute necessity of using ungreased baking sheets ensuring that your cookie press performs beautifully every time.
This detailed guide provides you not only with a flawless recipe but also the confidence to troubleshoot any issues that arise, guaranteeing dozens of perfectly shaped, uniform pressed cookies. Remember, success hinges on two key factors: properly softened butter and avoiding any grease or lining on your baking sheet. Master these steps, and you master the Spritz Cookie.
Now is the time to gather your ingredients, dust off that cookie press, and start creating beautiful, edible art. Whether you choose classic vanilla or venture into almond and citrus variations, these delicate cookies are guaranteed to be a crowd-pleaser, perfect for sharing, gifting, or simply enjoying with a warm cup of tea. Don’t forget to explore other simple holiday classics, such as this guide to making Christmas thumbprint cookies, to round out your festive baking platter.
We invite you to try this ultimate classic butter Spritz Cookie recipe today! Share your beautiful pressed creations and let us know your favorite shapes and flavor variations in the comments below. Happy baking!
#Classic Butter Spritz Cookie Recipe
Ingredients
Equipment
Method
- Preheat the oven to 375°F (190°C). Adjust your oven rack to the middle position.
- Crucially, prepare baking sheets by ensuring they are clean and completely ungreased. DO NOT use parchment paper or silicone mats, as the dough requires a plain metal surface to properly adhere when pressed.
- Cream the Butter and Sugar: In the bowl of a stand mixer fitted with the paddle attachment, beat the softened butter and granulated sugar together on medium speed for 2 to 3 minutes, until the mixture is light in color and fluffy. Scrape down the bowl sides frequently.
- Incorporate Wet Ingredients: Stop the mixer and add the room temperature egg and the vanilla extract. Mix again on medium speed until fully incorporated (about 1 minute).
- Add Dry Ingredients: In a separate bowl, whisk together the measured all-purpose flour and the salt. Reduce the mixer speed to low and gradually add the flour mixture.
- Mix only until the flour is just combined and no streaks of dry flour remain. Be careful not to overmix, which leads to tough cookies. The dough should be soft and hold its shape.
- Load the Cookie Press: Select your desired cookie disc shape. If the dough is too warm, chill it briefly (10-15 minutes). Fill the cookie press barrel tightly with dough, removing air pockets.
- Press the Cookies: Place the base of the cookie press firmly against the ungreased baking sheet. Press the lever or crank to release the dough. Lift the press straight up. If the cookie does not stick, wipe the sheet clean and try again. Space cookies 1 to 2 inches apart. Decorate immediately with sprinkles, if desired.
- Bake and Cool: Bake for 8 to 12 minutes, depending on the thickness of the shape. The cookies are finished when the edges are lightly set and the bottom rims just begin to turn a faint golden brown. They should remain pale overall.
- Remove the baking sheets from the oven and allow the cookies to cool on the sheets for 2 to 3 minutes before transferring them to a wire rack to cool completely.