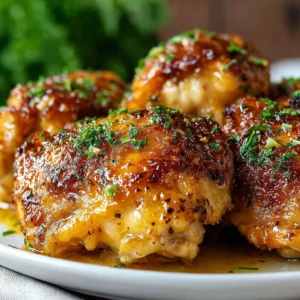
Welcome to your new favorite weeknight dinner solution! If you are searching for a meal that delivers maximum flavor with minimal effort, look no further than these spectacular Ranch Chicken Thighs. This recipe is designed for those busy evenings when you need a hearty, delicious meal on the table in under 40 minutes, utilizing the magic of oven-baking to deliver chicken that is unbelievably tender on the inside and coated in a savory, cheesy, crusty ranch seasoning on the outside.
Chicken thighs are the unsung heroes of the poultry world. Naturally rich in flavor and resistant to drying out, they are the perfect canvas for the bold, tangy, and universally loved flavor of dry ranch seasoning. By following our simple steps including the critical stage of moisture removal you will achieve a perfect crust every time, making these baked Ranch Chicken Thighs an instant family favorite. Forget dull, flavorless chicken; prepare for juicy, perfectly seasoned comfort food.
From the moment the seasoning hits the chicken, you’ll be anticipating the results. We’ve optimized this recipe to use basic pantry staples alongside the main ingredient: the humble dry Ranch seasoning packet. Whether you’re meal prepping for the week or looking for an easy, crowd-pleasing dinner, these flavorful Ranch Chicken Thighs are guaranteed to earn a permanent spot in your rotation. Get ready to preheat your oven and transform dinner time!
Why You Need These Easy Ranch Chicken Thighs in Your Life
In the culinary world, simplicity often reigns supreme, especially when the results taste this good. Our recipe for baked Ranch Chicken Thighs isn’t just easy; it’s a strategic win in the kitchen. It addresses every common weeknight dinner dilemma time constraints, picky eaters, and the eternal quest for juicy, flavorful protein. If you are serious about efficient, delicious cooking, here is why this specific recipe will become your go-to.
Unbeatable Speed and Efficiency
The beauty of these Ranch Chicken Thighs lies in the timeline. With a total preparation time of just 10 minutes, you can have the chicken fully coated and ready for the oven before your oven is even finished preheating. The required cook time of 25–30 minutes allows you to focus on whipping up a quick side salad or steaming some vegetables while the oven does the heavy lifting. This is truly a dump-and-bake recipe minimal fuss, maximum reward.
The Secret to Success: Chicken Thighs
While many chicken recipes call for breasts, chicken thighs possess inherent qualities that make them superior for baking applications like this one. Thighs have a slightly higher fat content, which means they retain moisture beautifully throughout the baking process. Even if you accidentally leave them in for an extra few minutes, they remain succulent. This forgiving nature ensures your Ranch Chicken Thighs are consistently juicy, tender, and mouth-watering a quality often hard to achieve with leaner cuts. They are also highly budget-friendly, making this a perfect economic protein choice.
Flavor, Texture, and the Parmesan Crust
The combination of the dry Ranch seasoning mix, along with our secret additions of garlic powder, onion powder, and optional grated Parmesan cheese, creates a multi-layered flavor experience. The ranch mix provides the tangy, herby base, while the added spices deepen the savory notes. The Parmesan cheese is crucial; as the fat renders off the chicken thighs and mixes with the cheese and spices, it bakes into a delightful, slightly crisp, golden crust that seals in the moisture. This texture contrast crispy coating meeting juicy interior is why this recipe stands out. If you love crispy chicken, ensure you don’t skip the Air Fryer Pumpkin Seeds, which are another excellent example of achieving perfect crispness.
Furthermore, cleanup is a breeze. By utilizing parchment paper or aluminum foil, the seasoning rub stays neatly on the chicken and off your baking sheet, resulting in virtually no scrubbing required after dinner. Simple ingredients, simple steps, and spectacular flavor that is the promise of these baked Ranch Chicken Thighs.
Unlocking Flavor: The Magic Behind Perfect Baked Ranch Chicken Thighs
Every successful recipe has a few critical steps that elevate it from good to great. When baking juicy Ranch Chicken Thighs, understanding the science behind the seasoning and the preparation technique is key. This recipe relies on achieving a beautiful exterior crust while protecting the moisture inside the thigh, and these next points explain why our specific method delivers consistently perfect results.
The Power of Drying the Chicken
This is arguably the most important preparation step. Moisture is the enemy of crispiness. Even though chicken thighs are boneless and skinless, they retain significant surface moisture from their packaging. Before applying any fat or seasoning, you must thoroughly pat the chicken dry using paper towels. By removing this excess liquid, you allow the olive oil (or butter) and the seasoning rub to adhere directly to the meat. When the chicken hits the high heat of the oven, this dry surface immediately begins to caramelize and crisp, forming that desirable, savory coating. Skipping this step leads to a soggy, steamed coating rather than a crisp, baked crust.
The Ideal Fat Barrier
We recommend tossing the chicken thighs in olive oil or melted butter before applying the seasoning rub. Why? The oil serves two primary functions. First, it helps the powdered spices (the ranch mix, garlic, and onion powder) stick uniformly across the surface of the chicken, preventing patchy seasoning. Second, the oil acts as a heat conductor. When placed in the hot oven, the fat quickly transfers heat to the spices and meat surface, initiating the browning process rapidly. Using butter adds an extra layer of richness that complements the tanginess of the ranch, while olive oil keeps the flavor lighter and maintains a healthier profile. Both work wonderfully for creating excellent Ranch Chicken Thighs.
The Role of Boneless vs. Bone-In
While you certainly could use bone-in, skin-on thighs, opting for boneless, skinless cuts offers distinct advantages for this specific preparation. Boneless thighs cook much faster and more uniformly, aligning perfectly with the quick 25–30 minute cooking time. Furthermore, without the skin, the ranch rub adheres directly to the meat, creating a seasoning crust that you can enjoy in every bite. This focused seasoning placement ensures that every single serving of Ranch Chicken Thighs is intensely flavored.
For those looking for other easy, savory weeknight options, consider pairing these juicy chicken thighs with a hearty side. Our Cheesy Chicken and Rice recipe also offers that comforting, easy-to-make satisfaction that makes weeknight cooking enjoyable. This ranch preparation method, utilizing high heat and moisture control, is the key to ensuring your dinner is not only easy but truly gourmet in flavor and texture.
Ingredients and Essential Tools for Flawless Ranch Chicken Thighs
Success in baking these delicious Ranch Chicken Thighs starts with gathering the right high-quality ingredients and ensuring you have the necessary kitchen gear. Remember, while the ingredient list is short, the quality of your seasoning mix directly impacts the final flavor.
Required Ingredients (The Ranch Chicken Thighs Ensemble)
| Category | Ingredient | Quantity | Purpose |
|---|---|---|---|
| Chicken and Fat | Boneless, skinless chicken thighs | 6 – 8 (approx. 2.5 pounds total) | The protein base; chosen for moisture and flavor. |
| Olive oil or melted unsalted butter | 2 Tablespoons | Binds the seasoning rub and aids in crust formation. | |
| Ranch Seasoning Rub | Dry Ranch seasoning mix (1 oz packet) | 1 Packet | The primary flavor agent (e.g., Hidden Valley or equivalent). |
| Garlic powder | 1 Teaspoon | Enhances savory depth and aroma. | |
| Onion powder | ½ Teaspoon | Provides subtle sweetness and complexity. | |
| Black pepper | ¼ Teaspoon | A necessary spice note to balance the seasoning. | |
| Finely grated Parmesan cheese (optional but recommended) | ¼ Cup | Crucial for creating a crispy, cheesy crust. | |
| Garnish | Fresh chopped parsley (optional) | 1 Tablespoon | Adds color and a touch of freshness before serving. |
Deep Dive into Essential Ingredients
- Chicken Thighs (Boneless, Skinless): Always choose thighs for maximum moisture retention. Aim for cuts that are roughly similar in thickness to ensure even cooking. This cut is much more forgiving than chicken breasts, reducing the chance of dry chicken.
- The Fat (Oil or Butter): This acts as the glue. If you desire a richer, more buttery ranch flavor, opt for melted unsalted butter. For a slightly lighter, Mediterranean twist on your Ranch Chicken Thighs, use high-quality extra virgin olive oil. Ensure the chicken is coated, but not saturated.
- Dry Ranch Seasoning Mix: A standard 1-ounce packet is the backbone of the flavor. While salt is already present in most mixes, we avoid adding extra salt to the rub to prevent over-seasoning, especially if using the salty Parmesan cheese.
- Parmesan Cheese: Use finely grated Parmesan (the powdery kind) rather than shredded. This fine texture melts seamlessly into the oil and seasoning, guaranteeing a consistent, crispy crust that locks the flavor onto the Ranch Chicken Thighs.
Recommended Tools and Utensils for Recipe Success
Having the right gear makes this process even smoother. Since this recipe involves baking at high heat, safety and preparation are paramount.
- Large, Rimmed Baking Sheet: You need a standard half-sheet pan with rims (approx. 18×13 inches) to hold all 6–8 chicken thighs without crowding. Crowding the pan is a mistake that leads to steaming rather than baking.
- Parchment Paper or Aluminum Foil: A non-negotiable for easy cleanup. Parchment paper is excellent for preventing sticking and promoting even browning. If using foil, be sure to lightly grease it.
- Small Mixing Bowl: Necessary for uniformly combining the dry Ranch seasoning rub before coating the chicken.
- Large Mixing Bowl or Zip-Top Bag: Used for tossing the chicken with the oil and then the seasoning. A zip-top bag can also work well for the coating process, making cleanup even simpler.
- Instant-Read Meat Thermometer (Crucial): This is the single most important tool for ensuring your Ranch Chicken Thighs are cooked perfectly to 165°F (74°C) without drying them out. Guessing the doneness is the easiest way to ruin perfectly seasoned chicken. Investing in a good thermometer guarantees moist, safe poultry every time.
- Paper Towels: Essential for the critical step of drying the chicken thighs before seasoning.
By preparing your station with these components, you are setting the stage for perfectly baked Ranch Chicken Thighs tender, flavorful, and ready in a flash.
Step-by-Step Guide to Baking Succulent Ranch Chicken Thighs
Following these steps ensures that your chicken is seasoned perfectly and baked to the ideal internal temperature, resulting in maximum tenderness and that coveted crispy ranch crust.
Step 1: Prepare the Oven and Baking Surface
Preheat & Prepare: Begin by setting your oven to 400°F (200°C). High heat is essential for quickly crisping the seasoning rub and cooking the chicken efficiently. Next, prepare your baking sheet. Line a large, rimmed baking sheet with parchment paper or aluminum foil. If using foil, a light spray of non-stick cooking spray will ensure the chicken doesn’t stick as the Parmesan cheese caramelizes. Proper preparation in this step minimizes cleanup later.
Step 2: Dry the Chicken Thighs (The Crucial Step)
Remove the Ranch Chicken Thighs (boneless, skinless) from their packaging. Place them on a clean cutting board or plate. Using several layers of paper towels, firmly pat every surface of the chicken thighs until they are visibly dry. Removing excess moisture is absolutely critical for achieving a crisp exterior crust. If the surface is damp, the chicken will steam instead of roast, leading to a dull, damp coating. Discard the wet paper towels.
Step 3: Mix the Seasoning Rub
In a small mixing bowl, combine all the dry ingredients for the ranch seasoning rub:
- 1 Packet (1 ounce) dry Ranch seasoning mix
- 1 Teaspoon garlic powder
- ½ Teaspoon onion powder
- ¼ Teaspoon black pepper
- ¼ Cup finely grated Parmesan cheese (if using)
Stir vigorously with a fork or small whisk until the mixture is uniform. Ensure the Parmesan cheese is completely integrated with the spices so every piece of chicken gets a balanced flavor coating.
Step 4: Coat the Chicken
Transfer the thoroughly dried chicken thighs into a large mixing bowl. Drizzle the 2 tablespoons of olive oil or melted butter over the chicken. Use tongs or clean hands to toss the chicken lightly, making sure every surface is lightly coated in the fat. This step acts as the binder.
Next, generously sprinkle the prepared Ranch seasoning rub over the chicken. Use your hands or tongs to press the seasoning mixture firmly into the meat on all sides. Ensure the entire surface of each chicken thigh is thoroughly covered in the spice mixture. You want a thick, visible layer of the ranch rub to form the crust.
Step 5: Arrange and Bake
Arrange the coated Ranch Chicken Thighs on the prepared baking sheet in a single layer. It is vital that the chicken pieces are not touching each other. Adequate spacing allows the hot air to circulate completely around the meat, which promotes even cooking and prevents steaming, thus maximizing crust formation.
Place the baking sheet into the preheated 400°F oven. Bake for 25 to 30 minutes. The exact time will depend on the thickness of your specific chicken thighs.
To confirm doneness, insert an instant-read meat thermometer into the thickest part of the thigh, avoiding any bone (since these are boneless, this is simple). The chicken is fully cooked and safe to eat when the internal temperature reaches 165°F (74°C). Do not rely solely on visual checks; the thermometer ensures a juicy result. Remember, precision is key to great cooking, whether you’re making Creamy Pumpkin Ravioli or perfectly baked chicken.
Step 6: Rest and Serve
Once the chicken reaches 165°F (74°C), remove the baking sheet from the oven. Carefully allow the Ranch Chicken Thighs to rest directly on the baking sheet for 5 to 10 minutes before slicing or serving. Resting is mandatory! This resting period allows the muscle fibers to relax and reabsorb the juices, ensuring that your finished product is maximally tender and moist. If you slice them too soon, the juices will run out, resulting in dry chicken.
Garnish with fresh chopped parsley, if desired, to add a pop of color and fresh flavor. Serve immediately alongside your favorite vegetable or starch. For visual inspiration and pairing ideas, check out our Pinterest board dedicated to easy meals: Recipes Liana Blog on Pinterest.
Customizing Your Meal: Tips, Tricks, and Variations for Ranch Chicken Thighs
One of the best qualities of this Ranch Chicken Thighs recipe is its adaptability. While the basic baked method is perfect, a few simple tweaks and variations can accommodate dietary needs, different cooking methods, or just add a little variety to your meal rotation. Here are tips, ingredient alternatives, and ways to avoid common mistakes.
Ingredient Alternatives and Substitutions
- Making it Gluten-Free or Dairy-Free: The core of this recipe is naturally gluten-free. If you need it to be dairy-free, simply omit the Parmesan cheese. Many commercial dry ranch mixes contain trace amounts of milk solids; for strict dairy avoidance, ensure you use a dedicated dairy-free ranch seasoning blend (there are many excellent options available now).
- Vegetable Integration (Sheet Pan Meal): Turn this into a full sheet pan dinner! About 10 minutes before the chicken is done, toss quick-cooking vegetables like broccoli florets, asparagus, or thick-sliced zucchini in a little olive oil, salt, and pepper, and scatter them around the chicken on the pan. For denser vegetables like potatoes or carrots, pre-roast them for 15–20 minutes before adding the chicken.
- Spice Level Adjustments: If you like a kick, add ¼ teaspoon of cayenne pepper or a pinch of red pepper flakes to the dry rub mixture. This adds heat without overwhelming the classic ranch flavor profile.
Alternative Cooking Methods for Ranch Chicken Thighs
Air Fryer Ranch Chicken Thighs
If you prefer a hyper-crispy crust, the air fryer is a fantastic option. Follow Steps 1–4 exactly. Preheat the air fryer to 375°F (190°C). Place the coated chicken thighs in the basket, ensuring they do not overlap. Cook for 15 to 20 minutes, flipping halfway through, until the internal temperature reaches 165°F (74°C). The crust achieves an exceptional crunch using this method.
Grilling Ranch Chicken Thighs
For outdoor grilling, this seasoning rub works beautifully. Preheat your grill to medium-high heat (around 400°F). Lightly oil the grates. Grill the thighs for about 5–7 minutes per side, depending on thickness, until the internal temperature hits 165°F. Be mindful of flare-ups due to the oil and cheese in the rub.
Avoiding Common Mistakes
- Mistake 1: Not Drying the Chicken. As emphasized, a wet surface prevents browning. Always pat the chicken until completely dry.
- Mistake 2: Not Using a Thermometer. Pulling the chicken too soon risks undercooked poultry; leaving it too long guarantees dryness, even for thighs. 165°F is the magic number for perfectly juicy Ranch Chicken Thighs.
- Mistake 3: Crowding the Pan. If you need to cook a large batch, use two separate baking sheets. Overcrowding traps steam, inhibiting the formation of the crisp ranch crust.
- Mistake 4: Skipping the Rest Period. The 5-10 minute rest is non-negotiable for juicy chicken. Place a piece of foil loosely over the chicken while it rests to maintain heat.
This recipe is also fantastic for meal prepping! Cook a full batch of Ranch Chicken Thighs and slice them cold to add to salads, wraps, or grain bowls throughout the week. They store well in an airtight container for 3–4 days in the refrigerator. For a quick weeknight dessert that uses pantry staples, try our Old Fashioned Peanut Butter Fudge.
Nutritional Breakdown and Benefits of Lean Ranch Chicken Thighs
When prepared correctly, boneless, skinless chicken thighs offer a delicious protein source that fits seamlessly into many healthy eating plans, including low-carb, keto, and high-protein diets. Understanding the nutritional profile of these delicious Ranch Chicken Thighs helps you integrate them smartly into your diet.
Estimated Nutritional Values (Per 6 oz Serving/Approx. 2 Thighs)
Please note: These values are estimates based on standard ingredients and size.
| Nutrient | Estimated Value | Benefit |
|---|---|---|
| Calories | 300 – 350 kcal | A satisfying meal without excessive caloric load. |
| Protein | 35 – 40 grams | Excellent source for muscle repair and satiety. |
| Total Fat | 18 – 22 grams | Includes beneficial monounsaturated fats from chicken and olive oil. |
| Saturated Fat | 4 – 6 grams | Moderate content, especially if using olive oil over butter. |
| Carbohydrates | 2 – 4 grams | Very low carb count, ideal for Keto/Low-Carb diets. |
| Sodium | 600 – 800 mg | The main source is the Ranch seasoning packet. Adjust salt in side dishes accordingly. |
The Benefits of Choosing Chicken Thighs
While often stereotyped as less healthy than breasts, boneless, skinless chicken thighs offer important nutritional advantages, especially when considering mineral content and overall satisfaction:
1. Excellent Protein Source
Chicken, regardless of the cut, is a complete protein, meaning it contains all nine essential amino acids necessary for the body. A high-protein meal like Ranch Chicken Thighs helps stabilize blood sugar, keeps you feeling full longer, and supports metabolism.
2. Rich in Essential Minerals
Chicken thighs naturally contain higher concentrations of certain essential minerals compared to breasts. They are particularly rich in:
- Iron: Important for oxygen transport in the blood.
- Zinc: Crucial for immune function and wound healing.
- Selenium: Acts as a powerful antioxidant, protecting cells from damage.
3. Healthy Fats for Flavor and Satiety
The slightly higher fat content in thighs contributes significantly to the flavor and texture, but it also increases satiety. When prepared using healthy fats like olive oil, this meal provides monounsaturated fats, which are known to be heart-healthy. Because the thighs retain moisture so well, you avoid the temptation to add excessive sauces or creams post-cooking.
4. Low-Carb and Keto Friendly
Since the coating for these baked Ranch Chicken Thighs relies solely on dried spices and a small amount of Parmesan cheese (not breading or flour), the carbohydrate count is negligible. This makes it an outstanding choice for those monitoring their carb intake, offering maximum flavor without the glycemic spike.
These flavorful and easy-to-prepare chicken thighs provide a nutrient-dense foundation for a well-rounded meal. Pair them with a simple green salad or roasted cruciferous vegetables for a complete and healthy plate.
FAQs About Making Ranch Chicken Thighs
Can I use bone-in, skin-on chicken thighs for this Ranch Chicken Thighs recipe?
Yes, you absolutely can! However, the cooking time will increase significantly, generally requiring 40 to 45 minutes at 400°F (200°C). If using skin-on thighs, the crispness will come from the skin rather than the seasoning, so ensure the chicken is very dry before applying the rub over the skin.
How do I store and reheat leftover Ranch Chicken Thighs?
Store leftovers in an airtight container in the refrigerator for up to 3–4 days. To reheat, the best method is the oven or air fryer to maintain the crispy crust. Reheat at 350°F (175°C) for about 8–10 minutes until warmed through. Microwaving is quick but often results in a soggy coating.
What are the best side dishes to serve with Ranch Chicken Thighs?
Since the chicken is already very flavorful, aim for simple, complementary sides. Mashed potatoes, roasted asparagus, steamed green beans, or a crisp cucumber salad work perfectly. You could also serve it with creamy pasta like our Creamy Garlic Parmesan Pasta for an indulgent meal.
Why did my ranch seasoning rub slide off the chicken?
This usually happens if the chicken thighs were not thoroughly dried before coating, or if too much oil/butter was used. Remember that moisture is the enemy of adherence. Ensure you pat the chicken completely dry and use just enough fat to thinly coat the surface, allowing the dry rub to press firmly onto the meat.
Can I make a homemade ranch seasoning rub instead of using a packet?
Yes, absolutely! A homemade ranch rub typically combines dried buttermilk powder, dried parsley, dried dill, garlic powder, onion powder, and sometimes a pinch of mustard powder. Using a homemade blend allows you to control the sodium and preservative content while achieving a similar savory, tangy flavor for your Ranch Chicken Thighs.
Final Verdict on the Ultimate Baked Ranch Chicken Thighs
If you walked away from reading this recipe with only one takeaway, let it be this: baked Ranch Chicken Thighs are the ultimate intersection of convenience, flavor, and reliability. This dish proves that fast food doesn’t have to mean sacrificing quality or taste. By leveraging the inherent moisture of chicken thighs and employing the flavor punch of a simple ranch seasoning rub, we transform basic poultry into a comforting, craveable main course that requires minimal active cooking time.
We’ve covered the critical steps, from the importance of drying the chicken to achieve that perfect crust, to the necessity of resting the meat to guarantee ultimate juiciness. Whether you opt for a full sheet pan dinner with vegetables or serve these savory thighs alongside a simple starch, this recipe is flexible enough to adapt to any schedule or palate.
Don’t wait to introduce this crowd-pleasing recipe into your kitchen. It’s perfect for satisfying those weeknight cravings and proving that healthy eating can also be incredibly flavorful. If you love quick, satisfying recipes like this one, be sure to check out our collection of holiday favorites, like this seasonal treat: Classic Christmas Toffee. Try these Ranch Chicken Thighs tonight and let us know in the comments how quickly they disappeared from your plate!

Easy Oven Baked Ranch Chicken Thighs
Ingredients
Equipment
Method
- Preheat your oven to 400°F (200°C). Line a large, rimmed baking sheet with parchment paper or aluminum foil for easy cleanup. If using foil, lightly spray it with cooking spray.
- Dry the Chicken: Remove the chicken thighs from their packaging and place them on a cutting board. Use paper towels to carefully pat the chicken thighs thoroughly dry. Removing excess moisture is crucial for achieving a nice crust.
- Mix the Rub: In a small mixing bowl, combine the dry Ranch seasoning mix, garlic powder, onion powder, black pepper, and the optional Parmesan cheese. Stir until all ingredients are uniformly mixed.
- Coat the Chicken: Place the dried chicken thighs into a large bowl. Drizzle the 2 tablespoons of olive oil or melted butter over the chicken and toss lightly to ensure the thighs are evenly coated in the fat.
- Season: Sprinkle the prepared Ranch seasoning rub generously over all the chicken pieces. Use your hands or tongs to ensure every surface of the chicken thigh is thoroughly covered in the spice mixture.
- Bake: Arrange the coated chicken thighs on the prepared baking sheet in a single layer, ensuring they are not touching each other. Place the baking sheet into the preheated 400°F oven. Bake for 25 to 30 minutes.
- Check Temperature: The chicken is fully cooked when the internal temperature reaches 165°F (74°C) as measured by an instant-read meat thermometer inserted into the thickest part of the thigh.
- Rest: Once cooked, remove the baking sheet from the oven and allow the chicken thighs to rest for 5 to 10 minutes before serving. Garnish with fresh chopped parsley, if desired, and serve immediately.