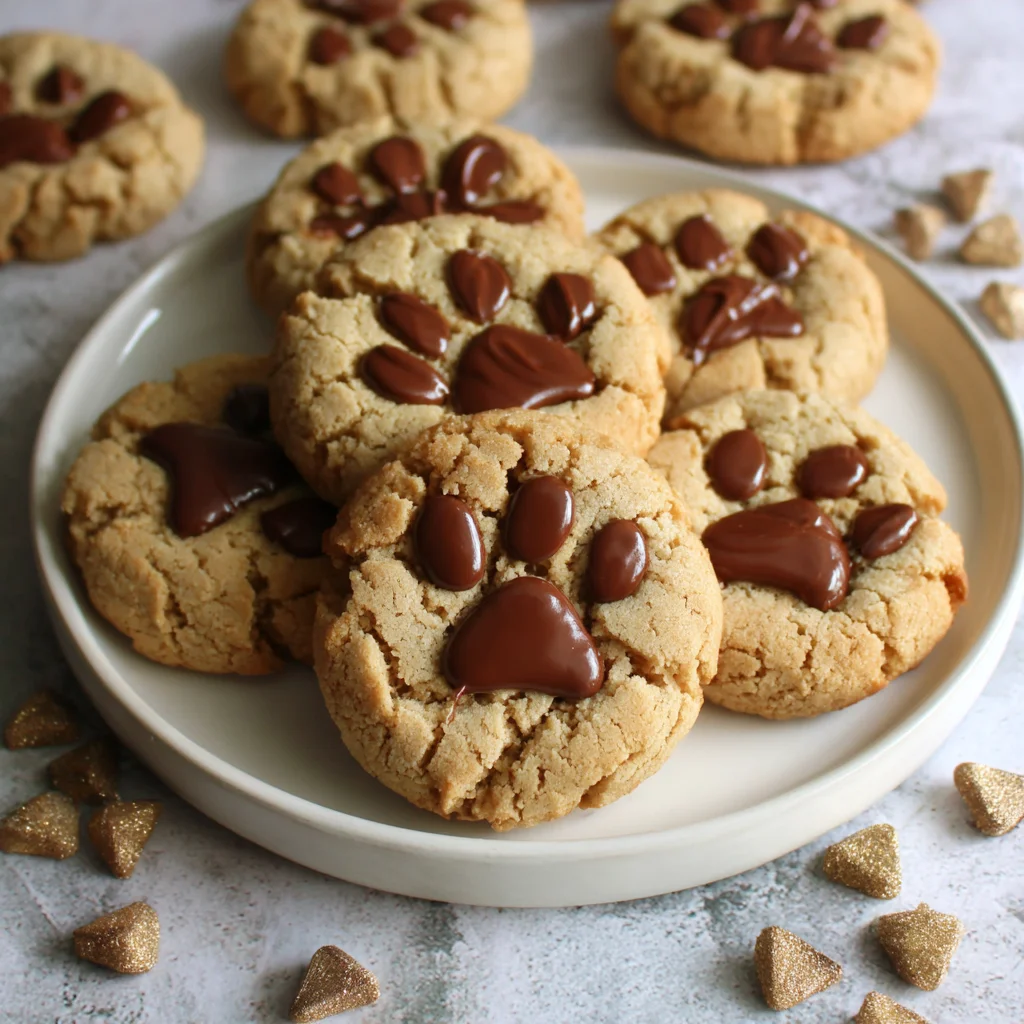
There is something uniquely comforting about a classic peanut butter cookie. That perfect balance of salty and sweet, the wonderfully chewy center, and the slightly crisp edges it’s pure nostalgic bliss. But what if we told you that you could take that classic comfort and add a touch of irresistible whimsy? Enter the truly adorable, deeply flavorful Peanut Butter Paw Print Cookies.
These are not just any peanut butter cookies; they are an experience. Each one is crowned with a charming “paw print” crafted from a dollop of contrasting peanut butter and perfectly placed mini chocolate chip “toes.” Whether you’re baking for a pet lover, preparing a themed party snack, or simply looking for a dessert that elicits genuine ‘awws,’ this recipe delivers.
This comprehensive guide will walk you through creating the softest, chewiest cookie base, mastering the delicate art of the paw print decoration, and ensuring your baking session is stress-free and fun. Get ready to preheat your oven and create a batch of the most charming cookies you have ever made. If you love the combination of rich peanut butter and a hint of chocolate, these Peanut Butter Paw Print Cookies are about to become your new signature bake!
The Irresistible Charm: Why You’ll Love These Peanut Butter Paw Print Cookies
In a world saturated with complex, multi-layered desserts, these cookies stand out because they combine simple, wholesome flavors with an unexpectedly cute presentation. If you’re searching for a recipe that marries ease with aesthetic appeal, look no further. The sheer delight these treats bring is infectious, making them perfect for any occasion, from casual Sunday baking to themed birthday parties.
Perfect Texture, Unbeatable Flavor
The foundation of any great cookie is its texture, and this recipe for Peanut Butter Paw Print Cookies absolutely nails it. We use a combination of softened butter, creamy peanut butter, and a blend of both granulated white sugar and packed light brown sugar. This mix is critical. The brown sugar introduces moisture and a hint of molasses, resulting in a cookie that stays wonderfully soft and chewy in the center, even after cooling. The peanut butter flavor itself is robust and satisfying, providing that essential nutty, slightly savory counterpoint to the sweetness.
Unlike some peanut butter cookie recipes that can turn dry or crumbly, ours ensures a rich, dense, and deeply flavorful base. When you take a bite, you get the classic peanut butter indulgence, followed by the smooth addition of the paw pad and the subtle crunch of the chocolate toes.
A Fun Project for All Ages
Baking should be a shared joy, and the decorating stage of these Peanut Butter Paw Print Cookies makes them incredibly family-friendly. The main cookie dough is easy to manage, but the real fun begins after baking. Rolling the small peanut butter balls for the center pad and placing the chocolate chips are simple tasks that even young children can help with. It encourages creativity and allows for a hands-on experience, turning baking time into quality family time. This element of decoration elevates the cookies from a simple dessert to a delightful craft.
Quick Gratification
Cookie cravings rarely wait, and thankfully, these Peanut Butter Paw Print Cookies come together relatively quickly. The baking time is short (9–11 minutes), and the decorating happens immediately while the cookies are still warm, meaning you don’t have to wait for the cookies to cool completely before starting the design. This immediacy is a huge plus when you need a speedy yet spectacular dessert.
Moreover, the structure of the cookie minimizes spreading, ensuring uniform sizes that are perfect for decorating. This reliability makes the recipe a favorite, guaranteeing success whether you are a novice baker or a seasoned pro. For another simple and satisfying treat, consider checking out this Easy Chocolate Fudge recipe another delightful option for speedy dessert preparation.
Beyond the Cute Factor: Why You Should Try Baking Peanut Butter Paw Print Cookies Today
While the visual appeal of these treats is undeniable, the reasons to choose this recipe for your next baking session extend far beyond mere aesthetics. This recipe is designed for maximum flavor impact, ease of execution, and perfect storage, ensuring you have delightful cookies on hand for days.
Simple, Accessible Pantry Ingredients
One of the best reasons to start making Peanut Butter Paw Print Cookies right now is that you likely already have every single ingredient in your pantry. We rely on classic baking staples flour, sugar, butter, eggs, and, of course, a generous amount of creamy peanut butter. You don’t need specialized flours or exotic flavorings. This accessibility means less last-minute grocery trips and more time spent mixing and baking. We focus on maximizing the flavor profiles of these common ingredients through proper technique.
The use of common ingredients also makes this a highly cost-effective recipe compared to many elaborate baked goods, providing a high return on investment in terms of taste and visual impact.
Guaranteed Softness and Chewiness
Achieving that coveted soft-baked texture is paramount for a premium cookie experience. Many peanut butter cookie recipes instruct you to press the dough with a fork before baking, which often results in a drier, crisper outcome. Our method, however, focuses on a slightly under-baked center (removed from the oven when the edges are just set) and the high moisture content from the butter and brown sugar. This technique guarantees a pillowy softness that is perfect for accepting the warm peanut butter paw pad.
The addition of baking soda ensures the cookies spread slightly and evenly, maintaining a beautiful, rounded shape ideal for decoration. These cookies truly showcase the pinnacle of classic, chewy texture. If you are a fan of rich, comforting flavors, you might also enjoy exploring options like Old Fashioned Peanut Butter Fudge, which uses similar base ingredients to create a totally different texture experience.
Perfect for Gifting and Events
Need a memorable homemade gift? Hosting a dog-themed birthday or adopting a new puppy? The unique appearance of the Peanut Butter Paw Print Cookies makes them an outstanding choice for gifting. They pack well, hold their shape, and are instantly recognizable and charming. They are a fantastic conversation starter and a guaranteed crowd-pleaser at potlucks, bake sales, or holiday cookie exchanges. The decorative element is sturdy the warmth of the cookie melts the paw print peanut butter just enough to set it firmly as the cookie cools, meaning they travel beautifully.
The Decorating Technique is Revolutionary
We’ve simplified the decoration process. Unlike recipes that require piping or complicated molding, the paw prints are created by pressing small, chilled peanut butter balls and chocolate chips directly onto the hot cookie. This method is incredibly quick, efficient, and requires zero specialized tools (beyond a small scoop or your hands). It harnesses the residual heat of the cookie to fuse the decorative elements, ensuring they don’t pop off once cooled.
By following our specific instructions, especially the tip to slightly chill the extra peanut butter for the paw prints, you ensure that the small balls maintain their spherical shape when pressed, creating that perfect, distinct paw pad indentation.
Essential Ingredients and Recommended Tools for Perfect Peanut Butter Paw Print Cookies
Success in baking often comes down to preparation and using quality ingredients. This recipe for Peanut Butter Paw Print Cookies requires standard baking components, but understanding the role of each item is crucial for achieving the desired soft texture and vibrant flavor.
Ingredients Breakdown (For the Cookies)
Precision matters in cookie baking. Always measure flour using the spoon-and-level method, and ensure dairy ingredients are at the correct temperature.
- 1 cup (2 sticks) unsalted butter, softened: Using unsalted butter allows you to control the overall salt content. Ensure the butter is truly softened meaning it gives slightly when pressed but doesn’t look greasy or melted. Room temperature butter creams properly with sugar, creating air pockets that result in light, fluffy dough.
- 1 cup creamy peanut butter: We recommend a traditional, oil-stabilized creamy peanut butter (like Jif or Skippy) over natural peanut butter. Natural peanut butter, which separates oil, can drastically change the moisture content and result in a drier, crumbly cookie.
- 1 cup granulated white sugar: Provides sweetness and helps the cookies spread slightly while baking.
- 1 cup packed light brown sugar: This is essential for chewiness and moisture. The molasses content in brown sugar binds the ingredients differently than white sugar, leading to that soft, bendy texture we want in Peanut Butter Paw Print Cookies. Make sure it is firmly packed into the measuring cup.
- 2 large eggs: These act as the primary binder, providing structure and richness. Ensure they are also at room temperature, which helps them emulsify better with the creamed butter mixture, leading to a smoother, more uniform dough.
- 1 tablespoon vanilla extract: A key flavor enhancer. Use pure vanilla extract for the best depth of flavor.
- 3 cups all-purpose flour: The main structure provider. Do not substitute this with self-rising flour, as the leavening agents will be off balance.
- 2 teaspoons baking soda: This provides lift and reacts with the acid in the brown sugar and peanut butter, helping the cookies spread and become tender.
- 1 teaspoon salt: Crucial for balancing the intense sweetness and highlighting the nutty flavor of the peanut butter.
Ingredients Breakdown (For the Paw Prints)
These components are used solely for decoration and must be prepared separately.
- 1/4 cup creamy peanut butter (extra, kept slightly chilled): This is the secret ingredient for the paw pad. Keeping it slightly chilled is vital. If it’s too warm, it will be messy to roll into pea-sized balls and may melt too quickly on the hot cookie, losing its distinct shape.
- 1/2 cup mini chocolate chips: We prefer mini chips as they look more proportional as “toes.” However, regular chips can be used if you prefer a more pronounced chocolate presence. You will need three chips per cookie.
Recommended Tools and Utensils (Secondary Keywords: Baking Essentials, Cookie Scoops, Electric Mixer)
Having the right tools simplifies the baking process and ensures consistent results for your homemade paw print cookies.
- Electric Mixer (Stand or Handheld): Essential for properly creaming the butter and sugars, which determines the final texture of the cookie. Medium speed is perfect for incorporating air without overworking the dough.
- Large Mixing Bowl: Necessary for the wet ingredients. A sturdy bowl prevents spills during high-speed mixing.
- Medium Bowl: For whisking the dry ingredients. Pre-whisking prevents pockets of unmixed baking soda or salt in the final cookie dough.
- Rubber Spatula: Critical for scraping down the sides of the bowl during creaming and gently folding in the dry ingredients.
- Cookie Scoops (1.5 tablespoon size): Using a scoop ensures every cookie is uniform in size. Uniformity is key for even baking times and for making sure every cookie looks like a perfect canvas for your paw prints.
- Parchment Paper or Silicone Baking Mats: Highly recommended. This prevents sticking, promotes even browning, and makes cleanup a breeze.
- Baking Sheets: Two or three large, light-colored baking sheets are ideal. Light-colored sheets prevent the bottoms of the cookies from browning too quickly.
- Cooling Racks: Essential for stopping the baking process immediately and preventing condensation on the cookie bottoms.
Preparation of these ingredients and tools sets the stage for flawless Peanut Butter Paw Print Cookies.
Detailed Recipe Steps: Mastering the Art of Peanut Butter Paw Print Cookies
Follow these steps precisely to ensure your cookies are soft, chewy, and perfectly adorned with their delightful paw print design.
Step 1: Preheat and Prepare for Success (H3)
The oven must be fully preheated before the cookies go in, as the initial blast of heat is important for setting the structure.
- Preheat your oven to 350°F (175°C).
- Line two or three large baking sheets with parchment paper or silicone baking mats. This prevents sticking and ensures easy removal.
Step 2: Creaming the Wet Ingredients
This is the most critical step for achieving soft, fluffy cookies. Do not rush the creaming process.
- In a large mixing bowl, using an electric mixer on medium speed, combine the softened butter, 1 cup of peanut butter, granulated white sugar, and packed light brown sugar.
- Cream until the mixture is visibly light and fluffy. This typically takes 2 to 3 minutes. The color will lighten slightly, and the texture will become aerated.
- Add the two large eggs, one at a time, mixing only until just incorporated after each egg. Overmixing the eggs can make the cookies tough.
- Stir in the vanilla extract. Scrape down the sides and bottom of the bowl thoroughly to ensure all ingredients are evenly mixed.
Step 3: Incorporating the Dry Ingredients
The goal here is thorough distribution without developing excess gluten, which leads to tough cookies.
- In a separate medium bowl, whisk together the all-purpose flour, baking soda, and salt. Whisking ensures the leavening agent is distributed perfectly.
- Gradually add the dry ingredient mixture into the wet ingredient mixture. Mix on low speed until the flour streaks have just disappeared.
- STOP mixing the moment you see the dry ingredients fully combined. Overmixing the flour activates gluten, resulting in a harder cookie.
Step 4: Shaping the Dough (H3)
Consistency in size is key for uniform baking and decoration.
- Using a small cookie scoop (about 1.5 tablespoons) or rolling the dough by hand, form the dough into uniform balls.
- Place the cookie dough balls onto the prepared baking sheets, ensuring they are spaced about 2 inches apart to allow for proper spread. You do not need to flatten these cookies.
Step 5: Baking and Initial Cooling
Watch the cookies closely during this short window. They should look slightly underdone when they come out.
- Bake the cookies for 9 to 11 minutes. They are done when the edges are lightly golden brown, but the centers still look slightly soft and pale.
- Remove the baking sheets from the oven and immediately place them on a cooling rack. The next steps must happen immediately while the cookies retain maximum heat.
Step 6: Creating the Paw Pad (The Center)
This step requires speed and utilizing the chilled peanut butter.
- While the cookies are still very hot and sitting on the baking sheet, quickly retrieve the 1/4 cup of extra, slightly chilled peanut butter.
- Roll this peanut butter into very small, pea-sized balls. These balls will form the central pad of the paw print.
- Gently press one small peanut butter ball into the center of each warm cookie. Press just firmly enough so that the ball adheres and slightly flattens, creating the classic paw pad shape. The residual heat from the cookie will slightly soften the chilled peanut butter, bonding it seamlessly to the cookie base.
For a beautiful presentation of other seasonal baked goods, you might want to try these Christmas Thumbprint Cookies, which also use a central indentation for decoration.
Step 7: Adding the Toes (H3)
The mini chocolate chips bring the design to life!
- For the “toes,” take three mini chocolate chips for each cookie.
- Arrange the three chips in a slight arc directly above the central peanut butter pad.
- Gently press them into the cookie so they stick. Ensure they are spaced evenly to complete the charming paw print look.
- Repeat this decoration process swiftly for all baked cookies.
Step 8: Final Cooling and Storage
Patience now ensures the paw prints are firmly set before handling.
- Allow the finished Peanut Butter Paw Print Cookies to cool completely on the baking sheet for at least 10 minutes. This setting time is crucial for both the cookie structure and for setting the peanut butter paw print design.
- Carefully transfer the cookies to a wire rack to finish cooling completely.
- Store cooled cookies in an airtight container at room temperature for up to one week, though they rarely last that long!
Tips, Tricks, and Creative Variations for Peanut Butter Paw Print Cookies
Baking is both a science and an art. Here are insider tips and variations to ensure your batch of Peanut Butter Paw Print Cookies is flawless and adaptable to various dietary needs or flavor preferences.
Avoiding Common Mistakes: The Spreading Disaster
The biggest challenge with cookie recipes is often preventing them from spreading into thin, crispy puddles. Here’s how to maintain that thick, chewy structure:
- Measure Flour Correctly: Too little flour results in excessive spreading. Always spoon the flour into your measuring cup and level it off.
- Butter Temperature: If your butter is too warm (greasy or melting), the cookies will spread immediately upon hitting the oven. Use properly softened (room temperature) butter, not melted butter.
- Baking Soda Freshness: Ensure your baking soda is fresh. Old leavening agents won’t provide the necessary lift, leading to flat cookies.
- Chill if Necessary: If your kitchen is very warm, or if your dough feels overly soft, pop the rolled cookie balls into the refrigerator for 15–20 minutes before baking.
Flavor and Decoration Variations (LSI: Cookie Decorating Ideas, Gluten-Free Peanut Butter Cookies)
These Peanut Butter Paw Print Cookies are wonderfully adaptable:
- Nut-Free Paw Prints: If you are baking for someone with a peanut allergy (and your base cookie is safely nut-free, perhaps using sunflower butter), you can use a small dollop of melted white chocolate or a cream cheese frosting for the paw pad center.
- Chocolate Toes Alternatives: Instead of mini chocolate chips, you can use M&M minis (especially festive colors for holidays), tiny candy pearls, or even small sprinkles strategically placed as toes.
- Gluten-Free Version: For a gluten-free cookie base, substitute the all-purpose flour with a high-quality 1:1 gluten-free baking blend that contains xanthan gum. Ensure the GF blend is properly measured, as GF dough can sometimes require slight adjustments in moisture.
- Vegan Option: Replace the butter with a vegan butter stick (or solid coconut oil) and use a flax egg substitute (1 tablespoon flaxseed meal mixed with 3 tablespoons water, rested for 5 minutes) for the eggs. Make sure all sugars are vegan-certified.
- Different Nut Butters: While this is optimized for peanut butter, you can experiment with almond butter or cashew butter, though the texture may change slightly depending on the consistency of the alternative butter.
If you’re looking for more fun and easy cookie decorating ideas, especially for themed events, you can find abundant visual inspiration on my dedicated baking boards: Check out my Pinterest page for more recipe inspiration!
Tips for Decorating Success
The success of the paw print design hinges on temperature control:
- Chill the Paw Print PB: Do not skip chilling the 1/4 cup of peanut butter used for the paw pads. This keeps it firm and prevents it from dissolving into the cookie heat.
- Work Quickly: You have a window of about 3–5 minutes after the cookies come out of the oven to place the paw prints while the heat is sufficient to bond the ingredients.
- Use a Timer for Cooling: Allowing the decorated cookies to set for 10 minutes on the tray is non-negotiable. This prevents the paw prints from smearing when you move them.
Nutritional Values and Benefits of Peanut Butter Paw Print Cookies
While cookies are undeniably a treat, it is helpful to understand the general nutritional profile and benefits of the core ingredients, especially the beloved peanut butter.
(Note: Exact nutritional values will vary based on brand of peanut butter and precise cookie size. The figures below are estimates per cookie based on dividing the total recipe yield into approximately 30 servings.)
Estimated Nutritional Information (Per Cookie)
When made according to the recipe, a single Peanut Butter Paw Print Cookie (approx. 1.5 oz) generally falls within the following ranges:
- Calories: 180 – 220 kcal
- Total Fat: 10 – 12 g (Saturated Fat: 4 – 6 g)
- Cholesterol: 20 – 30 mg
- Sodium: 100 – 150 mg
- Total Carbohydrates: 20 – 25 g (Sugar: 12 – 15 g)
- Protein: 4 – 5 g
Benefits of Peanut Butter (The Star Ingredient)
Peanut butter is the defining flavor of these adorable cookies, and it brings more than just taste:
- Protein Power: Peanut butter is an excellent source of plant-based protein. The addition of eggs and peanut butter gives these cookies a higher protein content than many typical baked goods, contributing to satiety.
- Healthy Fats: Peanuts primarily contain monounsaturated and polyunsaturated fats (the “heart-healthy” fats), which are essential for brain function and overall cellular health.
- Vitamins and Minerals: Peanuts are rich in various vitamins and minerals, including B vitamins (Niacin, Folate), Magnesium (important for muscle function), Phosphorus (for bone health), and Vitamin E (an antioxidant).
- Fiber: While not a high-fiber food, the peanuts contribute a small amount of dietary fiber, which aids in digestive health.
Enjoying these Peanut Butter Paw Print Cookies in moderation allows you to savor the rich flavor while benefiting from the protein and nutrients packed into every peanut.
Frequently Asked Questions (FAQs) About Peanut Butter Paw Print Cookies
We’ve gathered the most common questions about baking these adorable peanut butter treats, ensuring you have all the information needed for a perfect batch.
Q: Can I use crunchy peanut butter in the main cookie dough?
A: Yes, you absolutely can use crunchy peanut butter in the main cookie dough if you prefer a chunkier texture! However, for the extra 1/4 cup of peanut butter used for the paw print centers, stick to creamy peanut butter. The smooth texture of the creamy peanut butter ensures that the paw pad can be rolled into a small ball and pressed into a distinct, clean shape on the cookie surface.
Q: How do I prevent the Peanut Butter Paw Print Cookies from sticking to the parchment paper?
A: Using genuine parchment paper or silicone baking mats is the best defense against sticking. If you are using aluminum foil, you must spray it lightly with non-stick cooking spray, though foil is not recommended as it often leads to darker bottoms. Furthermore, ensure the cookies are cooled completely on the sheet for at least 10 minutes before attempting to lift them, as this allows the fats to solidify and release the cookies naturally.
Q: Can I make the cookie dough ahead of time?
A: Yes, this dough is excellent for preparing in advance. You can store the unbaked cookie dough, wrapped tightly in plastic wrap, in the refrigerator for up to 3 days. When ready to bake your batch of Peanut Butter Paw Print Cookies, let the dough sit at room temperature for about 30 minutes until it is scoopable. You can also freeze the dough balls for up to 3 months; simply add 2-3 minutes to the total baking time.
Q: Why do the paw prints need to be placed immediately after the cookies come out of the oven?
A: Placing the peanut butter paw pad and chocolate chip toes onto the cookies while they are hot is crucial for adhesion. The residual heat slightly melts the edges of the chilled peanut butter and chocolate, fusing them to the cookie surface. If you wait until the cookies cool, the decorations will simply rest on top and easily fall off when handled, compromising the visual integrity of the Peanut Butter Paw Print Cookies design.
Q: What is the best way to store these cute paw print cookies?
A: Store your delicious Peanut Butter Paw Print Cookies in an airtight container at room temperature. They will maintain their freshness and soft texture for up to a week. If you need to stack them, place a small sheet of parchment paper between the layers to prevent the peanut butter paw prints from sticking to each other.
Conclusion: The Perfect Blend of Whimsy and Comfort
The journey to baking the perfect Peanut Butter Paw Print Cookies is one filled with delicious scents and the satisfying joy of creating something both tasty and visually stunning. This recipe delivers everything you could want in a comfort dessert: a rich, chewy peanut butter base, balanced sweetness, and a decorative element so charming it can’t help but make you smile.
We’ve covered the fundamental techniques, emphasizing the importance of proper creaming and the critical timing of the decorating phase, which utilizes the cookie’s residual heat to perfectly set the paw prints. Remember, the secret to the best texture lies in not overmixing the flour and pulling the cookies slightly before they look fully set.
Whether you’re making a batch to share with friends, to celebrate a beloved pet, or simply to satisfy a serious peanut butter craving, these cookies are a guaranteed hit. They showcase how a simple twist on a classic recipe can result in a truly memorable treat.
Don’t wait for a special occasion gather your ingredients and start baking these irresistible Peanut Butter Paw Print Cookies today. Once you try this recipe, it’s sure to become a beloved staple in your baking repertoire. If you enjoy creating cute and comforting desserts, you might also be interested in my simple but festive recipe for Chocolate Spider Cookies for your next holiday gathering. Happy baking!
Peanut Butter Paw Print Cookies
Ingredients
Equipment
Method
- Preheat your oven to 350°F (175°C). Line two or three large baking sheets with parchment paper or silicone baking mats. Set aside.
- In a large mixing bowl, using an electric mixer on medium speed, cream together the softened butter, 1 cup of peanut butter, granulated white sugar, and light brown sugar until the mixture is light and fluffy (approximately 2 to 3 minutes).
- Add the two large eggs, one at a time, mixing well after each addition. Stir in the vanilla extract until fully incorporated. Scrape down the sides of the bowl as needed.
- In a separate medium bowl, whisk together the all-purpose flour, baking soda, and salt. Gradually add the dry ingredient mixture into the wet ingredient mixture, mixing on low speed until just combined. Be careful not to overmix the dough.
- Using a small cookie scoop (about 1.5 tablespoons), form the dough into uniform balls. Place the cookie dough balls onto the prepared baking sheets, spacing them about 2 inches apart.
- Bake the cookies for 9 to 11 minutes, or until the edges are lightly golden brown and the centers are still slightly soft. Remove the baking sheets from the oven and immediately place them on a cooling rack.
- While the cookies are still very hot, roll the 1/4 cup of extra chilled peanut butter into very small pea-sized balls. Gently press one small peanut butter ball into the center of each warm cookie. This forms the central paw pad.
- For the 'toes,' take three mini chocolate chips and arrange them in an arc directly above the central peanut butter pad on each cookie. Press them gently into the cookie so they stick. Repeat this process for all baked cookies.
- Allow the cookies to cool completely on the baking sheet for 10 minutes before transferring them carefully to a wire rack to finish cooling. This ensures the cookies and the paw prints are fully set.
- Store cooled cookies in an airtight container at room temperature.