There is perhaps no dessert that captures the spirit of pure, unadulterated joy quite like a homemade Funfetti cookie. These aren’t just cookies; they are edible celebrations, bursting with color, rich vanilla flavor, and an irresistible texture that is perfectly soft in the middle and slightly crisp around the edges. If you are searching for the quintessential recipe that delivers on that classic cake batter flavor without compromising on a fantastic chewy cookie consistency, your search ends here. Welcome to the ultimate guide to baking truly spectacular Funfetti Cookies.
Forget the dry, cakey cookies of your past. This recipe has been meticulously engineered to maximize moisture, chewiness, and that signature buttery-vanilla aroma that fills the kitchen when you bake with sprinkles. Whether you’re making them for a birthday party, a casual weekend treat, or just to bring a splash of color to an ordinary day, these Funfetti Cookies are guaranteed crowd-pleasers. We walk you through every critical step, from achieving that perfect “cream” in the butter and sugar to ensuring your rainbow jimmie sprinkles maintain their vibrant colors without bleeding into the dough.
Get ready to unleash your inner baker and create cookies that taste exactly like the beloved Funfetti cake mix, but with all the delightful texture of a bakery-style drop cookie. Grab your mixing bowls let’s make some magic!
Why You’ll Fall Head Over Heels for These Funfetti Cookies
The moment you pull these vibrant treats out of the oven, you’ll understand why they are a beloved classic. These are not merely sugar cookies dusted with a few dots of color; they are deeply flavored, textural masterpieces that hit all the right notes of nostalgia and modern baking excellence. If you are still on the fence about trying this specific recipe, here are several reasons why these Funfetti Cookies will become your new go-to standard for celebratory baking (and even just everyday cravings).
1. The Perfect Balance of Cake Batter Flavor: The secret to getting that nostalgic Funfetti taste is not just the sprinkles, but the strategic use of high-quality vanilla extract and milk (whole milk is highly recommended). This combination mimics the sweet, slightly artificial, yet deeply satisfying profile of classic boxed white cake mix. Unlike recipes that rely solely on almond extract, we focus on pure vanilla essence to keep the flavor profile universally loved and authentic to the Funfetti Cookies experience.
2. Unmatched Soft and Chewy Texture: We achieve the ideal bakery-style chewiness through a crucial combination of baking agents and sugars. The presence of both light brown sugar and granulated sugar is key. Brown sugar provides molasses, which adds depth of flavor and, more importantly, moisture, ensuring the cookies remain soft days after baking. The inclusion of creamed butter, mixed for a full 3 to 4 minutes, incorporates air, giving the cookies a beautiful puffy structure that resists becoming brittle.
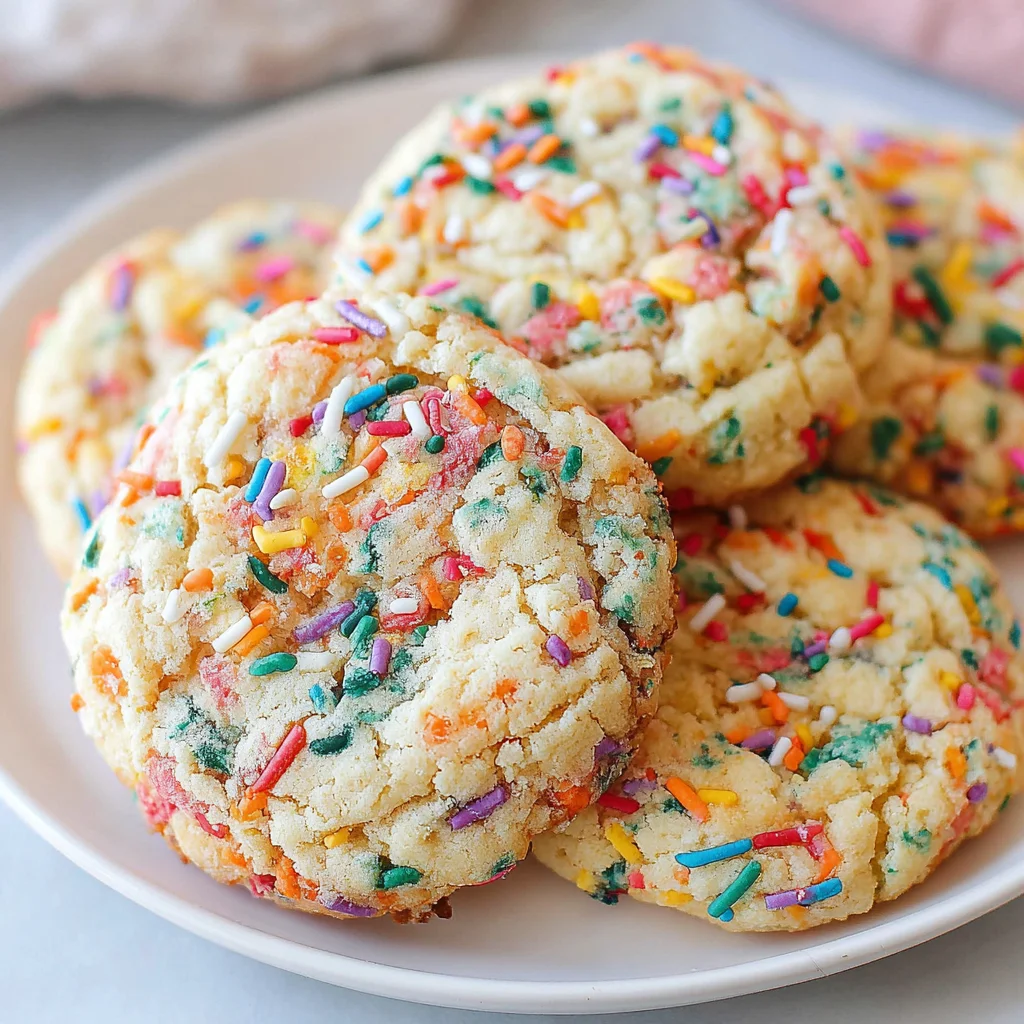
3. Visual Appeal That Captivates: Let’s be honest, half the fun of Funfetti Cookies is the visual spectacle. The vibrant burst of rainbow jimmie sprinkles transforms a simple cookie into a party centerpiece. This recipe specifically calls for jimmie sprinkles (the long, cylindrical ones) rather than nonpareils (the tiny, round balls). Nonpareils are notorious for dissolving and bleeding color when mixed into dough, resulting in muddy-looking cookies. Jimmies hold their shape and their hue, keeping your celebration cookies bright and cheerful.
4. A Versatile Celebration Treat: Whether it’s a birthday, graduation, baby shower, or just a Tuesday that needs cheering up, Funfetti Cookies fit the bill. They are easier and quicker to make than a full cake, transport beautifully, and are always a hit with both kids and adults. Plus, the bright colors make them incredibly easy to coordinate with any party theme.
5. Simple, Straightforward Technique: While we detail every step, the process itself is highly achievable for bakers of all skill levels. The steps are clearly defined: combine dry, cream butter/sugar, add wet, gently fold in sprinkles. With simple ingredients and minimal fuss, you can achieve professional-level results. We even offer the option to skip the chill time if you are truly in a rush, although chilling is always recommended for the absolute thickest, chewiest results.
By following this guide, you aren’t just baking cookies you’re creating joy in cookie form. For those who love sweet, colorful treats, this recipe stands alongside beloved holiday favorites like Christmas Thumbprint Cookies in its power to delight and inspire smiles.
The Secret to Perfect Sprinkle Cookies: Why This Funfetti Cookies Recipe is a Must-Try
Baking is a science, and when it comes to colorful treats like Funfetti Cookies, precision is key to avoiding common pitfalls like spread, dryness, or dreaded color bleed. This specific formulation builds upon classic cookie chemistry with modern tweaks designed for maximum flavor and texture payoff. Understanding the ‘why’ behind each ingredient and instruction will elevate your baking game and ensure consistent success every time you crave these festive cookies.
The Critical Role of Ingredients for Texture
Many simple cookie recipes fail because they rely too heavily on granulated sugar, resulting in a thin, crispy product. We counteract this by using a high ratio of brown sugar to granulated sugar. Brown sugar contains moisture and slightly acidic molasses, which interacts perfectly with the baking soda to create a soft interior crumb and a higher rise. This is the foundation of our soft and chewy texture.
Furthermore, the fat content is perfectly balanced. Using unsalted butter, softened to room temperature, is non-negotiable. If your butter is too cold, it won’t cream properly, leading to dense cookies. If it’s too melted, the dough will be greasy, and the cookies will spread excessively. The ideal softened butter should leave a slight indentation when pressed, but not smear.
Creaming: The Secret to Puffiness
Step 2 creaming the butter and sugars is one of the most overlooked steps in home baking. We instruct you to beat the mixture for a full 3 to 4 minutes. This process, known as aeration, incorporates tiny pockets of air into the fat. These air pockets expand during baking, resulting in cookies that are light, fluffy, and puff up rather than spreading immediately into flat disks. Never skip the full creaming time for these Funfetti Cookies!
Controlling the Spread: The Importance of the Chill
While the recipe states chilling is optional, it is highly recommended if you want that truly thick, bakery-style look. Chilling the dough solidifies the fat (butter). When the cold dough hits the hot oven, the edges begin to set before the butter has a chance to melt completely. This prevents rapid spreading, ensuring a thicker, chewier cookie profile. Even 30 minutes in the refrigerator makes a significant difference in the final structure of these delicious treats.
When incorporating liquids, we use two room temperature eggs, along with a tablespoon of vanilla and a bit of milk. Using room temperature ingredients ensures they emulsify smoothly with the creamed butter mixture. Cold ingredients can cause the butter to seize or break the emulsion, leading to a lumpy dough and inconsistent baking results.
Finally, we emphasize the importance of using jimmie sprinkles. If you substitute with nonpareils, the tiny dots contain high concentrations of dye and shellac. When mixed vigorously into the wet cookie dough, the moisture dissolves the dye, causing the color to bleed and turn the dough an unappetizing grayish-pink hue. Stick to the classic jimmies for the best, brightest results, making your homemade Funfetti Cookies truly photo-worthy. If you enjoy recipes where technique matters, you might also be interested in mastering the gooey perfection of Peanut Butter Chocolate Chip Cookies.
Essential Ingredients and Tools for Baking Incredible Funfetti Cookies
Baking these vibrant celebration cookies requires standard pantry staples, but paying close attention to the specified types and temperatures of ingredients is crucial for achieving that perfect soft, cake-like center and chewy edge. Here is a detailed breakdown of everything you need, followed by a list of necessary equipment.
Detailed Ingredients List for Funfetti Cookies
Precision in measuring is paramount, especially when working with flour and leavening agents.
- All-Purpose Flour (2 ¼ cups or 270g): We recommend spooning the flour into your measuring cup and leveling it off. Scooping directly from the bag compacts the flour, resulting in up to 25% too much, which leads to dry, dense cookies.
- Baking Soda (1 teaspoon): This is the primary leavening agent responsible for the lift and spread. Ensure your baking soda is fresh (check the expiration date, as it loses potency over time).
- Salt (½ teaspoon): Essential for balancing the sweetness and enhancing the deep vanilla and butter flavors.
- Unsalted Butter (1 cup, 2 sticks, or 227g): Must be softened to room temperature. This is critical for the creaming process (Step 2). Using unsalted butter allows you complete control over the total salt content in the recipe.
- Granulated Sugar (¾ cup or 150g): Provides structure and contributes to the crispness of the cookie edges.
- Packed Light Brown Sugar (¾ cup or 165g): Crucial for maintaining moisture and chewiness due to its molasses content. Always pack this down firmly into the measuring cup.
- Large Eggs (2): Must be room temperature. Room temperature eggs incorporate better into the fat mixture, creating a smoother dough. If you forget, quickly warm them by placing them in a bowl of warm (not hot) water for 5 minutes.
- Vanilla Extract (1 Tablespoon): This generous amount is what gives the Funfetti Cookies their signature “cake batter” flavor. For a truly pure white dough (if appearance is critical), you can substitute clear vanilla extract, though pure extract offers superior flavor.
- Milk (3 Tablespoons): Whole milk is recommended for richness. This liquid helps create a soft, supple dough and contributes significantly to the cake-like moisture.
- Rainbow Jimmie Sprinkles (½ cup or 100g): This is a critical specification. You must use jimmie-style sprinkles (the longer, rod-shaped ones). Nonpareils (small balls) will dissolve and bleed color into the dough, ruining the vibrant aesthetic of these homemade Funfetti Cookies.
Recommended Tools and Utensils for Cookie Success
Having the right equipment ensures your baking process is smooth and your results are consistent. These tools are recommended for maximizing the thickness and even baking of your Funfetti Cookies.
- Stand Mixer or Hand Mixer: While these cookies can be made by hand, a mixer is essential for achieving the required “light and fluffy” consistency during the creaming stage (3–4 minutes of mixing is vigorous work!).
- Rubber Spatula: Necessary for scraping down the bowl during mixing and, most importantly, for gently folding in the sprinkles to prevent color bleed.
- Medium Mixing Bowl: For combining the dry ingredients.
- Parchment Paper or Silicone Baking Mats: Highly recommended. These prevent sticking, ensure even heat distribution, and make clean-up effortless. Silicone mats (like Silpat) provide slightly better insulation on the bottom, often leading to less spread.
- Measuring Cups and Spoons: For accurate measuring.
- Kitchen Scale (Optional but Recommended): For the most precise measurement of flour, butter, and sugars (especially if you struggle with the proper scoop-and-level method).
- Medium Cookie Scoop (1.5 to 2 Tablespoons): Using a scoop is the key to ensuring every cookie is exactly the same size. This leads to uniform baking times, meaning no burnt edges or undercooked centers.
- Wire Cooling Rack: Essential for allowing air to circulate around the cookies after they come out of the oven, preventing the bottom from steaming and becoming soggy.
- Two Large Baking Sheets: Using two sheets allows you to cool one batch while prepping the next, optimizing your baking time.
Gathering these ingredients and tools before starting will set you up for absolute success, ensuring your batch of Funfetti Cookies is the best you’ve ever made.
Mastering the Method: Step-by-Step Instructions for Classic Funfetti Cookies
Follow these steps closely to ensure your dough reaches the perfect consistency light, airy, and ready to hold its shape for a beautiful, chewy cookie.
Step 1: Prepare and Combine Dry Ingredients
1. Preheat your oven to the precise temperature of 350°F (175°C). Proper preheating is crucial for consistent baking results. Line two large baking sheets with parchment paper or silicone baking mats. This step ensures easy removal and prevents scorching.
2. In a medium bowl, whisk together the all-purpose flour, baking soda, and salt. Whisking thoroughly disperses the leavening agent (baking soda) throughout the flour, guaranteeing an even rise. Set this bowl aside for later use.
Step 2: Cream Butter and Sugars for Aeration
1. In the bowl of a stand mixer fitted with the paddle attachment (or use a large mixing bowl with a hand mixer), combine the softened butter, granulated sugar, and light brown sugar.
2. Beat on medium speed. This is where patience is key. Continue beating until the mixture is light, fluffy, and noticeably paler in color. This process should take approximately 3 to 4 minutes. This extensive creaming builds the structure and fluffiness of your final Funfetti Cookies.
Step 3: Add Wet Ingredients
1. Add the eggs one at a time. Beat thoroughly after each addition until the yolk is completely integrated into the mixture. Adding them slowly prevents the mixture from separating.
2. Add the generous tablespoon of vanilla extract and the milk. Beat on low speed until the liquids are just combined. Crucially, do not overmix at this stage, as too much mixing develops gluten, which can make your cookies tough and cakey.
Step 4: Combine Wet and Dry Mixtures
1. Reduce the mixer speed to the absolute lowest setting. Gradually add the reserved dry ingredient mixture (flour, baking soda, salt) to the wet ingredients.
2. Mix only until the dough comes together and no visible streaks of flour remain. Stop the mixer frequently and scrape down the sides of the bowl to ensure all dry pockets are incorporated. The dough will be thick and soft. This gentle mixing technique ensures the Funfetti Cookies remain tender and chewy.
Step 5: Incorporate the Sprinkles
1. Remove the bowl from the mixer. This step must be done gently by hand to prevent color bleed.
2. Using a rubber spatula, gently fold the rainbow jimmie sprinkles into the cookie dough. Mix only until the sprinkles are evenly distributed throughout the dough. Overworking the dough here will cause the sprinkles to shed their dye, resulting in dull, muted colors. Aim for 8-10 gentle folds.
Step 6: Chill the Dough (Recommended for Thickness)
1. For thicker cookies that spread less, cover the bowl and chill the dough in the refrigerator for a minimum of 30 minutes. If you skip the chill, the cookies will spread more, resulting in a thinner, crispier edge. For the absolute best results, a 1-hour chill is ideal. If you are short on time, you can chill the scooped balls instead of the entire bowl for 15 minutes.
Step 7: Scoop and Bake
1. Use a medium cookie scoop (approximately 1.5 to 2 tablespoons) to portion the dough. Roll the portions lightly into uniform balls. This rolling step helps prevent uneven cracking during baking. Place them 2 inches apart on the prepared baking sheets.
2. Bake for 9 to 12 minutes. The sweet spot is usually around 10 minutes. Look for the critical visual cues: the edges should be lightly golden brown, but the centers must still look slightly soft, puffy, and undercooked. The residual heat on the baking sheet will finish cooking the center.
Step 8: Cool for Perfection
1. Remove the sheets from the oven and let the cookies cool undisturbed on the baking sheet for 5 minutes. This mandatory rest allows the delicate centers to finish setting and prevents the cookies from crumbling when transferred.
2. After 5 minutes, use a spatula to transfer the Funfetti Cookies to a wire rack to cool completely before serving, stacking, or storing. This ensures the bottoms stay crisp and prevents condensation.
Tips, Troubleshooting, and Delicious Funfetti Cookie Variations
While this recipe is straightforward, a few key professional tips can ensure absolute perfection. We also cover how to adapt the recipe for different dietary needs.
Essential Baking Tips to Avoid Common Mistakes
Preventing the Spread: If your cookies consistently spread too much, ensure your butter is truly softened, not melted. If your kitchen is very warm, consider increasing the chilling time to 60 minutes or even flash-freezing the dough balls for 10 minutes before baking. You can also slightly increase the flour amount by 2 tablespoons (about 15g) to absorb excess moisture.
Avoiding Color Bleed: As mentioned, use jimmie sprinkles. If you use generic mixes that include nonpareils, chill the dough before adding the sprinkles, then fold them in quickly right before baking. The colder the dough, the less chance the dye has to dissolve.
The “Perfect Circle” Trick: If your freshly baked cookies come out of the oven slightly misshapen, immediately take a large round cookie cutter (slightly larger than the cookie) or the rim of a glass and place it over the hot cookie. Swirl the cutter around the cookie to gently push the edges back into a perfect circle. Do this within 30 seconds of removing them from the oven.
Funfetti Cookie Variations for Every Diet
These classic Funfetti Cookies are easily adaptable with simple swaps:
- Gluten-Free Funfetti Cookies: Substitute the all-purpose flour with a high-quality 1:1 gluten-free baking blend that includes xanthan gum (such as Bob’s Red Mill or King Arthur). You may need to slightly increase the milk (by 1-2 teaspoons) as gluten-free flours tend to be more absorbent.
- Dairy-Free/Vegan Variation: Swap the unsalted butter for a high-quality vegan butter stick (like Miyoko’s or Earth Balance sticks, not tubs). Substitute the milk with a neutral-flavored plant milk, like soy or oat milk. To replace the two large eggs, use two flax eggs (2 tbsp ground flaxseed mixed with 6 tbsp water, allowed to gel for 5 minutes) or a commercial egg replacer like Bob’s Red Mill Egg Replacer.
- Flavor Boost: For an even more intense cake flavor, add ½ teaspoon of almond extract along with the vanilla. This gives a subtle, bakery-level sophistication to the Funfetti Cookies.
- Alternative Mix-Ins: Instead of, or in addition to, sprinkles, you can fold in white chocolate chips, mini M&Ms, or chunks of dehydrated birthday cake bits. Just ensure the total added volume doesn’t exceed 1 cup.
We believe in sharing the best tips for homemade treats. For more baking inspiration and ideas, be sure to check out our Pinterest page where we share dozens of delicious recipes.
Understanding the Nutrition and Benefits of Homemade Funfetti Cookies
While Funfetti Cookies are undeniably a treat, choosing to bake them at home offers several significant advantages over purchasing store-bought versions. When you make these cookies from scratch, you gain control over the quality of ingredients, allowing you to avoid unnecessary additives, high-fructose corn syrup, and excessive preservatives often found in commercial baked goods.
Estimated Nutritional Values (Per 2-Tablespoon Cookie Scoop)
The exact nutritional content will vary based on the specific brands of butter and sugar used, and the exact scoop size. Based on a yield of 24 medium cookies, the approximate values per cookie are:
- Calories: 180 – 200 kcal
- Total Fat: 9g – 11g
- Saturated Fat: 5g – 6g
- Carbohydrates: 25g – 28g
- Sugar: 15g – 18g
- Protein: 2g
These values place homemade Funfetti Cookies squarely in the realm of delicious dessert, best enjoyed in moderation. However, their ingredients offer certain benefits.
The Benefits of Baking These Celebration Cookies at Home
Quality Control and Freshness: The most significant benefit is the freshness. Cookies baked today taste infinitely better than those sitting on a shelf. You are using real butter, real eggs, and real sugar, avoiding hydrogenated oils or artificial flavoring agents that attempt to mimic the rich taste of natural ingredients. This commitment to simple, high-quality baking is evident in the finished flavor and texture.
The Role of Butter and Eggs: Real butter provides healthy saturated and monounsaturated fats necessary for flavor and nutrient absorption. The eggs contribute high-quality protein and essential micronutrients like Vitamin D, choline, and Vitamin A. While the final product is a dessert, the core ingredients are wholesome. For other comforting, homemade meals, check out our guide to Creamy Garlic Parmesan Pasta.
Mental and Emotional Wellness: Baking itself is often cited as a therapeutic activity. The sensory experience the smell of vanilla and butter, the repetitive motion of creaming, and the visual pleasure of seeing the colorful sprinkles can reduce stress and provide a satisfying sense of accomplishment. Sharing these joyful Funfetti Cookies with friends and family also fosters community and connection, proving that the benefit of a homemade treat extends beyond just caloric intake.
By preparing this recipe, you are providing a celebratory, high-quality, and intentional treat, perfect for any occasion that calls for a dash of color and happiness.
Frequently Asked Questions About Funfetti Cookies
To ensure you bake the best batch of Funfetti Cookies possible, we address the most common questions bakers ask about this beloved recipe.
Why did my sprinkles bleed color into the Funfetti Cookies dough?
Sprinkle color bleed usually happens for two reasons: using the wrong type of sprinkles (nonpareils instead of jimmies) or overmixing the dough. Nonpareils quickly dissolve their dye when exposed to moisture. Ensure you use the longer jimmie sprinkles and gently fold them in by hand only until just incorporated to minimize moisture contact time.
Do I really need to chill the Funfetti Cookies dough?
Chilling is highly recommended for optimal results, especially if you prefer thick, chewy cookies. Chilling the dough solidifies the butter, which prevents the cookies from spreading too rapidly in the oven. While you can bake immediately, unchilled dough will result in flatter, wider, and slightly crispier Funfetti Cookies.
Can I use cake mix to make these Funfetti Cookies instead?
This recipe is designed to replicate the flavor of cake batter using scratch ingredients, resulting in a superior texture to cake mix cookies. While cake mix cookies are fast, they are often too soft and lack the chewy edge achieved with this butter-and-sugar-based scratch recipe. Stick to the ingredients list for the ultimate soft and chewy Funfetti Cookies.
How should I store leftover Funfetti Cookies, and can I freeze the dough?
Store baked cookies in an airtight container at room temperature for up to 5 days. For long-term storage, the dough freezes beautifully. Scoop the dough balls onto a baking sheet, freeze until solid, and then transfer them to a freezer bag. Bake directly from frozen, adding 2–4 minutes to the total baking time.
What is the best way to achieve the best vanilla flavor in these Funfetti Cookies?
Use a high-quality pure vanilla extract, and be generous one full tablespoon is specified. Some bakers also swear by using a tiny amount of clear vanilla extract (which is often imitation) to replicate the specific synthetic taste found in classic Funfetti cake mix, while supplementing with pure vanilla for depth.
Conclusion: Bake Joy with Classic Funfetti Cookies
You now hold the keys to baking a batch of the most cheerful, flavorful, and perfectly textured Funfetti Cookies imaginable. By focusing on quality ingredients, paying close attention to the creaming process, and using the simple trick of chilling the dough (even briefly), you will bypass common pitfalls and achieve cookies that rival any high-end bakery. These cookies are a celebration of simplicity, flavor, and color they embody joy in every single bite.
This recipe provides the foundational knowledge needed for excellent baking, transforming simple pantry items into a stunning visual and culinary delight. Whether you are hosting a festive gathering, looking for the perfect lunchbox surprise, or simply seeking a comforting bake, these soft and chewy sprinkle cookies are guaranteed to deliver satisfaction.
We encourage you to roll up your sleeves, embrace the vibrancy of the rainbow jimmie sprinkles, and fill your home with the intoxicating aroma of cake batter and vanilla. Once you try this method, you will realize how easy it is to create perfectly thick and chewy Funfetti Cookies every time. Don’t forget to share your colorful creations with us! And if you are looking for other easy, comforting treats to bake, be sure to check out our recipe for Soft Peanut Butter Cookies.
Happy baking!
Classic Funfetti Celebration Cookies
Ingredients
Equipment
Method
- Preheat your oven to 350°F (175°C). Line two large baking sheets with parchment paper or silicone baking mats.
- In a medium bowl, whisk together the all-purpose flour, baking soda, and salt. Set the bowl aside.
- In the bowl of a stand mixer fitted with the paddle attachment (or use a large mixing bowl with a hand mixer), beat the softened butter, granulated sugar, and light brown sugar together on medium speed.
- Continue beating until the mixture is light, fluffy, and noticeably paler in color, which should take approximately 3 to 4 minutes. Stop and scrape down the sides of the bowl as needed.
- Add the eggs one at a time, beating well after each addition until the yolk is fully incorporated into the mixture.
- Add the vanilla extract and the milk. Beat on low speed until just combined. Be careful not to overmix at this stage.
- Gradually add the reserved dry ingredient mixture to the wet ingredients. Mix on low speed, pausing often to scrape down the sides, until the dough is just combined and no streaks of flour remain. Do not overmix the dough, as this develops gluten and can result in tough cookies.
- Gently fold the rainbow jimmie sprinkles into the cookie dough using a rubber spatula. Mix only until the sprinkles are evenly distributed throughout the dough.
- Use a medium cookie scoop (about 1.5 to 2 tablespoons) to portion the dough. Roll the portions into uniform balls and place them 2 inches apart on the prepared baking sheets.
- Bake for 9 to 12 minutes, or until the edges are lightly golden brown and the centers are still slightly soft and puffy. Do not overbake.
- Remove the sheets from the oven and let the cookies cool on the baking sheet for 5 minutes. The cookies will continue to set during this time.
- Transfer the cookies to a wire rack to cool completely before serving or storing.