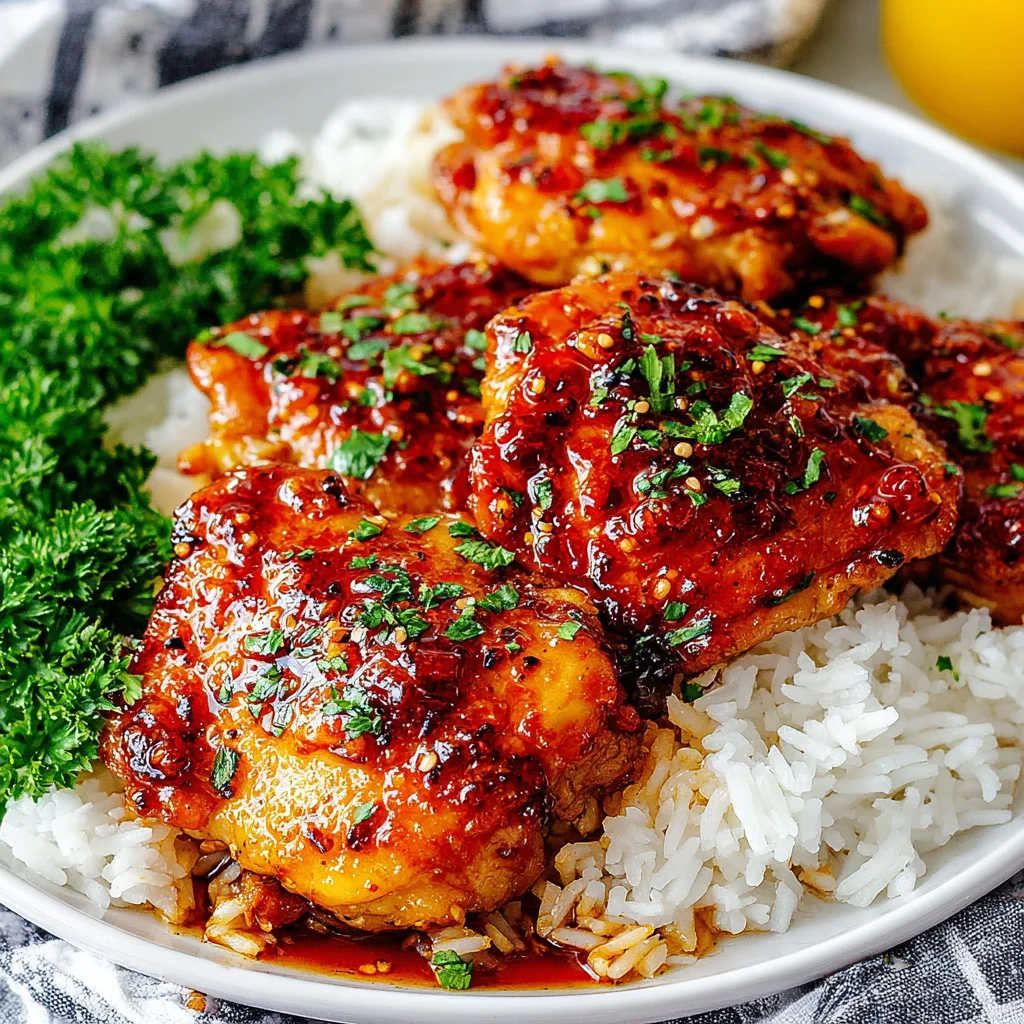
When you need a weeknight dinner that is universally loved, simple to prepare, yet tastes like it came from a high-end restaurant, look no further than this recipe for Honey Garlic Chicken Thighs. This dish is the undisputed champion of sweet and savory a perfect balance of rich, dark soy sauce, bright, fragrant garlic, a hint of spicy ginger, and the glossy sweetness of honey, all coating tender, juicy chicken thighs. Unlike dry chicken breasts, thighs guarantee moisture and absorb flavor magnificently. We walk you through the essential technique: achieving a perfect, crispy sear on the chicken before transforming the pan drippings into the most irresistible, sticky glaze imaginable.
Whether you are a novice cook or a seasoned chef, this preparation method ensures maximum flavor extraction and texture contrast. We promise that once you try this rendition of Honey Garlic Chicken Thighs, complete with its fast-acting cornstarch slurry and simple marinade, it will immediately enter your regular dinner rotation. Forget complicated steps; this recipe focuses on minimal ingredients delivering massive flavor impact, making it ideal for a quick yet satisfying family meal.
Why You’ll Fall Head Over Heels for These Honey Garlic Chicken Thighs
The beauty of the Honey Garlic Chicken Thighs recipe lies in its simplicity married with its complex, addictive flavor profile. This is comfort food redefined quick enough for a Tuesday night, but impressive enough for company. We’ve outlined several specific reasons why this version stands above the rest, ensuring maximum reader engagement and retention.
The Perfect Marriage of Sweet, Savory, and Umami
The core success of this dish is the balanced sauce. Many honey garlic recipes skew too sweet, becoming cloying. Our recipe counteracts the 1/2 cup of honey with a full 1/2 cup of low-sodium soy sauce, plus the acidity of apple cider vinegar, preventing flavor fatigue. The massive dose of fresh garlic (six cloves!) and optional fresh ginger provides a fragrant depth that elevates the entire experience. This isn’t just a sweet sauce; it’s a dynamic glaze that hits every note on the palate.
Unbeatable Texture: Crispy Skin, Juicy Meat
Chicken thighs are the superior choice here. They are naturally richer and more forgiving than breasts, guaranteeing a juicy result even if slightly overcooked. The high fat content in the thighs allows for a spectacular sear. By patting the thighs completely dry and searing them in a hot skillet, you create a deep, golden-brown crust that holds up against the thick, sticky glaze. The textural contrast between the crispy edges and the tender interior is what makes these boneless skinless chicken thighs truly exceptional.
Minimal Time Commitment, Maximum Flavor
In today’s busy world, speed is essential. This recipe for Honey Garlic Chicken Thighs is designed to be efficient. While we recommend a short 20-minute marinade (or even up to 4 hours if you have the time), the actual hands-on cooking time is under 20 minutes. The sauce, made directly in the pan using the leftover chicken fond (the flavorful brown bits), thickens in less than two minutes thanks to the cornstarch slurry. It’s a full-flavor meal ready faster than ordering takeout.
The Superiority of Thighs: Why You Should Try This Recipe Now
If you typically default to chicken breast, let this recipe be your turning point. Using boneless, skinless chicken thighs is the secret weapon to achieving a rich, moist, and flavorful final product. Their unique properties make them far better suited for glazes and high-heat searing than their leaner counterparts.
A Flavor Base Built for Seizing
Chicken thighs contain more intramuscular fat and connective tissue than breast meat. When properly seared, this fat renders, lubricating the pan and creating deep, caramelized pockets of flavor. These caramelized bits known as the ‘fond’ are later lifted by the sauce, adding depth and savory richness that chicken breast simply cannot replicate. The combination of this perfect sear and the sweet, savory sauce makes these easy chicken dinner thighs irresistible.
Perfect for Prep and Meal Planning
Because chicken thighs are so forgiving, they are excellent for meal prepping. They reheat beautifully without drying out, maintaining their juicy texture and the adherence of the sticky glaze. Make a large batch of Honey Garlic Chicken Thighs on Sunday, and you have lunches or quick dinners ready for the week. Serve them over simple white rice for absorbing all that extra sauce, or alongside a fresh salad. If you’re looking for other easy, flavorful dinners, try this creamy Cajun chicken pasta, or maybe a comforting bowl of cheddar garlic herb potato soup, but nothing beats the speed and versatility of this chicken recipe.
The Secret to the Signature Sticky Glaze
Our method ensures you achieve that perfect, professional-looking glossy glaze. The cornstarch slurry is non-negotiable. It bypasses the frustrating wait time of reducing a sauce naturally and gives you control over the thickness. This process, which takes seconds, results in a luxurious, non-greasy coating that clings perfectly to every curve of the Honey Garlic Chicken Thighs. This signature sticky texture is the defining feature that sets this recipe apart from thinner, runnier versions.
Essential Ingredients and Tools for Perfect Honey Garlic Chicken Thighs
To ensure your Honey Garlic Chicken Thighs are a resounding success, precise measurements and quality ingredients matter. We will break down exactly what you need and why each component is crucial, followed by the essential equipment list.
H3: Ingredients: The Building Blocks of Flavor
This recipe is split into two distinct parts: the chicken and the sauce. Note that while the ingredients are simple, the preparation (like mincing garlic very finely) is key to the final flavor profile.
For the Chicken:
- 2.5 pounds boneless, skinless chicken thighs (about 6 to 8 thighs): Opt for boneless, skinless for ease and speed. If you use bone-in, add 10–15 minutes to the cooking time.
- 1 tablespoon olive oil or vegetable oil: Use a neutral oil with a high smoke point (like canola or vegetable oil) if possible, as we are searing at medium-high heat.
- 1 teaspoon kosher salt: Kosher salt provides a clean, impactful salinity without the harshness of table salt.
- 1/2 teaspoon freshly ground black pepper: Always use freshly ground for the best aroma.
- 1/4 cup finely chopped fresh parsley or green onions (for garnish, optional): A mandatory step for color and freshness. Green onions add a slight, mild onion bite, while parsley keeps it herbaceous.
For the Honey Garlic Sauce (The Sticky Glaze):
- 1/2 cup low-sodium soy sauce: Low-sodium is critical. A full-sodium version can make the glaze overwhelmingly salty, especially since the chicken is already seasoned.
- 1/2 cup honey: Choose a good quality, liquid honey. This provides the primary sweetness and the sticky texture required for the glaze.
- 1/4 cup water or chicken broth: Broth adds depth (more savory flavor), but water works perfectly well for dilution and steam creation.
- 6 cloves garlic, minced very finely: Do not skimp on the garlic! Freshly minced garlic is vital. Pre-minced jarred garlic will not yield the same pungent, fresh flavor.
- 1 teaspoon grated fresh ginger (optional, but highly recommended): Ginger adds a subtle warmth and cuts through the richness of the honey and soy, balancing the flavor. A microplane is the best tool for grating fresh ginger.
- 1 tablespoon apple cider vinegar or rice vinegar: The acid is the secret weapon. It brightens the sauce and balances the heavy sweetness and saltiness, making the finished glaze taste vibrant.
- 1 tablespoon cornstarch (or corn flour): This is the thickening agent. It provides a beautiful, glossy finish almost instantly.
Note on Garlic Preparation: Since the garlic is cooked only briefly in the sauce, it must be minced very finely so it doesn’t leave large, unpleasant chunks in the smooth glaze. Use a garlic press or grate it for the best result.
H3: Necessary Utensils and Equipment
While this recipe is simple, having the right tools on hand ensures a flawless execution, particularly when it comes to searing and thickening the sauce efficiently. Success relies heavily on proper heat management and a reliable cooking surface.
Key Equipment:
- Large, Heavy-Bottomed Skillet: This is the most crucial piece of equipment. A 12-inch cast iron skillet or a high-quality stainless steel skillet is preferred because they retain heat evenly and create a superior sear (or ‘fond’). Non-stick pans can work, but they rarely achieve the deep caramelization required for the best flavor.
- Tongs: Essential for carefully placing the chicken in the hot oil and flipping it without losing the seasoning or damaging the sear.
- Whisk: Needed for combining the sauce ingredients smoothly and, critically, for creating the cornstarch slurry and stirring it into the hot sauce without clumps.
- Small Mixing Bowls (2): One for the main sauce ingredients and one for the cornstarch slurry.
- Shallow Dish or Zip-Top Bag: For marinating the chicken.
- Instant-Read Thermometer: The only way to guarantee the chicken is cooked perfectly to 165°F (74°C) without overcooking.
- Microplane Grater (Optional): Excellent for grating fresh ginger and ensuring the garlic is very finely minced.
Investing in these basic kitchen items will make preparing not just Honey Garlic Chicken Thighs, but countless other high-quality meals, significantly easier and more enjoyable. For instance, this heavy skillet will also be perfect for searing steak or making rich French onion pasta.
Detailed Recipe Steps: Mastering the Honey Garlic Chicken Thighs Glaze
Follow these instructions precisely to ensure tender chicken, a deep sear, and a gloriously sticky, glossy glaze. Remember, the key to success is separating the sauce into two halves: one for flavor-building (marinating) and one for thickening (glazing).
Part 1: Preparing the Chicken and Sauce
- Prepare the Thighs: Thoroughly pat the chicken thighs dry using paper towels. This step is critical for achieving a good sear. Moisture on the surface will steam the chicken instead of searing it. Season both sides of the thighs generously with the kosher salt and black pepper. Set aside.
- Mix the Sauce Base: In a medium bowl, combine the soy sauce, honey, water (or broth), minced garlic, grated ginger (if using), and apple cider vinegar. Whisk these ingredients together until the honey has fully dissolved and the mixture is uniform.
- Create the Slurry: In a small separate bowl, whisk the 1 tablespoon of cornstarch with 2 tablespoons of cold water until a smooth, thin paste (known as a slurry) is formed. Do not skip the cold water; using hot water will cause the cornstarch to clump instantly. Set the slurry aside.
- Marinate (Optional but Recommended): Pour about half of the honey garlic sauce mixture over the seasoned chicken thighs in a large zip-top bag or shallow dish. Toss to coat completely. Allow the chicken to marinate at room temperature for at least 20 minutes for maximum flavor penetration, or refrigerate for up to 4 hours. Keep the remaining half of the sauce mixture separate; this is the portion we will thicken into the final glaze.
Part 2: Cooking the Chicken and Building the Fond
- Heat the Pan: Heat the olive oil or vegetable oil in your large, heavy-bottomed skillet over medium-high heat until the oil is shimmering and just starting to smoke lightly. A hot pan is essential for a good sear.
- Sear the Chicken: Carefully place the marinated chicken thighs into the hot pan. Ensure they are not overcrowded (if they touch, the temperature will drop, and they will steam). You may need to work in two batches. Reserve any remaining marinade from the bag, as the sugars and seasoning will add flavor to the sauce later.
- Cook for Color: Sear the chicken thighs for 5 to 7 minutes on the first side without moving them. You are looking for a deep golden brown and slightly caramelized crust. Flip the chicken and reduce the heat slightly to medium.
- Finish Cooking: Continue to cook the chicken on the second side for another 5 to 8 minutes, or until the internal temperature reaches 165°F (74°C) when checked with an instant-read thermometer. Once cooked, remove the chicken from the skillet and transfer it to a plate. Cover loosely with foil to keep warm while you finish the glaze.
Part 3: Finishing the Sauce and Glazing
This is the fastest part of the recipe, requiring constant attention, but resulting in the glorious, sticky final product.
- Bring Sauce to a Simmer: If you reserved any marinade from the bag, add it now. Then, pour the reserved half of the fresh honey garlic sauce (the sauce that was not used for marinating) into the skillet. Bring the sauce to a rolling simmer over medium heat. Immediately scrape up any browned bits (fond) from the bottom of the pan using a wooden spoon. These bits contain concentrated flavor and will dissolve into your sauce.
- Thicken the Glaze: Whisk the prepared cornstarch slurry one more time to recombine (cornstarch settles quickly). Slowly pour the slurry into the simmering sauce while stirring constantly. Stir vigorously for about 1 to 2 minutes. The sauce will rapidly transform from a thin liquid into a glossy, sticky glaze. If it gets too thick, add a tablespoon of water or broth.
- Glaze the Chicken: Return the cooked Honey Garlic Chicken Thighs back into the skillet. Toss the chicken gently in the thickened sauce, turning them several times until they are completely coated and glossy with the honey garlic glaze. This process should take less than 30 seconds, just long enough to coat and warm the chicken through.
- Serve: Remove the chicken and sauce from the heat immediately. Garnish generously with fresh chopped parsley or green onions before serving. Serve hot over rice, noodles, or with a side of refreshing cucumber tomato salad.
Tips, Troubleshooting, and Delicious Variations for Honey Garlic Chicken Thighs
Achieving the perfect sticky glaze is easy once you understand the science. Here are some key tips, troubleshooting advice, and variations to adapt this recipe to dietary needs or personal taste preferences.
Troubleshooting Common Glazing Mistakes
My Sauce is Too Thin!
If your glaze doesn’t thicken after adding the slurry, it usually means the sauce wasn’t simmering hot enough, or you used too little cornstarch. To fix it, whisk another teaspoon of cornstarch with two teaspoons of cold water to create a second slurry. Bring the sauce back to a rapid simmer and whisk in the second slurry until the desired thickness is achieved.
My Sauce is Lumpy!
Lumps occur when the cornstarch slurry isn’t whisked smooth before being added, or when it’s poured into a sauce that isn’t hot enough. Always whisk the cornstarch with cold liquid first, and pour it into a sauce that is actively simmering while you stir rapidly.
The Chicken is Not Searing!
The number one reason for a lack of sear is moisture. You must pat the chicken completely dry. The second reason is not enough heat, or overcrowding the pan. Use medium-high heat and ensure there is plenty of space between the thighs. Work in batches if necessary.
Serving Suggestions and Variations
The versatility of Honey Garlic Chicken Thighs allows it to pair beautifully with many sides, or even transform into a different dish entirely.
- Go Gluten-Free: Swap the standard soy sauce for Tamari or coconut aminos. Ensure that any broth used is certified gluten-free. This simple substitution keeps the sweet and savory profile intact.
- Make it Spicy: For a kick, add 1/2 teaspoon of sriracha or 1/4 teaspoon of red pepper flakes to the sauce mixture before simmering. This creates delicious “Spicy Honey Garlic Chicken Thighs.”
- Vegetable Boost: Add chopped broccoli florets or sliced bell peppers to the skillet after the chicken has been removed. Sauté them quickly, then add the reserved sauce and thicken it as instructed, tossing the vegetables with the glaze before adding the chicken back in.
- Crispy Skin Option: If using skin-on thighs, the sear is even easier! Place them skin-side down first and press gently to maximize contact with the pan. Do not flip until the skin is perfectly crisp and golden brown (about 8–10 minutes).
- Serving: Classic pairings include jasmine rice, brown rice, or even creamy mashed potatoes. For a lighter meal, serve over quick-sautéed spinach or a simple cucumber salad.
If you’re looking for more quick and savory dinner ideas, check out our collection of recipes on Pinterest! Find more easy weeknight meals on Pinterest.
Nutritional Insights: The Benefits of Choosing Honey Garlic Chicken Thighs
While often perceived as an indulgent dish due to the sticky glaze, Honey Garlic Chicken Thighs offers substantial nutritional benefits, particularly compared to heavily processed fast-food alternatives. The preparation focuses on whole ingredients and healthy fats.
Estimated Nutritional Values (Per Serving, based on 6 thighs total):
Note: These are estimates and depend heavily on the size of the thighs and the exact amount of residual oil used.
- Calories: Approximately 350-400 kcal
- Protein: 35-40 grams
- Fat: 15-20 grams (Mostly monounsaturated and polyunsaturated fats from the chicken and olive oil)
- Carbohydrates: 20-25 grams (Primarily from the honey and cornstarch)
- Sodium: 600-750 mg (Significantly reduced by using low-sodium soy sauce)
Protein Powerhouse: The Chicken Thighs
Chicken thighs are an excellent source of high-quality protein, essential for muscle repair, immune function, and satiety. Protein helps you feel full longer, which is beneficial for weight management. Additionally, dark meat contains higher concentrations of important micronutrients than white meat, including iron, zinc, and B vitamins (Niacin, B6, and B12).
The Health Benefits of Garlic and Ginger
The sauce is heavily flavored with fresh garlic and fresh ginger, both of which contribute significant health benefits:
- Garlic: Garlic is renowned for its high levels of sulfur compounds, such as allicin, which are believed to have potent medicinal properties. It is often linked to supporting cardiovascular health and boosting the immune system.
- Ginger: Fresh ginger is a powerful anti-inflammatory and antioxidant. It is widely used to aid digestion and reduce nausea. The fragrant warmth it adds to the Honey Garlic Chicken Thighs sauce is not just for flavor it’s a bonus health boost.
Managing Sodium and Sugar
Because honey is the primary sweetener and soy sauce the primary salty component, portion control is key. By using low-sodium soy sauce, we drastically cut down on overall sodium without sacrificing that deep umami flavor. The carbs in this dish come from the natural sugars in the honey, a better option than refined sugar often found in pre-made sauces. Pairing the Honey Garlic Chicken Thighs with steamed broccoli or a salad instead of massive portions of white rice can help create a balanced, nutritious plate.
Frequently Asked Questions (FAQ) about Honey Garlic Chicken Thighs
We’ve compiled some of the most common questions people ask when preparing this sticky, savory dish to ensure your cooking experience is effortless and successful.
Can I use chicken breasts instead of boneless, skinless chicken thighs?
Yes, you can substitute chicken breasts, but the cooking time will be significantly shorter (around 4-6 minutes per side) and you must be careful not to overcook them, or they will dry out. Thinner cuts like chicken tenderloins will cook even faster. Chicken breasts will not retain the same level of moisture or the rich flavor that comes from searing the fatty Honey Garlic Chicken Thighs.
What is the purpose of patting the chicken thighs dry before seasoning and searing?
Patting the chicken dry is crucial for the Maillard reaction, which creates the desirable brown crust and deep flavor. If there is moisture on the surface of the chicken, the heat energy goes into evaporating that water (steaming the chicken) rather than searing it. This leads to pale, rubbery meat instead of beautifully caramelized Honey Garlic Chicken Thighs.
Can I prepare the honey garlic sauce ahead of time?
Absolutely. You can mix the entire sauce base (minus the cornstarch slurry) up to three days in advance and store it in the refrigerator. Remember to keep half of the sauce separate for thickening the glaze later, and use the other half for the marinade. The slurry, however, must be made immediately before you need to thicken the sauce.
Why do I need to reserve half the sauce instead of using all of it for marinating the Honey Garlic Chicken Thighs?
Reserved sauce is necessary for safety and optimal flavor. The portion used for marinating comes into contact with raw chicken and cannot be safely consumed unless boiled for several minutes, which often dulls the fresh garlic flavor. Using a reserved, fresh half ensures a vibrant, sanitary, and perfectly seasoned glaze.
How do I store and reheat leftover Honey Garlic Chicken Thighs?
Store leftovers in an airtight container in the refrigerator for up to 4 days. Chicken thighs reheat beautifully without drying out. For the best result, reheat them gently in a skillet over low heat until warmed through, or use a microwave. If the sauce looks too thick upon reheating, stir in a teaspoon of water or broth.
Can I make this recipe in a slow cooker or oven instead of a skillet?
Yes, though the texture will change. To oven-bake, arrange the seasoned thighs in a dish, brush with half the sauce, and bake at 400°F (200°C) for 20-25 minutes. To finish, thicken the reserved sauce separately on the stovetop and toss the cooked thighs in the glaze. Note that you will miss the deep, caramelized sear achieved in the skillet method.
Conclusion: Your New Favorite Weeknight Meal
The journey to creating perfect Honey Garlic Chicken Thighs is quick, simple, and incredibly rewarding. By focusing on fundamental techniques the crucial patting dry, the high-heat sear, and the controlled thickening of the glaze we transform basic ingredients into a spectacular dining experience. This recipe delivers everything you could want in a weeknight meal: speed, immense flavor, and that signature sticky texture that makes every bite memorable.
From the savory depth of the low-sodium soy sauce and the pungent kick of fresh garlic and ginger, to the luxurious, clinging glaze created by the cornstarch slurry, every step is designed to maximize flavor while minimizing effort. The natural richness of the chicken thighs ensures the final product is always juicy, tender, and robust enough to stand up to the powerful sauce. Whether you are serving this over a steaming bowl of rice, or adding it to your meal prep rotation, these boneless skinless chicken thighs are guaranteed to be a hit.
Don’t wait to try this exceptional dish. Grab your skillet, mince that garlic, and prepare to elevate your dinner game. If you loved this recipe, please share it with friends and family, and let me know in the comments below how your Honey Garlic Chicken Thighs turned out!
Long And Easy To Read Honey Garlic Chicken Thighs
Ingredients
Equipment
Method
- Prepare the Thighs: Thoroughly pat the chicken thighs dry using paper towels. This step is critical for achieving a good sear. Season both sides of the thighs generously with the kosher salt and black pepper. Set aside.
- Mix the Sauce Base: In a medium bowl, combine the soy sauce, honey, water (or broth), minced garlic, grated ginger (if using), and apple cider vinegar. Whisk these ingredients together until the honey has fully dissolved and the mixture is uniform.
- Create the Slurry: In a small separate bowl, whisk the 1 tablespoon of cornstarch with 2 tablespoons of cold water until a smooth, thin paste (known as a slurry) is formed. This will be used later to thicken the sauce. Set the slurry aside.
- Marinate (Optional but Recommended): Pour about half of the honey garlic sauce mixture over the seasoned chicken thighs in a large zip-top bag or shallow dish. Toss to coat completely. Allow the chicken to marinate at room temperature for at least 20 minutes, or refrigerate for up to 4 hours. Keep the remaining half of the sauce mixture separate, as this will be the final cooking sauce.
- Heat the Pan: Heat the olive oil or vegetable oil in a large, heavy-bottomed skillet (cast iron or stainless steel works best) over medium-high heat until the oil is shimmering.
- Sear the Chicken: Carefully place the marinated chicken thighs into the hot pan, ensuring they are not overcrowded (you may need to work in batches). Reserve any remaining marinade from the bag, as it can be added to the sauce later.
- Cook for Color: Sear the chicken thighs for 5 to 7 minutes on the first side until deep golden brown and slightly caramelized. Flip the chicken and reduce the heat slightly to medium.
- Finish Cooking: Continue to cook the chicken on the second side for another 5 to 8 minutes, or until the internal temperature reaches 165°F (74°C). Once cooked, remove the chicken from the skillet and transfer it to a plate. Cover loosely with foil to keep warm.
- Bring Sauce to a Simmer: Pour the reserved half of the honey garlic sauce (the sauce that was not used for marinating) into the skillet. Bring the sauce to a rolling simmer over medium heat, scraping up any browned bits (fond) from the bottom of the pan using a wooden spoon.
- Thicken the Glaze: Whisk the prepared cornstarch slurry one more time to recombine, then slowly pour it into the simmering sauce. Stir constantly for about 1 to 2 minutes. The sauce will rapidly thicken into a glossy, sticky glaze.
- Glaze the Chicken: Return the cooked chicken thighs back into the skillet. Toss the chicken gently in the thickened sauce, turning them several times until they are completely coated and glossy with the honey garlic glaze.
- Serve: Remove the chicken and sauce from the heat immediately. Garnish generously with fresh chopped parsley or green onions before serving. Serve hot over rice, noodles, or with steamed vegetables.