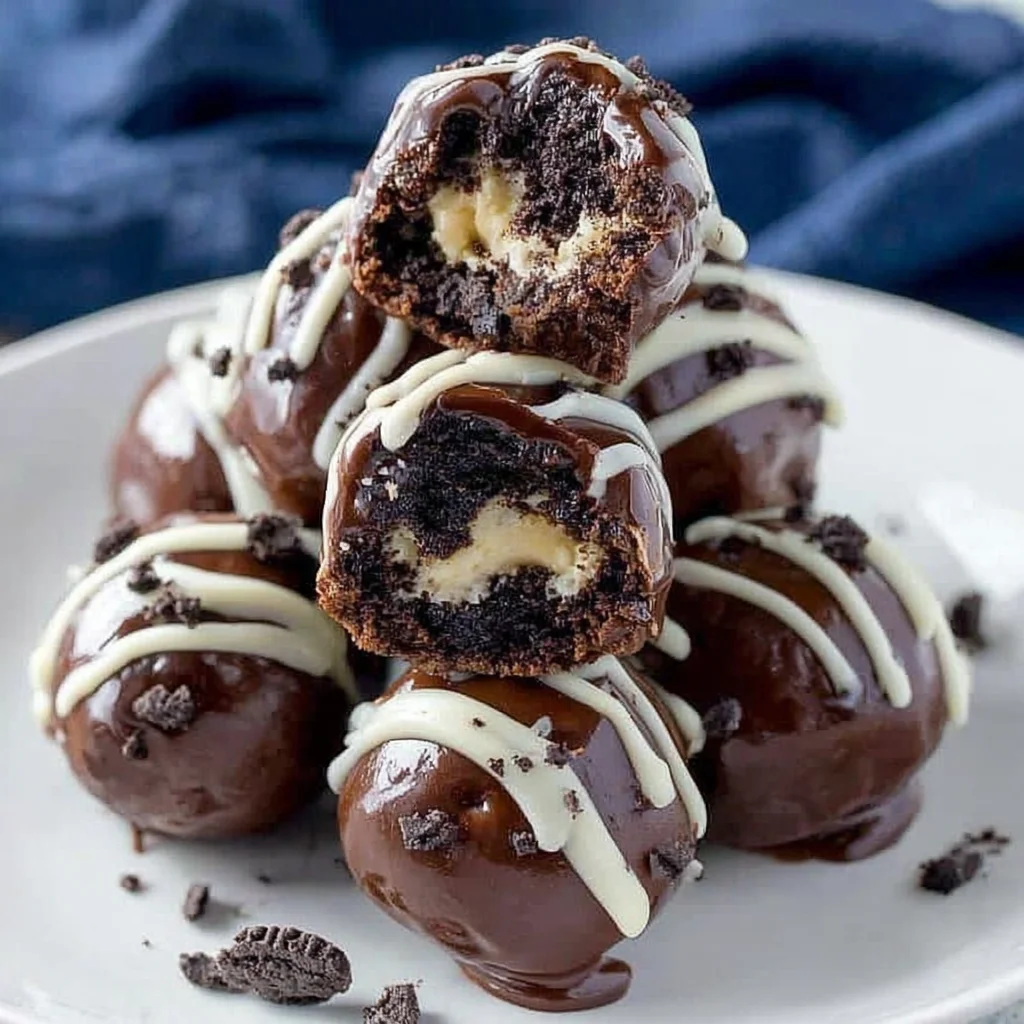
Welcome to the world of dessert magic! If you’re searching for a treat that delivers maximum flavor with minimal effort, look no further than these spectacular 3-Ingredient No-Bake Oreo Balls. Often called Oreo truffles, these delightful bites are rich, creamy, and coated in a decadent layer of chocolate all achieved without ever turning on your oven. This recipe is the definition of simplicity, making it a beloved staple for holiday parties, quick afternoon snacks, or anytime you need a guaranteed crowd-pleaser.
The beauty of this recipe lies entirely in its name: just three simple ingredients Oreos, cream cheese, and melting chocolate combine to create an irresistibly rich, dense, and perfectly balanced dessert. Forget complicated candy-making techniques or temperamental baking times. From start to finish, the active preparation time is under 20 minutes, followed by the essential chilling time that makes these no-bake dessert spheres truly set. Whether you are a seasoned baker or someone who rarely ventures into the kitchen, mastering these 3-Ingredient No-Bake Oreo Balls is completely within reach. They truly are the simplest path to dessert stardom.
Why You’ll Fall Head Over Heels for These 3-Ingredient No-Bake Oreo Balls
In a saturated market of intricate dessert recipes, the sheer elegance and reliability of the 3-Ingredient No-Bake Oreo Balls stands out. There are countless reasons why this recipe has become a viral sensation and a permanent fixture in home kitchens worldwide, appealing to both children and adults alike. This isn’t just a recipe; it’s a promise of guaranteed sweetness and success, even on your busiest days.
First and foremost, the core appeal is the effortless preparation. Unlike cookies or cakes that require precise measurements and controlled oven temperatures, these easy Oreo truffles require no baking whatsoever. The process involves blending, rolling, and dipping tasks that are highly manageable and even fun for the whole family. If you’ve ever struggled with a cake sinking in the middle or cookies spreading too thin, you understand the frustration that baking can sometimes bring. With no-bake desserts, those worries melt away (though you must ensure your cream cheese is properly softened!). This simplicity is perfect for spontaneous entertaining or satisfying a sudden sweet tooth craving without hours of preparation.
Secondly, let’s talk about the incredible texture and flavor. The combination of finely crushed Oreo cookies filling and all blended with rich, tangy cream cheese creates a dense, fudgy interior that is distinct from any traditional cake or cookie dough. When chilled, this interior becomes firm yet creamy. When encased in a crisp, sweet shell of dipping chocolate, the contrast is perfection: a satisfying snap followed by a smooth, deep chocolate flavor. The resulting flavor profile captures the essence of a gourmet candy bar but retains that comforting, familiar taste of an Oreo.
Furthermore, these 3-Ingredient No-Bake Oreo Balls are exceptionally versatile. They are naturally dark and delicious, but they serve as a perfect canvas for flavor exploration. You can customize the chocolate coating (milk, dark, or white) and add various toppings, from crushed peppermint for the holidays to toasted coconut for a tropical twist. This adaptability means you can use one core recipe to create treats for every season and celebration. They travel well, stack easily, and look stunning on any dessert platter, making them ideal for potlucks, party favors, or edible gifts.
Finally, the yield is fantastic. A single package of Oreos and one block of cream cheese produces approximately 40–45 beautifully sized, shareable pieces. This high yield makes the recipe highly cost-effective and efficient when feeding a large crowd. When considering a simple dessert that delivers high impact with low investment of time and money, these 3-Ingredient No-Bake Oreo Balls are truly unbeatable.
Why You Need These Easy Oreo Truffles in Your Dessert Repertoire
Beyond being delicious, incorporating a recipe like the 3-Ingredient No-Bake Oreo Balls into your cooking arsenal offers practical benefits that streamline your life, especially when time is of the essence. We all need those reliable, foolproof recipes we can pull out at a moment’s notice, and this recipe delivers on every front, making it an essential resource for busy individuals and home entertainers.
One of the strongest arguments for adopting this recipe is the minimal mess factor. Since you avoid flour, eggs, and the messy process of kneading or rolling out dough, cleanup is remarkably swift. You primarily use a food processor (or a plastic bag and rolling pin) and one large mixing bowl, plus the bowl for melting chocolate. This means less time scrubbing dishes and more time enjoying your incredible chocolate-covered Oreo bites. For parents, this low-mess, high-reward approach makes it the perfect activity for involving younger children in the kitchen. They can help with crushing, mixing (a fantastic sensory activity!), and, most importantly, the fun part of rolling the mixture into neat little spheres.
The ability to prepare these treats well in advance is another huge selling point. Unlike baked goods that often taste best fresh out of the oven, these 3-Ingredient No-Bake Oreo Balls actually require chilling time. They can be made up to a week ahead of time, stored in the refrigerator, and dipped in chocolate just before serving (or even dipped and stored). This advanced preparation capacity drastically reduces stress when hosting large events, allowing you to focus on main courses or savory appetizers while your dessert course patiently waits its turn. For example, planning for festive occasions often requires a dessert table, and these balls pair perfectly alongside traditional baked goods. If you are preparing for a holiday spread, consider making them alongside other simple, festive items like Christmas Fudge.
Moreover, this recipe addresses the perennial need for simple, grab-and-go snacks. Pre-portioned and bite-sized, these homemade Oreo balls are the ultimate portable treat. Pack them in lunchboxes, take them to the office, or simply grab one from the fridge when you need a quick energy boost. They hold their shape remarkably well once the chocolate coating has set, maintaining their structure even at room temperature (though refrigeration is recommended for long-term storage). This durability makes them far superior to traditional cookies or brownies when transportation is necessary.
Finally, the inherent “wow” factor of these dense, elegant truffles belies their easy origin. Guests will assume you spent hours laboring over a gourmet confectionery, unaware that the secret to these impressive desserts involves only three ingredients and a bit of patience during the chilling phase. This element of deception the ability to create something so polished and delicious from so little makes the 3-Ingredient No-Bake Oreo Balls truly invaluable in your recipe collection.
Ingredients and Essential Utensils for Perfect 3-Ingredient No-Bake Oreo Balls
Achieving perfection with these no-bake dessert balls hinges on understanding the role of the three core ingredients and using the right tools. While the list is short, quality and preparation matter immensely, particularly regarding the cream cheese consistency.
The Trio of Ingredients (The Secret to Simple Perfection)
The magic starts here. You need exactly three items, precisely measured, to ensure the right dough consistency for rolling your 3-Ingredient No-Bake Oreo Balls.
- 1 (14.3 oz) package Oreo Sandwich Cookies: The standard original flavor is recommended for the classic truffle taste, but feel free to experiment with flavor variations (like Mint or Peanut Butter Oreos) for unique homemade Oreo balls. Ensure you use the entire package cookies and the white cream filling as the filling is crucial for helping bind the mixture.
- 1 (8 oz) block Cream Cheese, Fully Softened: This is arguably the most important ingredient regarding preparation. The cream cheese MUST be at room temperature. If it is cold, it will not blend uniformly with the crushed cookies, resulting in a chunky, difficult-to-roll mixture. Take it out of the refrigerator at least 1-2 hours before starting the recipe.
- 16 ounces Dipping Chocolate (Melting Wafers or Candy Melts): High-quality melting chocolate is essential for an easy, glossy coating that sets quickly without needing complex tempering. Look for melting wafers, almond bark, or candy melts. You can choose milk chocolate, dark chocolate, or white chocolate based on your preference.
Why Ingredient Quality and Temperature Matter
While the recipe is simple, don’t skimp on quality. Using proper dipping chocolate (rather than standard chocolate chips) prevents the coating from seizing or creating a dull, streaky finish. Standard chocolate chips often contain stabilizers that make them temperamental when melted. Melting wafers or candy melts are specifically formulated to melt smoothly and set hard at room temperature, giving your 3-Ingredient No-Bake Oreo Balls that professional sheen.
Focusing on the cream cheese again: Room temperature cream cheese is non-negotiable. When cream cheese is cold, it contains tiny solidified fat particles that resist blending. When cold chunks mix with the fine, dry Oreo crumbs, the resulting dough will be crumbly and impossible to roll without falling apart. Softened cream cheese, however, incorporates smoothly and hydrates the cookie crumbs perfectly, forming a dense, pliable paste ideal for shaping these rich Oreo truffles. This critical step takes time, so planning ahead is necessary for success.
Recommended Tools for Assembling Your Chocolate-Covered Oreo Bites
Having the right equipment drastically speeds up the process, especially Step 1 (crushing the cookies) and Step 5 (dipping the balls).
- Food Processor: (Highly Recommended) A large food processor is the most efficient tool for turning Oreos into fine, uniform crumbs in seconds. This speed and consistency are key to ensuring the cream cheese blends seamlessly.
- Alternative Crushing Method: If you don’t have a food processor, use a large, heavy-duty sealable plastic bag and a rolling pin. Seal the bag tightly and crush the cookies until they resemble coarse flour. This requires a little more elbow grease but works just as well.
- Large Mixing Bowl: Necessary for combining the crushed Oreos and cream cheese.
- Rubber Spatula or Wooden Spoon: Essential for mixing the dough. Because the dough gets very thick, you might need a sturdy utensil. An electric hand mixer can be used on low speed, but manual mixing often works better to avoid overmixing.
- Small Cookie Scoop (1 tablespoon size): This ensures all your 3-Ingredient No-Bake Oreo Balls are uniform in size, which aids in presentation and consistent dipping time.
- Baking Sheet(s): Needed for placing the rolled balls before chilling and the dipped balls while the chocolate sets.
- Parchment or Wax Paper: Essential for lining the baking sheets to prevent sticking, especially when chilling and setting the chocolate coating.
- Microwave-Safe Bowl: For melting the chocolate wafers.
- Dipping Tools: A specialized chocolate dipping fork or simple toothpicks/standard forks work best for coating the balls cleanly and allowing excess chocolate to drain.
Detailed Instructions: Making Your 3-Ingredient No-Bake Oreo Balls
Follow these steps precisely to guarantee perfectly shaped and coated no-bake dessert balls that will impress everyone.
STEP 1: Achieve the Perfect Crumb Consistency
The foundation of great Oreo truffles is the cookie crumb. They must be very fine closer to flour than coarse sand.
- Open the package of Oreos. If you plan to decorate the finished balls with crumbs, set aside about 1/4 cup of whole cookies before crushing the rest.
- Place the remaining cookies, including the creamy centers, into a large food processor.
- Pulse the processor consistently until the cookies are reduced to very fine, uniform crumbs. Tip: Stop and scrape down the sides occasionally to ensure all pieces are equally processed.
- If using the plastic bag method, double-bag the cookies to prevent tears, and roll vigorously with a rolling pin until thoroughly crushed.
- Pour these finely crushed Oreo crumbs into your large mixing bowl.
STEP 2: Form the Rich Truffle Dough
This is where the magic happens, transforming dry crumbs into a pliable dough.
- Add the fully softened (room temperature) 8 oz block of cream cheese directly into the bowl with the Oreo crumbs.
- Using a sturdy utensil, begin mixing. Start slowly, pushing the cream cheese into the crumbs. As the mixture begins to absorb the cream cheese, it will quickly turn into a sticky, dense, dark dough.
- Crucial Mixing Point: Continue mixing until the dough is completely combined and uniform in color. You should not see any streaks of white cream cheese. The mixture should be stiff enough that you can easily press it together with your hands.
STEP 3: Scoop, Roll, and Chill (The Essential Step)
Chilling is the secret ingredient in all 3-Ingredient No-Bake Oreo Balls recipes. It firms up the fat content in the cream cheese, ensuring the balls maintain their shape during the warm chocolate dip.
- Line a large baking sheet with parchment or wax paper.
- Use a 1-tablespoon cookie scoop (or a measuring spoon) to portion the dough.
- Roll each portion firmly between your palms to create a smooth, dense sphere. If the mixture is too sticky, your cream cheese may have been slightly too warm; you can briefly place the whole bowl in the fridge for 10 minutes to stiffen it slightly before rolling.
- Place all finished balls onto the lined baking sheet.
- DO NOT SKIP THIS: Place the entire baking sheet into the refrigerator and chill the homemade Oreo balls for a minimum of 60 minutes. They should be very firm before dipping.
STEP 4: Prepare the Dipping Chocolate
Properly melted chocolate ensures a beautiful, smooth coating for your chocolate-covered Oreo bites.
- Place your 16 ounces of dipping chocolate wafers/melts into a microwave-safe bowl.
- Melt in 30-second intervals in the microwave, stirring thoroughly after each interval. Wafers hold their shape even when melted, so stirring is key to checking consistency.
- Continue this process until the chocolate is entirely smooth and fluid. Avoid Overheating: Overheated chocolate will thicken, become grainy, or burn.
- Pro Tip for Thinning: If the chocolate seems too thick for easy dipping, stir in 1 teaspoon of coconut oil or vegetable shortening. This slightly thins the chocolate, making it easier to achieve a thin, glossy shell.
STEP 5: Dip and Coat the Truffles
Speed is important here, as the warm chocolate will quickly soften the chilled balls.
- Remove only a small batch of chilled 3-Ingredient No-Bake Oreo Balls from the refrigerator at a time. Keep the rest chilling while you work.
- Using a dipping fork or toothpick, spear one ball. Dip the ball entirely into the melted chocolate, turning gently to coat.
- Lift the ball out and gently tap the tool against the rim of the bowl. This allows the excess chocolate to drip off, preventing puddles or thick bases.
- Carefully slide the dipped ball back onto the parchment-lined baking sheet.
STEP 6: Decorate and Set
The final decorative touch elevates these simple truffles into elegant desserts.
- Act Fast: While the chocolate is still wet, immediately sprinkle the top with your reserved Oreo crumbs, or other chosen toppings (sprinkles, sea salt, etc.). If you wait too long, the chocolate shell will begin to set, and the toppings won’t adhere.
- Repeat Steps 5 and 6 until all the 3-Ingredient No-Bake Oreo Balls are dipped and decorated.
- Allow the finished balls to set completely. You can leave them at cool room temperature (this might take 1-2 hours), or place the baking sheet back into the refrigerator for 15–20 minutes until the chocolate coating is firm and matte.
- Store the finished truffles in an airtight container in the refrigerator. They are ready to enjoy! For a similar level of easy holiday treat making, consider making Christmas Thumbprint Cookies.
Tips, Troubleshooting, and Delicious Variations
While the basic recipe for 3-Ingredient No-Bake Oreo Balls is straightforward, a few key tips can elevate your results, and knowing how to troubleshoot common issues will save the day. Moreover, exploring variations keeps this simple recipe fresh and exciting.
Solving Common Troubleshooting Issues
1. The Dough is Too Crumbly: If your mixture won’t hold together after mixing, this almost always means your cream cheese was too cold, or the Oreos weren’t crushed finely enough. Solution: Add a teaspoon of melted butter or a splash of milk/cream to the mixture and continue mixing until the dough binds together. Ensure next time you use truly softened cream cheese.
2. The Balls Fall Apart When Dipping: This means the balls were not chilled long enough. Solution: Immediately place the remaining balls back into the freezer for 15 minutes before attempting to dip again. The core must be very cold to withstand the warmth of the melted chocolate.
3. The Chocolate Coating is Too Thick: If the chocolate looks muddy or gloppy, it is either slightly burnt/overheated or too cool. Solution: Add 1 teaspoon of coconut oil or vegetable shortening (or food-grade paraffin wax) to the chocolate and stir vigorously until smooth. The fat will help thin the chocolate and restore its fluidity for clean dipping.
Flavor and Ingredient Variations (Beyond the Original)
One of the best features of these easy Oreo truffles is their adaptability. Once you master the basic 3-Ingredient No-Bake Oreo Balls, you can venture into countless flavor combinations.
- Peppermint Holiday Delight: Use regular Oreos, but crush 1/2 cup of candy canes and mix them directly into the cream cheese mixture for a minty interior. Dip in white or dark chocolate, then top with crushed candy cane pieces.
- Peanut Butter Kick: Use peanut butter-flavored Oreos (if available), or stir in 1-2 tablespoons of creamy peanut butter directly into the dough mixture (this counts as a fourth ingredient, but it’s worth it!). Dip in milk chocolate.
- Lemon Zest: Add 1 teaspoon of fresh lemon zest to the cream cheese mixture for a bright, tangy flavor contrast. Dip in white chocolate for a beautiful finish.
- Spice Variations: For a seasonal touch, mix 1/2 teaspoon of cinnamon and a dash of nutmeg into the dough. This is wonderful when paired with white chocolate coating.
Dietary Alternatives for 3-Ingredient No-Bake Oreo Balls
It’s easy to modify this recipe to accommodate specific dietary needs:
Gluten-Free: Many brands now offer excellent gluten-free sandwich cookies that mimic Oreos perfectly. Swap the standard Oreos for the gluten-free alternative. The process for making these 3-Ingredient No-Bake Oreo Balls remains exactly the same.
Vegan/Dairy-Free: The Oreo brand is traditionally vegan (check labels, as flavorings can vary). Substitute the standard cream cheese with a high-quality vegan cream cheese alternative (ensure it is fully softened). Swap the melting wafers for dairy-free chocolate chips or vegan candy melts. These vegan Oreo truffles maintain the same wonderful texture and are perfect for guests with sensitivities.
Remember that when chilling these homemade Oreo balls, ensure they are covered tightly if they share the refrigerator with strong-smelling foods, as cream cheese can easily absorb odors.
Nutritional Values and Benefits of These Sweet 3-Ingredient No-Bake Oreo Balls
As a rich, dense confectionary item, the 3-Ingredient No-Bake Oreo Balls are undeniably a treat. They are meant to be enjoyed in moderation and are best known for providing a significant boost of energy and, most importantly, joy. While specific nutritional values vary based on the exact type of Oreo and chocolate coating used, we can provide a general breakdown of what each delicious ball contains.
When using standard ingredients (original Oreos, full-fat cream cheese, and milk chocolate), each ball (assuming a 1-tablespoon serving size, yielding 45 truffles) typically contains:
- Calories: Approximately 90–110 calories per ball.
- Total Fat: Approximately 6–8 grams (largely sourced from the cream cheese, the Oreo filling, and the chocolate coating).
- Carbohydrates: Approximately 10–12 grams (primarily sugars and starches from the cookies and the dipping chocolate).
- Protein: Less than 1 gram.
The Source of Energy and Comfort
The primary benefit of these chocolate-covered Oreo bites is the immediate caloric energy provided by the carbohydrates and fats. They make an excellent small treat when you need a quick mood boost or a bite-sized reward. The fats contribute significantly to the satiety and creamy texture, making the truffles feel deeply satisfying despite their small size.
The core ingredients also offer minor nutritional components:
- Cream Cheese: While predominantly fat, full-fat cream cheese provides small amounts of Vitamin A (fat-soluble) and calcium. Its role in this recipe is less about nutrition and more about contributing that essential tangy contrast to the sweetness of the Oreos.
- Chocolate Coating: Depending on the type of chocolate used, you may gain some benefits. Dark chocolate, for instance, contains antioxidants and minor amounts of iron and magnesium. Using high-quality dark chocolate (70% cocoa or higher) for the coating can slightly increase these beneficial compounds and reduce overall sugar content compared to milk chocolate.
Mindful Indulgence: The Role of Treat Foods
It is important to view the 3-Ingredient No-Bake Oreo Balls as a delightful indulgence rather than a source of daily nutrients. Because they are highly palatable and rich, practicing mindful portion control is key. The small, uniform size of these homemade Oreo balls is perfect for this you can easily enjoy one or two without overindulging.
If you are looking for slightly healthier alternatives in your no-bake repertoire, you might be interested in simple energy balls or protein snacks, but for a true, comforting dessert that leverages maximum flavor with minimum effort, these 3-Ingredient No-Bake Oreo Balls remain the ultimate choice. They offer a moment of pure, unadulterated sweetness that perfectly complements any celebration.
For more easy dessert ideas and tips, be sure to check out my Pinterest page dedicated to simple sweets and treats!
Frequently Asked Questions (FAQs) About 3-Ingredient No-Bake Oreo Balls
How long do 3-Ingredient No-Bake Oreo Balls last?
Once dipped and set, these homemade Oreo balls should be stored in an airtight container in the refrigerator. They will remain fresh and delicious for up to 1 week. If stored in the freezer (undipped or dipped), they can last for up to 1–2 months.
Can I use low-fat or whipped cream cheese for these Oreo truffles?
It is highly recommended to use a full-fat block of cream cheese for the best results. Low-fat or whipped cream cheese often contains too much water content, which results in a stickier, softer dough that is much harder to roll and risks separating during the chocolate dipping process. Using a firm, full-fat block ensures the correct structure for these 3-Ingredient No-Bake Oreo Balls.
What is the best way to crush Oreos without a food processor?
The easiest method is to place the cookies in a large, sealable plastic bag and press all the air out. Use a rolling pin or a heavy mallet to crush the cookies completely. Ensure the crumbs are as fine as possible, resembling flour, as this consistency is crucial for the cream cheese to bind them into a proper truffle dough.
Why did my chocolate coating crack after setting?
Chocolate cracking usually happens due to a drastic temperature shock. If the 3-Ingredient No-Bake Oreo Balls are frozen solid, the warm chocolate expands the coating, and as the center warms slightly, the outside shell contracts too quickly. Ensure the balls are chilled in the refrigerator (not the freezer) for 60 minutes before dipping to maintain the temperature balance.
Can I use regular chocolate chips instead of melting wafers for these no-bake dessert bites?
While possible, using regular chocolate chips is discouraged. Chocolate chips contain stabilizers that prevent them from melting as smoothly as dipping wafers, often leading to a dull, matte finish or a coating that is too thick. If using chips, you must add 1-2 teaspoons of shortening or coconut oil to help them melt thin and shiny for better coating of the chocolate-covered Oreo bites.
Can I prepare the dough for these 3-Ingredient No-Bake Oreo Balls ahead of time?
Absolutely! The truffle dough can be mixed, rolled into balls, and stored on the parchment-lined baking sheet in the refrigerator for up to 3 days before dipping. This makes the recipe ideal for preparing in stages. Just remember to allow the balls to chill for at least an hour right before dipping, even if they have been refrigerated for days.
Conclusion: The Sweet Simplicity of 3-Ingredient No-Bake Oreo Balls
The journey to creating these irresistible 3-Ingredient No-Bake Oreo Balls is a testament to how often the simplest recipes yield the most spectacular results. We’ve covered every step, from ensuring your cream cheese is perfectly softened to mastering the chocolate dip, all to create dense, fudgy, and beautiful Oreo truffles that require absolutely zero oven time.
This recipe is more than just an easy dessert; it’s a time-saver, a crowd-pleaser, and a customizable canvas for all your flavor fantasies. Whether you opt for the classic dark chocolate shell, experiment with white chocolate, or introduce seasonal spices, the fundamental combination of crushed Oreos and cream cheese provides a reliable, decadent base every time. They are the perfect solution for urgent party needs, holiday gatherings, or simply when a deep chocolate craving strikes.
Don’t hesitate to make these your new go-to sweet treat. They store beautifully and are ready for snacking whenever you are. If you loved the ease of these simple treats, you might also enjoy making similar no-bake recipes, like 3-Ingredient Peanut Butter Balls, which offer the same level of preparation simplicity. Give these 3-Ingredient No-Bake Oreo Balls a try today, and prepare to be amazed by the deliciousness you can achieve with so little effort. Share your experience and tell us your favorite variations in the comments below!
3-Ingredient No-Bake Oreo Balls (Classic Chocolate Truffles)
Ingredients
Equipment
Method
- Open the package of Oreos. If desired, set aside a small handful of cookies to crush separately for decoration. Place the remaining Oreo cookies, including the cream filling, into a large food processor. Pulse until the cookies are finely ground into uniform, flour-like crumbs. Pour the crumbs into a large mixing bowl.
- Add the fully softened (room temperature) cream cheese directly to the bowl of Oreo crumbs. Using a sturdy spatula or an electric hand mixer on low, mix the crumbs and cream cheese together until a thick, uniform dark dough forms. Ensure there are no streaks of white cream cheese remaining.
- Use a small cookie scoop (about 1 tablespoon) to portion the mixture. Roll each portion firmly between your palms to form smooth balls. Place the balls onto a large baking sheet lined with parchment or wax paper. Chill the Oreo balls in the refrigerator for at least 60 minutes. This step is critical for successful dipping.
- Place the dipping chocolate in a microwave-safe bowl. Heat in the microwave in 30-second intervals, stirring thoroughly between each interval, until the chocolate is completely smooth and lump-free. If the chocolate seems too thick, stir in 1 teaspoon of coconut oil or shortening.
- Remove the chilled Oreo balls from the refrigerator. Using a dipping fork or two standard forks, carefully drop one ball into the melted chocolate, turning to coat completely. Lift the ball out and gently tap the fork on the edge of the bowl to remove excess chocolate.
- Return the dipped ball to the parchment-lined baking sheet. If decorating, immediately sprinkle the wet chocolate coating with the reserved Oreo crumbs or sprinkles. Repeat the process with all remaining Oreo balls.
- Allow the dipped balls to set completely at room temperature or place the baking sheet back into the refrigerator for 15–20 minutes until the chocolate shell is firm to the touch. Store the finished Oreo balls in an airtight container in the refrigerator for up to 1 week.