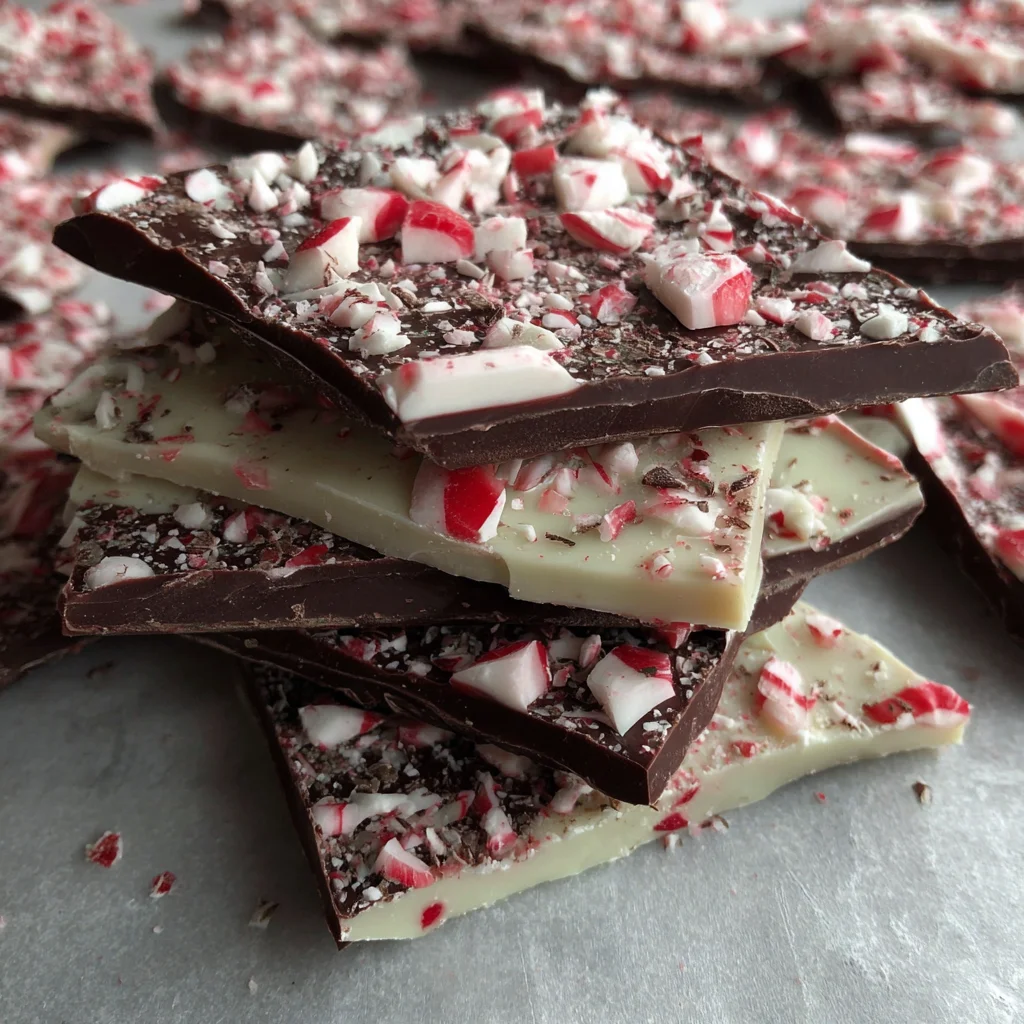
There is no confection that screams “holiday cheer” quite like classic homemade Peppermint Bark. This iconic dessert is a symphony of textures and temperatures: the satisfying snap of two decadent chocolate layers rich dark and creamy white followed by the cool, invigorating crunch of crushed peppermint candy canes. Whether you’re searching for the perfect edible gift, a show-stopping addition to your holiday dessert table, or simply a comforting treat to enjoy during a cozy winter evening, this recipe for Peppermint Bark delivers perfection every single time. It requires minimal baking skill, just careful attention to melting chocolate, making it an ideal project for even novice candy makers. If you’ve ever paid a premium price for gourmet, store-bought Peppermint Bark, prepare to be amazed by how easy and economical it is to create an even better version right in your own kitchen.
Making your own Peppermint Bark transforms simple ingredients into a dazzling masterpiece. It’s an edible tradition that brings smiles to faces young and old, capturing the essence of the festive season in a single, refreshing bite. We’re going to walk through every essential step, from choosing the right chocolate to achieving that professional-grade snap, ensuring your homemade Peppermint Bark is the star of your holiday season.
Why You’ll Absolutely Love Crafting This Peppermint Bark Recipe
The appeal of creating your own chocolate confections goes far beyond simple economics; it’s about quality, control, and the sheer joy of gifting something truly handmade. This specific Peppermint Bark recipe stands out because it balances complexity with simplicity, yielding a result that far surpasses anything you might find pre-packaged. You control the ratio of dark chocolate to white chocolate, the intensity of the peppermint, and the density of the candy cane crunch all tailored precisely to your preferences.
One of the primary reasons this Peppermint Bark is beloved is its incredible texture contrast. We start with a foundation of high-quality dark chocolate, providing a deep, slightly bitter counterpoint to the sweet, milky white chocolate layered above it. The addition of a small amount of coconut oil (or shortening) in the dark chocolate layer is a subtle trick that ensures a smooth, glossy finish and a satisfying, clean snap when the bark is broken. This small step significantly elevates the final product, preventing the dark chocolate from becoming brittle or powdery.
The ease of preparation is another huge selling point. Unlike fussy cookies or cakes that require precise temperature regulation and extensive cleanup, Peppermint Bark is a no-bake wonder. The entire process, from crushing the candy canes to chilling the finished slab, can be completed in under two hours, with most of that time being hands-off chilling. This makes it an ideal last-minute gift or party addition when the holiday schedule gets hectic.
Furthermore, the aroma that fills your kitchen while making this Peppermint Bark is pure holiday magic. The scent of melting chocolate combined with the bright, cool fragrance of peppermint is deeply nostalgic and instantly festive. It’s an immersive culinary experience that engages all your senses. When guests or gift recipients see and taste the vibrant contrast of the rich brown chocolate, the crisp white layer, and the sparkling red crushed candy, they immediately recognize the effort and love put into this classic Christmas confection. This homemade Peppermint Bark isn’t just a dessert; it’s an edible invitation to celebrate the season. It’s rich, cooling, crunchy, and beautifully dramatic everything a holiday treat should be.
The Sensory Experience of Perfect Peppermint Bark
A successful batch of Peppermint Bark is defined by a flawless sensory profile. Visually, the stark contrast between the dark and white layers, dotted with shimmering red and white peppermint shards, is captivating. The sound is perhaps the most exciting part: the definitive “snap” when you break or cut the chilled slab confirms that your chocolate has set perfectly a true sign of quality.
But it’s the taste that cements its status as a holiday essential. The slightly bitter notes of the dark chocolate melt first, coating your palate, followed by the creamy, vanilla sweetness of the white chocolate, which carries the bright, cool essence of the peppermint extract. Finally, the sugary crunch of the candy canes provides textural excitement and a final burst of intense mint flavor. This layered complexity is what makes homemade Peppermint Bark so addictive and such a beloved tradition across the globe. You are creating a professional-grade confection without needing any specialized training.
Why You Should Try Making Homemade Peppermint Bark This Year
While holiday schedules are often packed, dedicating a small amount of time to make homemade Peppermint Bark offers tremendous rewards that transcend simply having a treat to eat. This process allows you to take full control over the ingredients, ensuring a premium taste and quality that mass-produced versions simply cannot match. When you make your own Peppermint Bark, you are choosing the specific type of dark and white chocolate, often opting for higher cocoa content or ethically sourced brands, which dramatically impacts the depth of flavor.
Furthermore, this recipe is a fantastic vehicle for creating memorable holiday traditions. Involving family members, especially children, in the crushing of the candy canes (a wonderful, stress-relieving activity!) or the sprinkling of the toppings can become an annual ritual everyone looks forward to. The entire endeavor fosters connection and creativity during a time when simple, shared activities are highly valued.
From a culinary perspective, mastering this simple two-layer chocolate technique builds confidence. Dealing with the nuances of melting chocolate particularly sensitive white chocolate is a fundamental skill in confectionery. Successfully creating a glossy, smooth, and perfectly set slab of Peppermint Bark is a satisfying accomplishment that encourages you to try more complex dessert projects in the future, like perhaps making Christmas Fudge next.
Gifting is another compelling reason to choose homemade Peppermint Bark. Beautifully packaged in cellophane bags or small decorative tins, this treat makes an incredibly thoughtful and professional-looking present. Because it holds up well at room temperature and is shelf-stable for weeks, it’s perfect for mailing or delivering to neighbors, teachers, and colleagues. The high cost of gourmet, store-bought versions makes your homemade effort even more appreciated. You can produce a large batch of stunning, custom-quality candy for a fraction of the price of purchasing a small, specialized box.
Finally, this recipe is inherently forgiving. If your spreading isn’t perfectly neat, or if your edges are a bit uneven, it doesn’t matter! The rugged, broken nature of the final bark piece is part of its charm. There is no need for perfect precision, just enthusiasm and good ingredients. This combination of impressive results with an easy process is why homemade Peppermint Bark remains a timeless and essential holiday favorite. Don’t wait until the last minute; start your Peppermint Bark tradition this year.
Controlling the Quality: The Key to Great Peppermint Bark
The defining characteristic of superior Peppermint Bark is the quality of its components. When you buy commercial bark, you often get compound chocolate (which contains vegetable oils instead of cocoa butter) and artificial flavorings. By contrast, this recipe mandates good quality chocolate. Good quality chocolate ensures a lower melting point, a creamier mouthfeel, and a richer flavor profile. The better the chocolate, the better the final snap and shine of your Peppermint Bark. Choosing good cocoa butter-based white chocolate is especially crucial, as poor quality white chocolate is highly prone to seizing and developing a grainy texture when heated.
The freshness of the peppermint extract also matters significantly. A pure, clean peppermint extract will provide that signature refreshing zing without the artificial aftertaste sometimes found in lower-quality versions. By investing slightly more in your ingredients, you ensure that every piece of your homemade Peppermint Bark is a truly gourmet experience worthy of the holiday table.
Ingredients and Essential Tools for Perfect Peppermint Bark
Success in making excellent Peppermint Bark hinges on both the quality of your ingredients and the preparation of your equipment. Here is a detailed breakdown of what you need and why it matters, ensuring you are prepared before you even start melting the chocolate.
The Classic Peppermint Bark Ingredients
Achieving the perfect flavor requires specific quantities and careful choices, particularly regarding the chocolate and the flavoring.
- 16 ounces (about 2 2/3 cups) Good Quality Dark Chocolate or Semi-Sweet Chocolate: This forms the essential base layer. Choose chocolate that is 60% cacao or higher for a robust flavor that cuts through the sweetness of the white chocolate and candy canes. Chocolate chips are convenient, but finely chopped bar chocolate (couverture) or feves will melt more smoothly and provide a better final texture.
- 1 tablespoon solid Coconut Oil or Vegetable Shortening (Optional): This addition is highly recommended, especially if you are not tempering your chocolate. It adds a touch of fat that helps the chocolate melt into a thinner, smoother consistency, making it easier to spread thinly and providing that desirable, clean “snap.”
- 24 ounces (about 4 cups) Good Quality White Chocolate: White chocolate is the sensitive star of the top layer. Since it lacks cocoa solids, it burns easily and seizes when exposed to too much heat or moisture. Invest in high-quality white chocolate (made with real cocoa butter, not just palm kernel oil) for the best results. The quantity difference (24 oz vs. 16 oz dark) ensures a visible, creamy top layer that provides contrast.
- 1/2 teaspoon pure Peppermint Extract: This is crucial for flavor. Always use pure extract, not essential oil. Peppermint oil is too concentrated and can cause the delicate white chocolate to “seize” instantly (turn grainy and hard) because oils and cocoa butter do not mix well in that concentration. Extract is diluted and safe for use in chocolate.
- 1 1/2 cups crushed Peppermint Candy Canes or Hard Peppermint Candies: This provides the signature crunch and vibrant color. This quantity equates to roughly 12 to 15 standard-sized candy canes. It is vital to crush them into a mix of small powder and medium shards for both maximum adherence and visual appeal.
Essential Tools for Peppermint Bark Success
While this recipe is simple, using the right tools ensures smooth execution and professional results.
1. The Baking Sheet and Liner:
- Large Baking Sheet (10×15 inches minimum): A large surface allows you to spread the chocolate thinly, which is key to excellent Peppermint Bark.
- Parchment Paper or Silicone Baking Mat: This is non-negotiable. It prevents the sticky, set chocolate from adhering to the pan and makes removing the large slab effortless. Ensure the paper overhangs the edges slightly to act as handles.
2. Melting Vessels:
- Two Large, Heat-Proof Bowls (Glass or Metal): You need separate, perfectly dry bowls for the dark and white chocolate to prevent cross-contamination or moisture introduction.
- Saucepan (for Double Boiler Method): If you choose to use the double boiler (bain-marie) method, use a saucepan with 1-2 inches of water. Ensure the water is simmering gently, not boiling vigorously, and that the bottom of the bowl does not touch the water. Steam, not boiling water, should melt the chocolate. This method is often safer for white chocolate.
- Microwave (Alternative Melting Method): If using the microwave, ensure your bowls are microwave-safe.
3. Spreading and Crushing Tools:
- Sturdy Zip-Top Bag: Essential for crushing the candy canes. Use a high-quality, freezer-grade bag to prevent tears.
- Rolling Pin, Meat Tenderizer, or Heavy Pan: Needed to effectively crush the peppermint candies.
- Offset Spatula or Rubber Spatula: An offset spatula is ideal for smoothly and evenly spreading the melted chocolate layers. Its flat, thin blade minimizes streaks and uneven thickness, crucial for the satisfying snap of the finished Peppermint Bark.
4. Measuring and Finishing Tools:
- Measuring Spoons/Cups: For accurate ingredient measurement.
- Sharp Chef’s Knife or Cleaver: For cutting the finished bark, especially if you desire cleaner edges instead of rustic breaks.
Gathering these tools and ingredients beforehand, especially focusing on high-quality chocolate and using the extract instead of oil, sets the foundation for a flawless batch of classic Peppermint Bark. Now we move onto the technique.
Detailed Recipe Steps: Creating Perfect Layered Peppermint Bark
Follow these instructions precisely to ensure both chocolate layers melt smoothly, adhere properly, and result in that signature crisp snap that defines premium Peppermint Bark.
Step 1: Prepare the Work Surface and Crush the Candy Canes
Preparation is key to working quickly with chocolate.
- Line the Pan: Line a large baking sheet (10×15 inches or larger) with parchment paper or a silicone mat. Allow the lining to extend over the sides; these flaps will act as handles for easy removal later.
- The Crunch Factor: Place the 1 1/2 cups of peppermint candy canes into a heavy-duty, zip-top freezer bag. Double-bagging is recommended to prevent puncture tears.
- Smash Time: Using a rolling pin, meat tenderizer, or the flat bottom of a heavy skillet, carefully smash the candies. The goal is not fine powder, but a mixture of fine powder (which helps it stick) and medium-sized shards (for the crunch). Set the crushed candy aside in a small bowl.
Step 2: Melting the Dark Chocolate Layer (The Base)
The dark chocolate layer is more forgiving, but temperature control is still essential.
- Combine the 16 ounces of dark chocolate (chips, feves, or chopped) and the optional 1 tablespoon of coconut oil or shortening in a dry, heat-proof bowl.
- Microwave Method: Heat in 30-second intervals. After each burst, stir thoroughly, scraping down the sides. Continue until the chocolate is mostly melted, with just a few tiny lumps remaining. Remove from the microwave and stir vigorously until the residual heat dissolves the final lumps. Avoid overheating, which can cause scorching or separation.
- Double Boiler Method: Place the bowl over a saucepan of gently simmering water. Stir constantly and remove the bowl immediately once the chocolate is smooth and glossy.
- Tip: Aim for a temperature around 90°F (32°C). This is the ideal temperature for spreading and achieving a good “snap.”
Step 3: Spread and Set the Dark Layer
Speed is important here to ensure the dark chocolate doesn’t set unevenly before spreading.
- Pour the melted dark chocolate onto the center of the prepared baking sheet.
- Use an offset spatula or the back of a spoon to quickly spread the chocolate into a thin, even layer, approximately 1/8 to 1/4 inch thick. Try to maintain a rectangular or square shape, covering most of the parchment paper.
- Transfer the baking sheet to the refrigerator immediately. Chill for 20 to 30 minutes. Crucially, the layer must be firm and cool to the touch. If it’s sticky or soft, the warm white chocolate will melt into it, causing muddy layers.
Step 4: Melting and Flavoring the White Chocolate (The Sensitive Layer)
White chocolate requires far more gentle handling.
- Place the 24 ounces of white chocolate in a separate, clean, and completely dry bowl. Any residual moisture will cause seizing.
- Melting Gently: Use the double boiler method over very low heat, stirring continuously, or use the microwave in very short 15-second bursts, stirring extensively between each burst.
- Stop Heating Early: Remove the white chocolate from the heat source when it is about 75% melted. Continue stirring off-heat until the remaining lumps dissolve. This prevents scorching and ensures a smooth finish.
- Flavoring: Once fully smooth, stir in the 1/2 teaspoon of pure peppermint extract. Mix until completely incorporated.
Step 5: Assemble and Top the Classic Peppermint Bark
Work quickly! The cold dark chocolate base will accelerate the setting process of the white chocolate.
- Remove the chilled dark chocolate layer from the refrigerator.
- Pour the melted, flavored white chocolate over the solidified dark layer.
- Using a clean offset spatula, spread the white chocolate evenly across the dark layer, working from the center outward. Ensure the thickness is roughly equal to the dark layer.
- Immediate Topping: Immediately and generously sprinkle the reserved crushed candy canes over the entire surface of the wet white chocolate.
- Press to Adhere: Gently press the peppermint pieces into the white chocolate with your fingertips or the back of a spatula. This ensures they stick firmly when the chocolate sets.
Step 6: Final Chill and Breaking the Peppermint Bark
Patience now yields the perfect snap later.
- Return the baking sheet to the refrigerator and chill for a minimum of 1 to 2 hours, or until the entire slab is rock hard.
- Remove the hardened Peppermint Bark from the refrigerator. Lift the entire slab using the parchment paper handles and place it on a sturdy cutting board.
- Carefully peel the parchment paper away from the bottom of the chocolate.
- Breaking or Cutting: For a rustic, traditional look, simply use your hands to break the slab into irregular, bite-sized pieces. For neater presentation (ideal for gifting), use a large, sharp knife and press down firmly (do not saw) to cut the bark into squares or diamonds.
Store your finished Peppermint Bark in an airtight container at cool room temperature (ideally below 70°F) for up to 2 weeks, or in the refrigerator for longer storage. This robust layering process guarantees delicious, professional-grade Peppermint Bark every time.
Tips, Variations, and Troubleshooting for Peppermint Bark
Even the simplest chocolate recipes can encounter hiccups. Here are some essential tips for avoiding common mistakes and fun ideas for variations on your classic Peppermint Bark.
Troubleshooting Common Peppermint Bark Problems
1. Why is my Chocolate Grainy (Seized)?
Chocolate seizes when even a tiny amount of liquid (water, steam, or sometimes too much extract/oil) is introduced during melting, or if it is overheated. White chocolate is the most susceptible.
Fix: If you catch it early, sometimes stirring in a teaspoon of the specified oil (coconut or shortening) can emulsify the mixture and bring it back, though this is rare.
Prevention: Ensure all your bowls, spatulas, and tools are bone dry. Use low, indirect heat (especially for the white chocolate). Do not substitute peppermint oil for extract.
2. My Layers Blended Together. Why?
This happens because the base layer wasn’t fully chilled when the second layer was applied.
Fix: There’s no easy fix once they are blended, but the Peppermint Bark will still taste delicious!
Prevention: The dark chocolate layer must be firm and cool (not freezing, but definitely not soft) before applying the warm white chocolate. The temperature difference helps them set cleanly.
3. The Bark is Too Soft, Not Snappy.
This usually means the chocolate was overheated, or you used low-quality chocolate that contains stabilizers, which prevent a crisp snap.
Fix: Ensure the Peppermint Bark is thoroughly chilled before breaking. Store it slightly cooler than room temperature.
Prevention: Use good quality chocolate designed for melting (couverture or chips intended for baking). The optional coconut oil helps, but too much oil/shortening can also reduce the snap.
Peppermint Bark Variations for Every Diet
This recipe is highly adaptable, allowing you to cater to various dietary needs or simply experiment with new flavors.
- Vegan Peppermint Bark: Replace both the dark and white chocolate with high-quality, dairy-free versions. Several brands offer excellent vegan white chocolate made with coconut or rice milk solids. Ensure your candy canes are naturally colored and vegan (some contain gelatin or animal-derived coloring).
- Gluten-Free: This recipe is naturally gluten-free, provided your chocolate and candy canes do not contain cross-contamination warnings.
- Triple Chocolate Bark: Add a layer of milk chocolate between the dark and white layers for a richer, sweeter flavor profile. Ensure the milk chocolate layer is chilled before adding the white chocolate.
- Salted Peppermint Bark: Sprinkle a few flakes of sea salt (Maldon is excellent) over the white chocolate before adding the candy canes. The salt dramatically enhances the dark chocolate notes and cuts the sweetness.
- Non-Peppermint Bark: Swap the peppermint extract for 1 teaspoon of pure vanilla extract and use crushed Oreos or sprinkles instead of candy canes. This creates a delicious, versatile two-layer cookie bark.
For more holiday treat inspiration and visual guides on gift packaging ideas, you can always check out related recipes on my Pinterest board, such as Holiday Treats and Desserts. Learning to master the technique of layering chocolate opens the door to so many possibilities!
Consider making a batch of peppermint chocolate chip cookies or pumpkin fudge as well, which complements the clean mint flavor of the Peppermint Bark beautifully.
Nutritional Values and Benefits of Homemade Peppermint Bark
While Peppermint Bark is undeniably a dessert a delightful indulgence meant for celebration it does offer some surprising nutritional benefits, especially when using high-quality dark chocolate.
Estimated Nutritional Breakdown (Per 1 oz Serving)
Since the exact nutritional content depends heavily on the specific brand of chocolate and the thickness of the layers, these figures are estimates based on standard recipe parameters. A 1-ounce serving (approximately 2-3 pieces of bark) generally contains:
- Calories: 150 – 180 kcal
- Total Fat: 9g – 12g (dependent on cocoa butter content)
- Saturated Fat: 5g – 7g
- Carbohydrates: 15g – 20g (primarily from sugar in the candy canes and chocolate)
- Sugar: 12g – 17g
- Protein: 1g – 2g
As a holiday treat, Peppermint Bark should be enjoyed in moderation, recognizing it is dense in calories and sugar. However, crafting it at home ensures you are avoiding unnecessary additives and preservatives often found in commercial candies.
The Unsung Benefits of Dark Chocolate
The dark chocolate layer in this Peppermint Bark recipe contributes more than just rich flavor; it offers genuine health benefits, provided you choose a high-quality product (60% cocoa or higher).
- Antioxidant Power: Dark chocolate is packed with powerful antioxidants, including flavonoids and polyphenols. These compounds help combat free radicals in the body, potentially reducing inflammation. By including a robust dark chocolate layer, you are boosting the antioxidant profile of the entire bark.
- Mineral Content: Quality dark chocolate is a good source of essential minerals like iron, magnesium, copper, and manganese. Magnesium, in particular, is vital for muscle and nerve function, and many people are deficient.
- Mood Booster: Chocolate contains compounds like tryptophan and phenylethylamine, which are associated with the production of feel-good chemicals in the brain. Enjoying a small piece of dark chocolate Peppermint Bark can genuinely contribute to a sense of well-being.
- Heart Health: Studies suggest that the compounds in dark chocolate can improve blood flow and lower blood pressure, contributing to overall cardiovascular health when consumed moderately.
The Benefits of Peppermint
The crushed candy canes and extract add the iconic cooling flavor, but peppermint itself carries certain benefits:
- Digestive Aid: Peppermint is traditionally known to soothe the digestive tract. The menthol in peppermint can help relieve mild indigestion and bloating a welcome attribute after a large holiday meal.
- Stress Relief: The aroma of peppermint is often cited in aromatherapy for its ability to reduce stress and anxiety, offering a calming, yet invigorating effect.
Ultimately, while Peppermint Bark is a celebratory dessert, choosing high-quality ingredients allows you to maximize the flavor while still benefiting from the inherent qualities of rich, antioxidant-laden dark chocolate.
Frequently Asked Questions About Homemade Peppermint Bark
If you’re making Peppermint Bark for the first time, you might have a few questions about storage, ingredients, and ensuring the perfect final product. Here are answers to some of the most common inquiries related to this holiday favorite.
How long does homemade Peppermint Bark last, and how should I store it?
Homemade Peppermint Bark will last remarkably well due to its low moisture content. Stored in an airtight container at cool room temperature (below 70°F), it remains fresh for up to two weeks. If stored in the refrigerator, it can last for 3 to 4 weeks, but ensure the container is tightly sealed to prevent the chocolate from absorbing odors or moisture.
Can I use colored sugar instead of crushing candy canes for my Peppermint Bark?
While you could use red or green sanding sugar for color, you would lose the signature crunch and intense flavor that the crushed candy canes provide. The coarse texture of the candy canes is essential to the authentic experience of Peppermint Bark. If you only use sanding sugar, you should add a few extra drops of peppermint extract to boost the mint flavor, as the sugar itself is purely decorative.
Why did my white chocolate seize (turn hard and grainy) when I added the peppermint flavor?
Chocolate seized because of the introduction of liquid or steam. In this context, it often happens when switching from pure peppermint extract (which is alcohol-based) to potent peppermint essential oil. Peppermint oil, despite being called “oil,” does not emulsify with cocoa butter and causes the chocolate solids to clump instantly. Always use the specified pure peppermint extract and ensure your bowl is completely dry.
Is it necessary to use a double boiler, or can I exclusively use the microwave for melting the chocolate for the Peppermint Bark?
You can definitely use the microwave for both the dark and white chocolate layers, but you must be extremely cautious with the white chocolate. Microwaving in very short bursts (15 seconds or less) and stirring extensively off-heat is essential to prevent burning or seizing. The double boiler method is often preferred for white chocolate as it provides more gentle, even heat distribution.
Can I freeze homemade Peppermint Bark?
Yes, Peppermint Bark freezes very well, making it excellent for advanced preparation. Place the broken pieces in a freezer-safe, airtight container, separating layers with parchment paper. To thaw, move the container to the refrigerator overnight, and then bring it to room temperature (while still sealed) before opening. This gradual warming prevents condensation, which can ruin the texture.
What is the secret to getting a glossy finish on the dark chocolate layer?
A glossy finish usually indicates the chocolate has been successfully tempered or, in this easier recipe, that high-quality chocolate was melted slowly and gently. The optional tablespoon of coconut oil or vegetable shortening listed in the ingredients helps achieve this sheen and a clean snap without requiring the technical difficulty of traditional tempering methods.
Conclusion: The Magic of Homemade Peppermint Bark
Creating your own classic Peppermint Bark is one of the most rewarding and easiest ways to participate in the culinary magic of the holiday season. We’ve covered every detail, from selecting premium dark and white chocolate to the careful art of layering and the satisfying crunch of perfectly crushed candy canes. This recipe is more than just instructions; it’s a blueprint for generating holiday happiness, resulting in a treat that is vastly superior in taste and texture to anything available commercially.
Remember the key takeaways: choose quality ingredients, handle the sensitive white chocolate gently using low heat, ensure the dark layer is completely set before layering the white chocolate, and always use pure peppermint extract. The resulting two-tone confection, rich with cocoa and bright with mint, makes for an unforgettable edible gift or a delightful addition to your own festive spread. Whether you break it into rustic chunks or cut it into neat squares, your homemade Peppermint Bark embodies the crisp, cool spirit of winter and the warmth of a handmade holiday.
We encourage you to try this recipe this year and perhaps start a new tradition. Share the love (and the crunch!) with your friends and family. If you enjoyed crafting this simple yet sophisticated candy, be sure to explore our other festive recipes, such as our guide to making Old-Fashioned Peanut Butter Fudge or the process for perfect Classic Christmas Toffee. Happy candy making!
CLASSIC HOMEMADE PEPPERMINT BARK
Ingredients
Equipment
Method
- Line a large baking sheet (approximately 10x15 inches or similar) with parchment paper or a silicone baking mat. Ensure the lining extends over the sides to make removing the finished bark easier. Set the prepared pan aside.
- Place the peppermint candy canes into a heavy-duty zip-top bag. Seal the bag, pressing out as much air as possible. Using a rolling pin, a meat tenderizer, or the bottom of a heavy pan, carefully smash the candies until they are crushed into a mixture of small and medium-sized pieces. Set the crushed candy aside in a small bowl.
- Combine the dark chocolate and the optional coconut oil or shortening in a large, heat-proof bowl. Melt the chocolate using a microwave (heating in 30-second intervals and stirring) or a double boiler over simmering water until smooth and only a few tiny lumps remain. Stir vigorously until those last lumps dissolve from the residual heat.
- Pour the melted dark chocolate onto the center of the prepared baking sheet. Use a spatula or offset knife to spread the chocolate evenly into a thin layer, approximately 1/8 to 1/4 inch thick, covering the entire surface or creating a large rectangle shape.
- Transfer the baking sheet to the refrigerator and chill the dark chocolate for approximately 20 to 30 minutes, or until the layer is completely set and firm to the touch. This step is crucial before adding the white chocolate layer.
- Place the white chocolate into a clean, dry, heat-proof bowl. Melt the white chocolate using the microwave in shorter 15-second bursts or a double boiler over very low heat, stirring frequently. Once the white chocolate is nearly smooth, remove it from the heat source and stir in the 1/2 teaspoon of peppermint extract until the mixture is fully incorporated and smooth.
- Pour the melted white chocolate over the solidified dark chocolate layer. Quickly spread the white chocolate evenly over the dark chocolate using a spatula or offset knife. Work fast, as the cold dark chocolate will cause the white chocolate to set quickly.
- Immediately and generously sprinkle the reserved crushed candy canes over the top of the wet white chocolate layer. Gently press the peppermint pieces into the white chocolate with the back of a spoon or your fingertips to ensure they adhere firmly.
- Return the baking sheet to the refrigerator and chill for at least 1 to 2 hours, or until both layers of the peppermint bark are completely firm and solid. The chocolate must be rigid before breaking.
- Remove the bark from the refrigerator. Lift the entire slab of bark off the baking sheet using the parchment paper lining and place it on a cutting board. Peel the parchment paper away from the bottom. Use a large, sharp knife to cut the bark into squares, or simply use your hands to break the chocolate slab into irregular, bite-sized pieces.