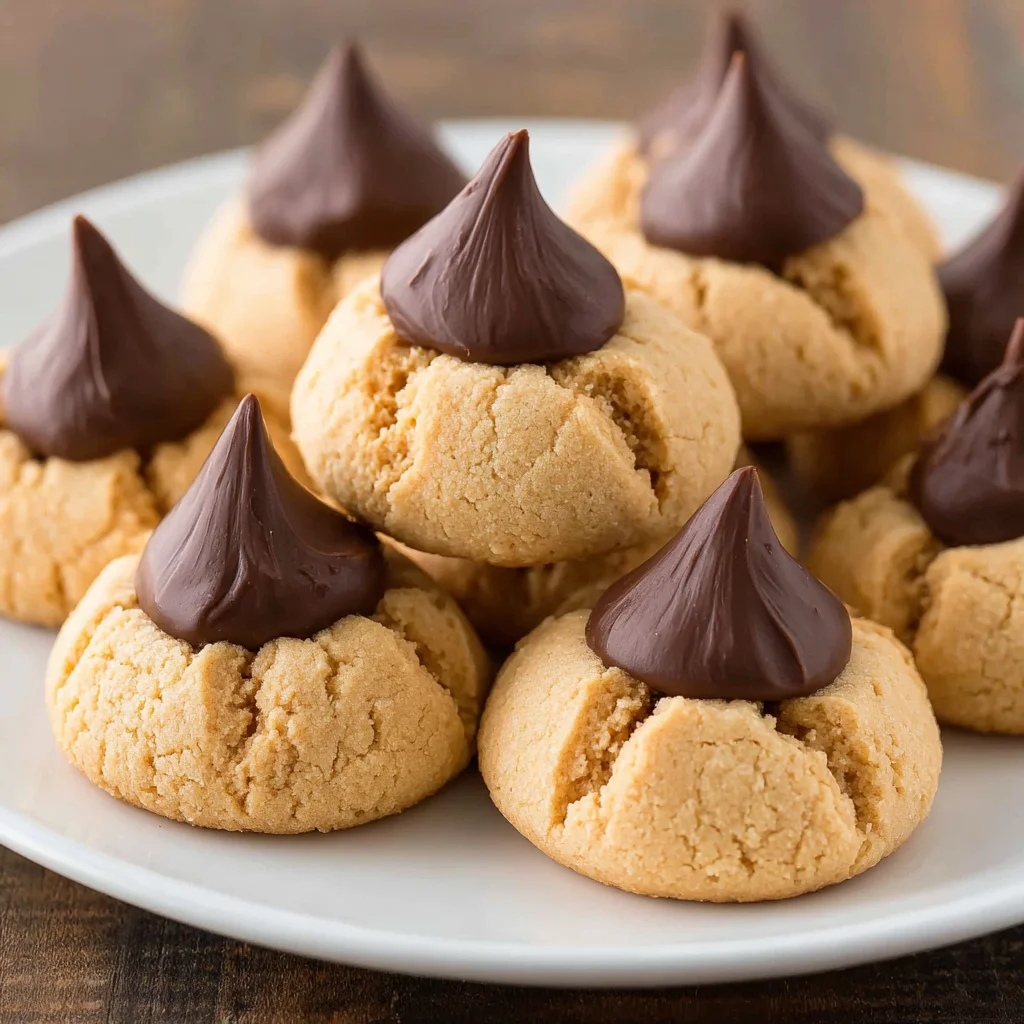
There are few cookies that evoke the sheer nostalgia and warmth of holiday baking quite like the Peanut Butter Blossom. That unmistakable combination of a tender, rich peanut butter cookie base, rolled in glittering sugar, crowned with a soft, melted milk chocolate candy kiss it’s pure magic. But achieving that perfect balance a cookie that is soft, chewy, yet stable enough to hold its chocolate hat without crumbling requires more than just a basic recipe. It demands a commitment to precision. Welcome to the ultimate guide to making truly Perfect Peanut Butter Blossoms. This isn’t just another set of instructions; this is the definitive recipe designed to guarantee soft, crackled edges and a heavenly melt-in-your-mouth experience every single time.
For generations, these delightful peanut butter kiss cookies have graced cookie trays, holiday parties, and school lunchboxes, standing as a testament to the simple power of combining two beloved flavors: peanuts and chocolate. While the concept is straightforward, the execution can sometimes lead to dry, flat, or overly crumbly cookies. Our method focuses on key ratios of wet to dry ingredients, temperature control, and the critical timing of adding the chocolate kiss, ensuring your cookies achieve that signature texture and look. If you are ready to elevate your baking skills and produce batch after batch of the most irresistibly soft peanut butter cookies you’ve ever tasted, you are in the right place. Get your stand mixer ready; we are about to unlock the secret to bakery-quality Perfect Peanut Butter Blossoms.
Why You’ll Love This Perfect Peanut Butter Blossoms Recipe
This recipe transcends the typical standard for peanut butter blossom cookies, offering several compelling reasons why it will immediately become your family’s favorite version. We focus on optimizing the texture, balancing the sweetness, and ensuring maximum peanut flavor, delivering a superior cookie experience that leaves those dry, cakey alternatives far behind.
Unbeatable Texture: Soft, Chewy, and Perfectly Cracked
The hallmark of a great peanut butter blossom is its texture. This recipe delivers a cookie that is inherently soft and delightfully chewy, thanks to the perfect balance of fats and sugars, particularly the inclusion of brown sugar. Brown sugar introduces moisture and a slight acidity that keeps the cookies from drying out during the baking process. When you bite into one of these, you’ll notice the delicate crackle on the surface, a result of rolling the dough in granulated sugar before baking. This sugary coating crystalizes, providing a beautiful aesthetic contrast and a wonderful, subtle crunch before you reach the moist, tender interior. The texture contrast with the smooth, slightly molten chocolate kiss is unparalleled, making these soft peanut butter cookies truly addictive.
The Ideal Salty-Sweet Balance
Peanut butter, by its nature, provides a savory element that prevents the cookie from becoming cloyingly sweet. Our specific measurements of salt and sugars are calibrated to enhance that natural salty profile of the peanut butter, making the sweetness of the chocolate kiss even more pronounced and satisfying. This delicate interplay between salty, sweet, nutty, and rich is what defines the flavor profile of the Perfect Peanut Butter Blossoms. They are equally satisfying to both those who prefer a classic, hearty cookie and those who crave a chocolatey indulgence.
Nostalgia and Festive Charm
For many, the sight of a Peanut Butter Blossom signals the start of the holiday season or a comforting memory from childhood. These cookies are intrinsically linked to warmth, tradition, and gathering. Baking a batch fills your home with the comforting aroma of roasted peanuts and sweet vanilla, instantly boosting morale. They are universally loved and hold tremendous curb appeal on any dessert platter, making them a fantastic choice for potlucks, gifts, and, especially, Christmas cookie swaps. When you present a tray of these shiny, sugar-dusted treats, you are sharing a piece of edible nostalgia that everyone appreciates.
A Simple, Yet Satisfying Baking Project
While the result tastes complex and professional, the process of making Perfect Peanut Butter Blossoms is straightforward and requires minimal specialized technique. It’s a classic cream-and-mix method that is accessible even to beginner bakers. We utilize standard pantry staples, and the only “trick” is the precise timing of adding the chocolate kiss a step we guide you through flawlessly. If you are looking for a reliable recipe that guarantees success and minimizes stress in the kitchen, this guide to making these classic peanut butter kiss cookies is exactly what you need.
Whether you are tackling a marathon baking session or just need a quick weeknight treat, the dependable nature and incredible payoff of this recipe will make you fall in love with baking all over again. They offer the joy of homemade baking with the reliability of a foolproof formula.
Why You Should Try This Recipe for Classic Peanut Butter Blossoms Today
If your cookie repertoire currently features other standard favorites, such as classic chocolate chip cookies or intricate fudge recipes, adding the Perfect Peanut Butter Blossoms to your rotation is a necessity. They offer a unique textural and flavor experience that sets them apart. Here is why you shouldn’t delay in whipping up a batch of these glorious peanut butter kiss cookies.
They are a Tested, Foolproof Formula for Success
This isn’t just a recipe cobbled together; it’s a meticulously balanced formula that accounts for common baking variables. We address issues like cookie spread (too much) or dryness (too little moisture) by fine-tuning the ratios of flour, butter, and peanut butter. Unlike some recipes that call for minimal fat, sacrificing flavor for structure, our formula uses a healthy amount of both butter and peanut butter to ensure a deep, rich flavor and a beautifully tender crumb. The combination of baking soda and egg acts as the perfect leavening and binding agents, ensuring each cookie rises slightly and forms those desirable cracks without becoming cakey.
The Perfect Year-Round Dessert
While often associated with winter holidays, the combination of peanut butter and chocolate is a flavor pairing that never goes out of style. These cookies are hardy enough for summer picnics yet comforting enough for cozy fall evenings. Their structure makes them excellent for transporting, and they freeze beautifully, meaning you can always have a stash of these delightful treats ready for unexpected guests or sudden cravings. If you need inspiration for other equally satisfying seasonal treats, check out our guide to Christmas Thumbprint Cookies for more festive baking ideas.
Superior Peanut Butter Flavor Density
Some peanut butter cookie recipes taste primarily of sugar and butter with a hint of peanut. Our recipe ensures that the robust, nutty flavor of the peanut butter is the star. By incorporating a full half-cup of creamy peanut butter alongside the butter, we maximize the essential peanut profile. This concentration of flavor means that even a small cookie delivers a huge, satisfying burst of pure peanut goodness, perfectly complemented by the creamy melt of the chocolate kiss pressed into the top.
A Fun, Hands-On Activity for All Ages
Making Perfect Peanut Butter Blossoms involves several simple, tactile steps that make it a fantastic family activity. Kids love creaming the butter and sugar, rolling the dough balls in the sugar coating (which results in beautifully shimmering cookies), and, most importantly, pressing those little chocolate kisses into the warm baked cookies. This final step is crucial and provides instant gratification, transforming a simple baked round into the iconic “blossom” shape we all recognize and love. It’s a recipe that creates delicious memories as well as delicious food.
Don’t settle for mediocre cookie tray fillers. Choose the recipe that delivers on its promise of perfection. When you make these classic peanut butter kiss cookies, you are investing in a proven success story that will impress everyone who tries them. Their irresistible texture and balanced flavor make them a staple, not just an occasional treat.
Ingredients and Essential Tools for Perfect Peanut Butter Blossoms
To achieve the soft, chewy texture and the rich, nutty flavor that defines truly Perfect Peanut Butter Blossoms, ingredient quality and accurate measurements are key. We are using standard pantry items, but paying attention to their state (like softened butter) is critical for emulsification and dough consistency. This section details the precise ingredients needed and the indispensable tools that ensure your baking is a success.
Detailed Ingredient List (For the Cookies)
Achieving the ideal cookie texture relies heavily on the quality and temperature of your fats. Please ensure your butter and egg are at true room temperature before starting.
- 1/2 cup (1 stick) unsalted butter, softened: Using unsalted butter allows you to control the salt level precisely. Softened butter (not melted!) is vital for successfully creaming with the sugars, which creates air pockets that lead to a light, tender cookie.
- 1/2 cup granulated sugar: Provides sweetness and helps with the creaming process. This sugar contributes to the crispness on the exterior edges.
- 1/2 cup packed light brown sugar: This is a key ingredient for moisture and chewiness. Brown sugar contains molasses, which not only adds a deeper flavor note but also keeps the final cookie soft and fudgy rather than dry and cakey.
- 1/2 cup creamy peanut butter: We strongly recommend using conventional, processed creamy peanut butter (like Jif or Skippy) over natural-style peanut butter. Natural peanut butter often separates oil, which can drastically alter the fat ratio in the dough, leading to flat, greasy cookies. Ensure it is at room temperature for easy blending.
- 1 large egg: The binder that holds the structure together and contributes moisture. Ensure it is also at room temperature so it incorporates smoothly into the creamed mixture without curdling the fats.
- 1 teaspoon vanilla extract: A flavor enhancer that complements the peanut butter and chocolate beautifully. Use pure vanilla extract for the best flavor.
- 1 3/4 cups all-purpose flour: Measured using the spoon-and-level method (spoon the flour into the measuring cup, then level off the top). Over-measuring flour is the number one cause of dry, crumbly peanut butter cookies.
- 1 teaspoon baking soda: The primary leavening agent. It reacts with the acid in the brown sugar (and sometimes the peanut butter) to create the slight lift and the beautiful, signature cracks on the surface of the cookies.
- 1/2 teaspoon salt: Crucial for balancing the sweetness and enhancing the rich, nutty flavor of the peanut butter.
Detailed Ingredient List (For Rolling and Garnish)
- 1/4 cup granulated sugar (for rolling): This sugar provides the signature glistening crust and subtle crunch on the exterior of the Perfect Peanut Butter Blossoms.
- Approximately 48 milk chocolate candy kisses, unwrapped: While milk chocolate kisses are traditional, you can substitute other small chocolate candies like dark chocolate kisses, caramel kisses, or even mini peanut butter cups for a variation. Crucial Tip: Unwrap these before you start mixing the dough! You need to be able to place them on the hot cookies immediately after they come out of the oven, and fumbling with wrappers will cost you precious time.
Understanding the role of each component is vital for achieving success with these classic peanut butter kiss cookies. The balance between the soft, spreadable fats (butter and peanut butter) and the dry ingredients (flour and leavening) is what ultimately determines the perfect final texture.
Essential Tools and Utensils for Baking Success
While this recipe is straightforward, having the right equipment ensures ease, efficiency, and consistent results, especially when making multiple batches of Perfect Peanut Butter Blossoms.
Mixing and Measuring Tools:
- Electric Mixer (Stand or Handheld): Essential for properly creaming the butter and sugars. Achieving a truly “light and fluffy” texture is difficult to do by hand and is key to a tender cookie.
- Large Mixing Bowl: Necessary for the initial creaming process and mixing the final dough.
- Medium Bowl and Whisk: Used to combine and evenly distribute the dry ingredients (flour, baking soda, salt) before adding them to the wet mixture. This step prevents pockets of leavening or salt in the final cookie.
- Measuring Cups and Spoons: Accuracy is paramount in baking. Ensure you have proper dry and liquid measuring tools.
- Rubber Spatula or Scraper: Essential for scraping down the sides of the bowl during mixing, ensuring all ingredients are thoroughly incorporated.
Preparation and Baking Tools:
- Baking Sheets: Two large baking sheets are ideal for continuous baking.
- Parchment Paper or Silicone Baking Mats: Highly recommended. They prevent sticking, promote even heat distribution, and make cleanup significantly easier. They are crucial for easily transferring the delicate, hot cookies.
- Small Cookie Scoop (1-inch or 1 tablespoon capacity): This tool is perhaps the most critical for consistent results. Using a scoop ensures every cookie is the exact same size, guaranteeing uniform baking time and presentation. This is paramount for achieving beautifully uniform Perfect Peanut Butter Blossoms.
- Small, Shallow Dish: Used to hold the rolling sugar, making it easy to coat the dough balls evenly.
- Wire Cooling Rack: Needed for the final cooling stage. Cookies should not be left on the hot baking sheet for too long after the initial rest, as this can continue cooking them and lead to dry edges.
By gathering these ingredients and tools, you are setting the stage for a smooth, enjoyable baking process that culminates in a batch of truly extraordinary peanut butter blossoms.
Detailed Recipe Steps: Creating Perfect Peanut Butter Blossoms
Following these steps precisely, particularly regarding dough handling and baking time, will ensure your Perfect Peanut Butter Blossoms achieve that coveted soft center and cracked, sugared exterior. Pay close attention to temperature and timing.
1. Preparation: Oven, Sheets, and Kisses
Preheat your oven to 375°F (190°C). Proper oven temperature is vital for the correct rise and spread of the cookie. Line two large baking sheets with parchment paper or silicone baking mats. This protects the bottoms of the cookies from burning and aids in easy removal. The most important preparatory step: Unwrap all 48 milk chocolate candy kisses and place them in a cool, easily accessible spot. You need to press these into the hot cookies immediately, and you won’t have time to unwrap them once the oven timer goes off.
2. Creaming the Fats and Sugars (The Foundation)
In a large mixing bowl, using an electric mixer fitted with the paddle attachment, combine the softened butter, 1/2 cup granulated sugar, and packed light brown sugar. Beat on medium speed for 2 to 3 minutes. Essential Tip: You must beat until the mixture is truly light, fluffy, and pale in color. This process is called creaming, and it incorporates air into the fat, which is essential for a tender, non-dense cookie structure. Stop the mixer occasionally to scrape down the sides of the bowl.
3. Incorporate Peanut Butter and Flavoring
Reduce the mixer speed to low. Add the 1/2 cup of creamy peanut butter and continue mixing until it is fully combined, usually about 30 seconds. Scrape down the sides again. Add the large egg and vanilla extract. Mix just until the egg is blended in. Do not overmix at this stage; once the egg is incorporated, stop the mixer. Over-beating the egg can lead to a tougher cookie.
4. Combining Dry Ingredients
In a separate medium bowl, whisk together the all-purpose flour, baking soda, and salt. Whisking ensures the leavening agent and salt are evenly distributed throughout the flour, preventing uneven rising or salty pockets. This small extra step is fundamental for achieving uniform Perfect Peanut Butter Blossoms.
5. Mixing the Dough (Handle with Care)
Gradually add the dry ingredient mixture to the wet mixture, mixing on the lowest speed possible. Mix only until the dough comes together and no streaks of flour remain, usually 30 to 45 seconds. Critical Baking Trick: Stop mixing as soon as the flour disappears. Overmixing develops the gluten in the flour, resulting in tough, dry cookies. The final dough should be slightly sticky but manageable.
6. Prep the Rolling Station
Pour the reserved 1/4 cup of granulated sugar into a small, shallow dish or bowl. This simple rolling step contributes significantly to the visual appeal and texture of the peanut butter kiss cookies.
7. Scoop, Roll, and Coat
Scoop the cookie dough using a small cookie scoop (approximately 1 tablespoon or 1 inch in diameter). If you don’t have a scoop, aim for uniform balls rolled between your palms. Roll each dough ball thoroughly in the dish of granulated sugar to coat all sides completely. The sugar should adhere nicely, creating a beautiful sparkle.
8. Arrange and Bake
Place the sugared dough balls onto the prepared baking sheets, spacing them about 2 inches apart. Adequate spacing allows the cookies to spread slightly without merging. Place one tray in the preheated oven.
9. The Initial Bake (The Most Crucial Timing)
Bake the cookies for 8 to 10 minutes. Monitor Closely: The cookies should be lightly golden brown around the edges and appear set, but the center should still look slightly soft and puffy. If they look completely firm, they are likely overbaked and will be dry. Removing them when they are just slightly underdone is the key to ensuring you get soft peanut butter cookies that remain chewy after cooling. The 8-minute mark is often the sweet spot for a softer cookie.
10. Add the Chocolate Kisses Immediately
Immediately upon removing the cookies from the oven (while they are still piping hot), work quickly. Gently press one unwrapped chocolate kiss firmly into the center of each hot cookie. The pressure should cause the cookie to crack slightly around the edges, creating the iconic “blossom” effect. Why speed matters: If you wait even a minute, the cookie crust will set, and the chocolate will not adhere properly, or the cookie will shatter when pressed.
11. Cool Completely and Set the Chocolate
Allow the cookies to cool undisturbed on the baking sheet for 5 minutes. This allows the cookie to finish setting and the chocolate kiss to start melting and softening into the center. After 5 minutes, carefully transfer the cookies to a wire rack to cool completely. Patience is a Virtue: The chocolate kisses will be soft and meltable. Do not touch, stack, or attempt to move the cookies further until the chocolate has fully set, which may take up to an hour at room temperature. Rushing this step results in smudged chocolate.
Once cooled, enjoy your perfect batch of Perfect Peanut Butter Blossoms!
Tips, Variations, and Troubleshooting for Classic Peanut Butter Kiss Cookies
Even with a stellar recipe, a few common pitfalls can trip up a baker. These insider tips, along with exciting variations, will guarantee you maintain the consistent quality and charm of the Perfect Peanut Butter Blossoms.
Troubleshooting Common Cookie Problems
The Cookies Spread Too Much/Too Flat:
If your cookies turn into peanut butter puddles, there are a few likely culprits:
- Soft Butter or Warm Dough: The butter might have been too warm (closer to liquid than softened). Ensure your butter is just pliable. Also, if your kitchen is very warm, consider chilling the prepared dough balls for 15–20 minutes before rolling in sugar and baking.
- Too Much Fat: If you used natural peanut butter or over-measured the butter, the fat ratio will be off. Stick strictly to the specified amounts and use conventional creamy peanut butter.
- Old Baking Soda: Baking soda loses potency over time. Ensure yours is fresh; it’s essential for the rise and texture of these soft peanut butter cookies.
The Cookies Are Dry and Crumbly:
Dryness is almost always caused by too much flour or overbaking.
- Flour Measurement: Always use the spoon-and-level technique. Never scoop the measuring cup directly into the flour bin, as this compacts the flour and adds too much volume.
- Overbaking: If you bake the cookies past the 10-minute mark, the center moisture evaporates, leaving them dry. Remember, they should look slightly underdone in the center when removed from the oven.
Tips for Achieving the Perfect Blossom Look
The beauty of the peanut butter blossom lies in its iconic crackled surface and the perfectly placed, partially melted chocolate kiss.
- Unwrap First: We cannot stress this enough. If you have to unwrap 48 kisses while the cookies cool, the cookies will set, and you won’t get those signature cracks when you press the chocolate in.
- Firm Press: When adding the kiss, press down gently but firmly until you see the cookie edge begin to crackle. Don’t press too hard, or the cookie will flatten completely. The goal is a gentle, appealing fracture.
- Set the Chocolate in a Cool Place: In warm weather, place the cooling rack near a slightly open window or even in the refrigerator for 10-15 minutes after the initial 5-minute set on the pan. This quickly sets the chocolate, preventing it from drooping or getting messy. You can find more visual inspiration and tips for presentation on platforms like our Pinterest page.
Flavor and Ingredient Variations
While the classic milk chocolate and peanut butter pairing is unbeatable, you can easily adapt this recipe to suit different dietary needs or flavor preferences.
Alternative Peanut Butter Blossoms:
- Dark Chocolate Lovers: Substitute the milk chocolate kisses for dark chocolate or special edition truffle kisses. The bittersweet chocolate offers a sophisticated contrast to the sweet peanut butter base.
- Salty Caramel Twist: Use Rolo candies (caramel-filled chocolates) instead of kisses. Ensure they are still slightly cold when pressed, as they melt faster than solid chocolate.
- Nutty Alternative: Replace the peanut butter with almond butter or sunflower butter (SunButter) for a delicious, nut-free version. Note: Sunflower butter reacts with baking soda to sometimes turn the cookies slightly green after baking, which is completely harmless.
- Spice it Up: Add 1/2 teaspoon of ground cinnamon or a pinch of nutmeg to the dry ingredients for a subtle warmth, especially suitable for fall or holiday baking.
Dietary Adjustments:
- Gluten-Free Perfect Peanut Butter Blossoms: Substitute the all-purpose flour with a high-quality 1:1 gluten-free baking blend that contains xanthan gum. You may need to add an extra tablespoon of milk if the dough seems too dry, as GF flours absorb moisture differently.
- Dairy-Free/Vegan Option: Replace the unsalted butter with a high-quality, plant-based stick butter substitute (like Miyoko’s or Earth Balance) and ensure you use a vegan chocolate candy alternative for the kisses.
These variations allow everyone to enjoy the rich, satisfying flavor of these classic peanut butter kiss cookies, regardless of dietary restrictions or specific flavor cravings.
Nutritional Values and Benefits of Perfect Peanut Butter Blossoms
While cookies are undeniably a treat, understanding the nutritional components and the benefits derived from key ingredients helps balance enjoyment with informed eating. Perfect Peanut Butter Blossoms offer more than just a sugar rush they provide essential fats and protein.
Estimated Nutritional Breakdown (Per Cookie)
Due to variations in specific chocolate kiss size and exact dough yield, these are estimates based on a recipe yielding 48 cookies:
- Calories: Approximately 120–140 calories
- Total Fat: Approximately 7–8 grams (g)
- Saturated Fat: Approximately 3–4 g
- Cholesterol: Approximately 10–15 milligrams (mg)
- Sodium: Approximately 70–90 mg
- Total Carbohydrates: Approximately 14–18 g
- Dietary Fiber: Approximately 0.5–1 g
- Total Sugars: Approximately 10–12 g
- Protein: Approximately 2–3 g
These classic cookies are primarily carbohydrate and fat-based, making them an excellent source of quick energy. They are ideal as a satisfying snack or a small dessert indulgence.
The Benefits of Peanut Butter
The star ingredient in these Perfect Peanut Butter Blossoms, peanut butter, brings several nutritional advantages that go beyond flavor:
- Source of Healthy Fats: Peanut butter is rich in monounsaturated and polyunsaturated fats (the ‘good’ fats), which are known to support heart health when consumed in moderation.
- Plant-Based Protein: Peanuts are a robust source of plant protein. Though two to three grams per cookie may seem small, it helps contribute to satiety, making these cookies slightly more satisfying than treats made entirely of flour and sugar.
- Essential Vitamins and Minerals: Peanut butter is packed with beneficial micronutrients, including:
- Vitamin E: A powerful antioxidant that helps protect cells from damage.
- Niacin (B3): Important for energy metabolism and nervous system function.
- Magnesium: Critical for muscle and nerve function, blood sugar control, and blood pressure regulation.
- Folate: Essential for cell growth and function.
While enjoying these delicious soft peanut butter cookies, you are also benefiting from the inherent nutritional power of peanuts. To explore other ways to incorporate the wholesome goodness of peanuts into your baking, take a look at our recipe for Old-Fashioned Peanut Butter Fudge, a decadent treat that showcases this versatile ingredient.
A Note on Sugar Content
It is important to remember that these Perfect Peanut Butter Blossoms utilize three types of sugar (granulated sugar in the dough, brown sugar for moisture, and sugar coating on the outside) plus the chocolate kiss. The resulting flavor is perfectly balanced, but the overall sugar count is high, as expected in a classic cookie recipe. For those monitoring sugar intake, enjoying these treats in moderation is key.
By using real butter, natural peanut butter (if substituting, adjust moisture slightly), and quality chocolate, you ensure that the calories consumed come from wholesome, recognizable sources, making this a rewarding and nourishing homemade snack.
FAQs About Perfect Peanut Butter Blossoms
Do you have lingering questions about achieving the perfect chew, preventing spreading, or storing these classic peanut butter kiss cookies? We’ve answered the most common questions bakers ask about making Perfect Peanut Butter Blossoms.
How do I prevent my Perfect Peanut Butter Blossoms from spreading too much?
Excessive spreading is usually due to too much fat or the dough being too warm. Ensure you measure the flour accurately using the spoon-and-level method. Also, check that your butter is only softened, not melted. If you live in a hot climate, chilling the scooped and sugared dough balls for 15 minutes before baking helps solidify the fat and maintain the shape of the soft peanut butter cookies.
Can I freeze the dough for Perfect Peanut Butter Blossoms?
Yes, the dough freezes beautifully! Scoop and roll the dough balls in sugar, then place them on a baking sheet and flash-freeze until solid. Transfer the frozen dough balls to a freezer-safe bag or container. When ready to bake, place them directly on the prepared sheet and add 2–4 minutes to the baking time. This is a great tip for holiday baking preparation!
What is the secret to getting the chocolate kiss perfectly melted and set?
The secret lies in the timing. The kiss must be pressed immediately after the cookies exit the oven while they are at their hottest. This allows the residual heat to gently melt the chocolate just enough so it adheres and softens without completely losing its shape. After pressing, ensure the cookies cool completely and undisturbed often up to an hour before handling them so the chocolate sets firm.
How long do Perfect Peanut Butter Blossoms stay fresh, and how should I store them?
These cookies remain fresh for 5–7 days when stored in an airtight container at room temperature. For longer storage, you can freeze the baked cookies (after the chocolate has fully set) for up to 3 months. Thaw them overnight at room temperature before serving. Note that stacking them while the chocolate is still soft will ruin the appearance of these classic peanut butter kiss cookies.
Can I use crunchy peanut butter instead of creamy for these soft peanut butter cookies?
While you technically can, creamy peanut butter is preferred for the best texture in these Perfect Peanut Butter Blossoms. Crunchy peanut butter alters the dough’s consistency and can prevent the signature smooth, soft chewiness we aim for. If you do use crunchy, the texture of the cookie will be slightly drier and the overall dough mixture will be more crumbly.
Conclusion: Your New Go-To Recipe for Perfect Peanut Butter Blossoms
We’ve journeyed through the creation of the quintessential peanut butter cookie a recipe that is more than just ingredients; it’s a guide to crafting a perfect memory. The Perfect Peanut Butter Blossoms recipe ensures that every batch you bake results in cookies that are gloriously soft, intensely peanut-flavored, wonderfully chewy, and crowned with that irresistible, creamy milk chocolate kiss. By adhering to the critical steps creaming your fats thoroughly, measuring your flour accurately, and timing that chocolate kiss addition flawlessly you are guaranteed a blue-ribbon standard cookie every single time.
These classic peanut butter kiss cookies are truly a timeless classic for a reason. They offer the comforting familiarity of homemade baking while delivering a depth of flavor and texture that elevates them above standard holiday fare. Whether you are baking for a school fundraiser, preparing for a festive holiday season, or simply craving a satisfying evening treat, this detailed guide provides you with the confidence and tools necessary for baking success.
Don’t let another season pass with dry, disappointing cookies. Embrace the perfection of this formula and make a batch today. The aroma alone is worth the effort! We encourage you to share your results, especially that moment when the chocolate kiss melts into the warm, crackled surface. Did you try a variation? Do you have your own secret tip for keeping them extra soft? Please leave a comment below we love hearing about your baking adventures!
If you loved perfecting these soft peanut butter cookies, be sure to explore our site for more comforting classics, such as our guides on Peanut Butter Chocolate Chip Cookies or our numerous holiday dessert ideas. Happy baking!
PERFECT PEANUT BUTTER BLOSSOMS: Classic Holiday Cookies
Ingredients
Equipment
Method
- Preheat your oven to 375°F (190°C). Line two large baking sheets with parchment paper or silicone baking mats. Unwrap all of the chocolate kisses and set them aside.
- In a large mixing bowl, use an electric mixer to cream together the softened butter, 1/2 cup granulated sugar, and light brown sugar until the mixture is light and fluffy, about 2 to 3 minutes.
- Beat in the peanut butter until fully combined. Add the egg and vanilla extract and mix until just blended, scraping down the sides of the bowl as needed.
- In a separate medium bowl, whisk together the all-purpose flour, baking soda, and salt. Gradually add the dry ingredient mixture to the wet mixture, mixing on low speed until the dough comes together and no streaks of flour remain. Do not overmix.
- Pour the reserved 1/4 cup of granulated sugar into a small, shallow dish for rolling the cookie dough. Scoop the dough using a small cookie scoop (about 1 tablespoon) or roll the dough into uniform balls, approximately 1 inch in diameter.
- Roll each dough ball thoroughly in the dish of granulated sugar to coat all sides completely. Place the sugared dough balls onto the prepared baking sheets, spacing them about 2 inches apart.
- Bake the cookies for 8 to 10 minutes. The cookies should be lightly golden brown and appear set, but they should still look slightly soft in the center.
- Immediately upon removing the cookies from the oven, gently press one unwrapped chocolate kiss firmly into the center of each hot cookie. The pressure should cause the cookie to crack slightly around the edges.
- Cool the cookies on the baking sheet for 5 minutes before carefully transferring them to a wire rack to cool completely. Do not move or touch the chocolate kisses until the chocolate has fully set (about 1 hour).