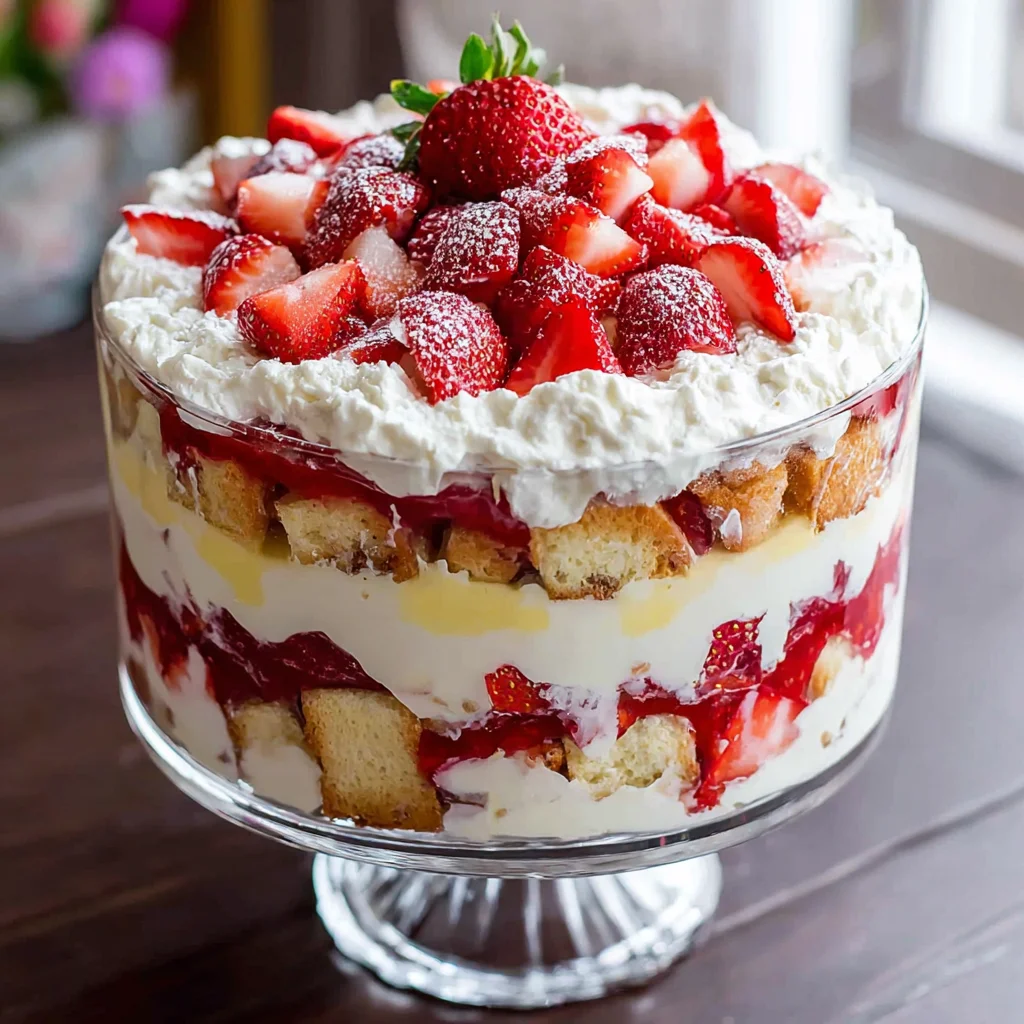
There are few desserts that command attention quite like a beautifully layered trifle. The combination of textures soft cake, creamy filling, and luscious fruit creates a symphony of flavor that is irresistible. But when you elevate this classic British dessert by merging it with the tangy, rich complexity of cheesecake, you achieve something truly spectacular: the Strawberry Cheesecake Trifle. This recipe is the epitome of effortless elegance, demanding zero oven time but delivering maximum impact. It is the perfect centerpiece for summer gatherings, holiday meals, or any occasion where you need a jaw-dropping dessert without the baking stress.
Imagine diving your spoon through layers of moist pound cake, followed by a light, airy, no-bake cheesecake mousse, and finally, reaching a pool of sweet, glistening, macerated strawberries. The layers are clearly visible through the glass trifle bowl, making this dessert as much a visual masterpiece as it is a culinary delight. Unlike traditional baked cheesecakes, this version is remarkably quick to assemble, relying on the magic of cold cream and softened cream cheese to create a stable, yet cloud-like, filling. If you are searching for that one signature dessert that is universally loved and surprisingly easy to execute, your search ends here. Let’s dive into how you can create this show-stopping Strawberry Cheesecake Trifle.
This recipe is engineered for success, even for novice bakers. We focus on maximizing flavor extraction from fresh ingredients like perfectly macerating the strawberries to create a natural, vibrant syrup and ensuring the cheesecake filling maintains its structure without being dense. We emphasize the importance of high-quality ingredients and the critical role of chilling time, which allows the flavors to truly marry and the cake to reach that perfect, tender consistency as it soaks up the delightful strawberry juices and creamy goodness. Get ready to impress every guest with this glorious, tiered masterpiece.
Why You’ll Fall in Love with this Decadent Strawberry Cheesecake Trifle
The appeal of the Strawberry Cheesecake Trifle goes far beyond its striking appearance; it lies in its practical benefits and the exquisite balance of flavors it offers. If you are weighing up whether to dedicate time to this dessert, consider these compelling reasons why it deserves a permanent spot in your recipe rotation.
Effortless Elegance: No Baking Required
In the culinary world, “no-bake” often translates to “stress-free.” This is perhaps the greatest advantage of the Strawberry Cheesecake Trifle. You eliminate the risks associated with baking such as cracked cheesecake tops or sunken cakes. The base utilizes a store-bought (or pre-made) pound cake, simplifying the process immediately. The filling is merely a combination of whipping and folding, transforming simple dairy ingredients into a luxurious, stable mousse. This makes it an ideal choice when the weather is too hot to turn on the oven, or when you are pressed for time during busy holiday preparations.
A Symphony of Textures and Flavors
What sets a great trifle apart is the interplay of textures. This recipe delivers: the moist, sturdy base of pound cake provides structure; the creamy cheesecake filling adds a rich, cool contrast; and the macerated strawberries burst with juicy freshness. The maceration process is key, as the sugar pulls the moisture from the berries, creating a naturally vibrant syrup that not only flavors the cake but prevents the final dessert from feeling dry. The slight tang from the sour cream in the filling cuts through the sweetness, ensuring every bite is perfectly balanced and prevents the dessert from feeling overly heavy or cloying. The light acidity from the strawberries and optional lemon juice further brightens the overall profile, providing a beautiful complexity that far surpasses simpler desserts.
Perfect Make-Ahead Dessert
The trifle is unique among desserts because it actually improves with time. Unlike many cakes or pies that must be served immediately, this Strawberry Cheesecake Trifle requires a minimum of 4 hours, and ideally 8 hours or overnight, in the refrigerator. This chilling time is essential. It allows the cake layers to fully absorb the strawberry syrup and the moisture from the cheesecake filling, transforming them from simple slices into tender, flavor-infused morsels. Preparing it the day before your event means less scrambling on the day of the gathering, allowing you to focus on other aspects of hosting while your dessert develops its magnificent flavor profile in the fridge. The sturdy structure of the pound cake and the stability of the no-bake filling ensure the layers remain pristine, even after a full night of chilling.
Crowd-Pleasing Presentation
Serving a trifle in a large, clear glass bowl is a presentation tactic that always garners compliments. The distinct horizontal stripes the golden cake, the pale pink/white filling, the ruby red berries, and the pristine whipped cream cap are incredibly appealing. This visual artistry makes the Strawberry Cheesecake Trifle a standout dessert. Furthermore, trifles are inherently easy to serve. Unlike slicing a delicate cake or pie, you simply scoop generous portions directly from the bowl, making it a low-fuss option for large parties or intimate family dinners. This recipe elevates the typical fruit salad or basic layer cake into a dazzling, celebratory centerpiece.
If you’ve enjoyed other creamy, comforting, layered desserts like a No-Bake Peanut Butter Pie or Strawberry Cheesecake Dump Cake, you will undoubtedly appreciate the luxurious simplicity and satisfying results of this layered beauty.
Why You Should Try Making This Strawberry Cheesecake Trifle Today
Stepping into the kitchen to create this dessert is not just about producing a tasty treat; it’s about experiencing the joy of assembling a visually stunning creation using simple techniques. If you need more convincing, here’s why this particular iteration of the classic Strawberry Cheesecake Trifle recipe is worth your time and effort right now.
Mastering Simple Techniques for Stunning Results
This recipe is an excellent way to practice fundamental dessert techniques, particularly whipping cream and folding. Achieving perfectly stiff peaks for the whipped cream, both for the filling and the topping, is crucial for the final texture. Learning the delicate “cut and fold” technique when combining the whipped cream with the cream cheese ensures that the cheesecake filling remains light and airy, rather than dense and heavy. These foundational skills are easily transferable to countless other dessert recipes, making this trifle a valuable learning experience disguised as an indulgence. Even if you consider yourself a novice baker, the steps are straightforward and forgiving.
Flavor Intensity from Maceration
One of the true stars of this dessert is the macerated strawberries. Many trifle recipes simply layer sliced strawberries, but we take the crucial step of drawing out their natural sugars and juices. The addition of granulated sugar and a touch of lemon juice creates a thick, syrupy glaze that intensifies the strawberry flavor dramatically. This syrup is what truly penetrates the pound cake, infusing it with summery sweetness. This technique ensures that the berry layers are deeply flavorful and vibrant, contrasting beautifully with the rich, dairy-heavy fillings.
Ultimate Adaptability and Customization
While the classic Strawberry Cheesecake Trifle is perfection, this recipe serves as a brilliant blueprint for seasonal variations. You can easily swap out the fruit for raspberries, blueberries, or a combination of mixed berries. During the fall, consider using pumpkin spice cake and caramel apples for a festive twist. For the cheesecake filling, a touch of almond or coconut extract can introduce new dimensions of flavor. We will explore variations in detail later, but the core stability of the pound cake and cheesecake filling allows for immense creativity. This adaptability means this recipe isn’t just a one-time bake; it’s a versatile foundation for year-round desserts. You could even use leftover pieces from baking something like these Moist Chocolate Cake layers, swapping chocolate for vanilla cake elements.
The Joy of Assembly
There is immense satisfaction in the layering process. Using a beautiful glass trifle bowl transforms the preparation process into an artistic endeavor. Each layer the dense cake, the pale pink cheesecake, the glistening red berries is meticulously placed, building anticipation with every spoonful added. When the final layer of reserved, stiffly-whipped cream is piped on top, perhaps garnished with a few fresh berries, the final reveal is incredibly rewarding. It’s a guaranteed conversation starter, and the sheer volume of dessert it produces makes it incredibly efficient for feeding a crowd.
Don’t hesitate; gather your ingredients and try creating this stunning Strawberry Cheesecake Trifle today. The minimal effort for such a high reward is unmatched.
Ingredients and Necessary Utensils for the Perfect Strawberry Cheesecake Trifle
Achieving the perfect texture and flavor for this Strawberry Cheesecake Trifle relies heavily on the quality of your ingredients and using the right tools. We emphasize using specific temperatures and types of dairy to ensure the cheesecake filling is stable, fluffy, and holds its shape beautifully under the weight of the fruit layers. Here is a detailed look at what you will need:
Detailed Ingredient List
For the Pound Cake Base
- 1 (10-ounce) frozen pound cake, thawed, or 1 homemade pound cake: The pound cake provides the essential structure. Using thawed frozen cake is a fantastic shortcut. Ensure it is fully thawed before slicing.
- 1/4 cup heavy cream or milk (optional, for softening the cake layers): Used sparingly to pre-moisten the cake and encourage the absorption of the strawberry syrup.
For the Macerated Strawberries (The Flavor Core)
- 2 pounds fresh strawberries, hulled and sliced: Choose ripe, firm strawberries for the best flavor and texture. Two pounds provides enough volume for two generous layers.
- 1/2 cup granulated sugar: This acts as an osmotic agent, drawing out the natural juices to create the critical syrup.
- 1 teaspoon fresh lemon juice (optional, brightens the flavor): A small but mighty addition. The acidity enhances the sweetness of the berries and prevents the flavor from tasting flat.
For the No-Bake Cheesecake Filling
This is the heart of the Strawberry Cheesecake Trifle. We use a combination of cream cheese, sour cream, and whipped cream to achieve a light yet rich consistency.
- 2 (8-ounce) packages full-fat cream cheese, softened to room temperature: Crucial Point: Ensure the cream cheese is completely soft. Cold cream cheese will result in a lumpy filling, regardless of how long you beat it. Full-fat is required for the necessary structure.
- 1 1/2 cups powdered sugar, sifted: Sifting prevents lumps and ensures the filling is smooth. Powdered sugar dissolves easily and provides bulk without graininess.
- 1 teaspoon pure vanilla extract: Enhances the classic cheesecake flavor profile.
- 1/4 cup sour cream (adds tanginess and creaminess): The sour cream provides a crucial tangy element that balances the sweetness and gives the filling a luxurious, smooth mouthfeel.
For the Whipped Cream Layers (Stabilizing and Topping)
- 3 cups heavy whipping cream, cold: The key to successful whipping is temperature. The cream must be very cold to achieve stiff, stable peaks.
- 1/2 cup powdered sugar (additional): Used to sweeten and stabilize the whipped cream. Powdered sugar contains cornstarch, which helps the cream hold its shape longer than granulated sugar.
Recommended Tools and Utensils for Success
While the process is simple, having the right equipment ensures that the mixing and layering goes smoothly, especially when dealing with cold, airy components like the whipped cream.
- Large Clear Glass Trifle Bowl: This is non-negotiable for a trifle! The whole point of a trifle is the visible layers. A bowl with at least an 8-10 cup capacity is ideal.
- Stand Mixer or Hand Mixer: Essential for both whipping the heavy cream and beating the cream cheese. Attempting to do this by hand is extremely time-consuming and often results in an unstable mixture.
- Large Mixing Bowls (2): You will need one for the strawberries and one for the cream cheese mixture.
- Rubber Spatula: Absolutely necessary for gently folding the whipped cream into the cheesecake base. This preserves the air pockets and keeps the filling light.
- Wire Whisk Attachment: Used on the mixer for whipping the heavy cream.
- Paddle Attachment: Used on the stand mixer for beating the softened cream cheese.
- Sifter or Fine-Mesh Sieve: For sifting the powdered sugar, preventing lumps in the cheesecake filling.
- Sharp Knife and Cutting Board: For hulling and slicing the strawberries and cutting the pound cake into even layers or cubes.
- Measuring Cups and Spoons: Accuracy is important, particularly for the dairy ratios.
- Optional: Piping Bag and Star Tip: For achieving a professional, decorative swirl on the top layer of reserved whipped cream.
Ensuring all your dairy ingredients (cream cheese, sour cream) are ready at the correct temperature (softened for cream cheese, cold for whipping cream) is the single most important preparatory step for a flawless Strawberry Cheesecake Trifle.
Detailed Recipe Steps: Assembling Your Stunning Strawberry Cheesecake Trifle
The beauty of this recipe lies in its sequential assembly. Follow these steps meticulously to ensure your layers are stable, your cake is moist, and your filling is perfectly creamy.
Step 1: Prepare the Macerated Strawberries
Maceration is the secret weapon for intensely flavored berries and juicy cake layers.
- In a medium bowl, combine the sliced strawberries, the 1/2 cup of granulated sugar, and the lemon juice (if using).
- Gently toss the strawberries using a rubber spatula until they are thoroughly coated with the sugar. Do not over-mix, as this can bruise the delicate berries.
- Set the bowl aside at room temperature for 30 to 45 minutes. You will notice the berries shrink slightly and release a significant amount of bright red syrup. Do not discard this syrup; it is essential for flavoring the pound cake layers.
Step 2: Prepare the Stabilized Whipped Cream
We are making a large batch of sweetened whipped cream here, some of which will be folded into the cheesecake base, and some reserved for the crowning top layer.
- Pour the 3 cups of cold heavy whipping cream into the bowl of a stand mixer fitted with the whisk attachment. Tip: Ensure both the bowl and the whisk are very cold this aids in achieving stiff peaks faster.
- Begin whipping the cream on medium speed until soft peaks form (the cream gently holds its shape but the tip flops over).
- Gradually add the 1/2 cup of additional powdered sugar and increase the speed to medium-high. Continue whipping until firm, stiff peaks form. Crucial Warning: Watch carefully and stop whipping immediately once stiff peaks are achieved. Over-whipping results in curdling and ultimately, butter.
- Carefully measure and reserve 1 1/2 cups of this stiffly whipped cream. Place this reserved portion in the refrigerator immediately. This is exclusively for the top layer and garnish of the Strawberry Cheesecake Trifle.
Step 3: Create the No-Bake Cheesecake Filling
The magic happens when the tangy cream cheese meets the airy whipped cream.
- In a separate large bowl, use a hand mixer or a stand mixer fitted with the paddle attachment to beat the 2 packages of softened cream cheese. Start slowly and gradually increase speed until the cream cheese is perfectly smooth, fluffy, and absolutely free of lumps. This should take 2–3 minutes.
- Stop the mixer and scrape down the sides of the bowl. Add the 1 1/2 cups of sifted powdered sugar and the vanilla extract. Beat again on medium speed until the mixture is light, airy, and the sugar is fully incorporated.
- Add the 1/4 cup of sour cream and mix only until just combined. Overmixing at this stage can break down the fat structure.
- Take the remaining prepared whipped cream (the large portion not reserved for topping) and gently introduce it to the cream cheese mixture. Use a large rubber spatula and employ a cutting and folding motion. Fold gently until no white streaks of whipped cream remain. The goal is to incorporate the cream cheese while minimizing air loss. This lightened mixture is your smooth, dreamy cheesecake filling.
Step 4: Prepare and Moisten the Pound Cake Base
The cake acts as a sturdy sponge for all the luscious juices.
- Slice the thawed pound cake into even 3/4-inch thick slices. For easier placement and serving, some cooks prefer cutting the cake into bite-sized cubes.
- If using slices, line the bottom of your large, clear glass trifle bowl with the cake pieces, trimming them as needed to fit snugly without large gaps. If using cubes, spread an even, dense layer across the bottom.
- Optional Moistening Step: To ensure maximum tenderness, lightly drizzle or brush the cake layer with a tablespoon or two of the extra heavy cream or milk. Alternatively, if the strawberries have yielded a lot of syrup already, use a small amount of that syrup to dampen the cake.
Step 5: Master the Art of Layering
Now, assemble the visually stunning Strawberry Cheesecake Trifle.
- First Layer (Cheesecake): Spread exactly half of the prepared cheesecake filling evenly over the top of the pound cake base. Use the back of a spoon or spatula to create a smooth surface.
- Second Layer (Strawberries): Spoon half of the macerated strawberries, ensuring you include a generous amount of the collected syrup/juice, over the top of the first cheesecake layer. Try to keep the berries away from the very edge of the glass so the filling layer is visible.
- Third Layer (Cake Repeat): Add the second layer of pound cake slices or cubes directly over the strawberry layer. Pat them down gently.
- Fourth Layer (Cheesecake Repeat): Carefully spread the remaining half of the cheesecake filling over the second cake layer. This layer tends to be slightly more challenging; spread from the center outward to avoid disturbing the layers below.
- Fifth Layer (Strawberries Repeat): Top the remaining cheesecake filling with the rest of the strawberries and all their flavorful juices.
- Final Layer (Whipped Cream Topping): Take the 1 1/2 cups of reserved, cold, stiff whipped cream. Gently spread it evenly over the top of the entire trifle, sealing the layers. For a decorative finish, transfer the cream to a piping bag and pipe rosettes or swirls.
- Garnish: Decorate the top with a few perfect whole fresh strawberries, or a pattern of additional strawberry slices.
Step 6: Chill and Serve
Patience is the final ingredient in making a truly magnificent Strawberry Cheesecake Trifle.
- Cover the trifle loosely with plastic wrap. Avoid letting the plastic touch the whipped cream topping if you have piped it decoratively.
- Refrigerate the completed trifle for a minimum of 4 hours, but preferably 8 hours or overnight. This mandatory rest allows the cake to become tender, the filling to fully set, and the vibrant flavors to meld together seamlessly.
- Serve chilled directly from the trifle bowl, using a large spoon or scoop to ensure you capture all the layers in each portion.
Tips, Troubleshooting, and Delicious Variations
Even though the Strawberry Cheesecake Trifle is an easy dessert, a few insider tips can elevate your results from good to absolutely spectacular. Furthermore, knowing how to troubleshoot common issues and incorporate variations ensures this recipe remains exciting every time you make it.
Avoiding the Soggy Cake Syndrome (Troubleshooting)
The most common concern with trifles is the cake becoming too mushy. While some softness is desirable, we don’t want liquid sludge.
- Control the Syrup: Ensure you spread the macerated strawberries and their juices evenly. The syrup should moisten the cake, not drown it. If your strawberries yielded an excessive amount of liquid (more than 1/2 cup), you may choose to only use half of the syrup on the cake layers.
- Pound Cake Choice: Use a dense cake. Pound cake is robust enough to hold up to moisture absorption. Avoid light sponge cakes or angel food cake, which dissolve quickly.
- The Drizzle Tip: Use the optional milk or heavy cream drizzle in Step 4 very lightly. It’s meant to kickstart the moistening process, but the strawberry syrup does most of the heavy lifting during the chilling phase.
Stabilizing the Cheesecake and Whipped Cream
If your filling seems too loose, chances are the cream wasn’t whipped enough, or the cream cheese wasn’t soft enough when beaten.
- Cold is Key for Cream: Always start with very cold heavy whipping cream and a cold bowl. If your kitchen is warm, place the bowl over an ice bath while whipping.
- Sourcing Cream Cheese: Use high-quality, full-fat block cream cheese. The cheaper, softer tubs often contain too much water, leading to a runny filling.
- Gentle Folding: When folding the whipped cream into the cream cheese mixture, be deliberate but gentle. If you stir vigorously, you will deflate the air you worked so hard to incorporate, resulting in a dense, loose filling.
Delicious Flavor Variations
Once you’ve mastered the classic Strawberry Cheesecake Trifle, feel free to experiment with these exciting alternatives:
Lemon-Infused Berry Trifle
Add the zest of one whole lemon to the cream cheese mixture along with the vanilla extract. This bright, zesty note complements the strawberries beautifully and enhances the tanginess of the cheesecake layer. This variation is particularly refreshing on hot days.
Tropical Twist
Replace half of the strawberries with sliced mangoes or pineapples. You can also swap the pound cake for coconut cake. For the filling, add 1/2 teaspoon of coconut extract instead of vanilla. For an extra creamy kick, you can even look at incorporating elements from a Cheesecake Fudge recipe for an incredibly rich alternative base.
Gluten-Free Version
This trifle is incredibly easy to convert to gluten-free. Simply substitute the traditional pound cake for a dense, store-bought gluten-free pound cake or use layers of crisp gluten-free shortbread cookies (like Walkers) or crushed gluten-free vanilla wafers. If using cookies, you may need extra milk/syrup to soften them during the chill time.
Chocolate Lover’s Trifle
Swap the vanilla pound cake for chocolate fudge cake or chocolate wafers. Instead of just vanilla, add 1 tablespoon of high-quality cocoa powder to the cream cheese mixture and 1/4 teaspoon of instant espresso powder to deepen the chocolate notes. This richer version pairs wonderfully with the bright strawberries.
Pinterest Inspiration
For more visual inspiration on plating and alternative flavor combinations for layered desserts, make sure to check out my board dedicated to stunning holiday and everyday desserts on Pinterest. You can find beautiful presentation ideas and seasonal variations here: Dessert Inspiration on Pinterest.
Nutritional Values and Benefits of the Strawberry Cheesecake Trifle
While the Strawberry Cheesecake Trifle is undeniably an indulgent treat, understanding its components allows for appreciation of the nutritional contributions, especially when enjoyed in moderation. Desserts like this primarily provide energy, but the fresh fruit and dairy components also contribute essential vitamins and minerals.
General Nutritional Breakdown (Per Serving Estimate)
Given the richness of the ingredients full-fat cream cheese, heavy whipping cream, and sugar this is a calorically dense dessert. Nutritional values can vary widely based on serving size and the type of pound cake used, but typically, a generous serving will contain:
- Calories: Approximately 450–600 calories per serving (standard scoop size).
- Fats: High (around 30–45g), primarily saturated fat from the heavy cream and cream cheese.
- Carbohydrates: High (around 45–60g), mainly from the sugars used for stabilization, sweetening, and the pound cake base.
- Protein: Moderate (around 5–8g), derived from the dairy products (cream cheese and milk).
Recommendation: Due to its richness, this Strawberry Cheesecake Trifle is best enjoyed as an occasional treat rather than a daily indulgence. Smaller portion sizes allow you to enjoy the flavor without overdoing the caloric intake.
Benefits of Key Ingredients
Strawberries: A Boost of Antioxidants
Strawberries are the most nutrient-dense ingredient in this trifle. They are an excellent source of Vitamin C, a powerful antioxidant known for supporting the immune system and skin health. They also contain manganese, potassium, and beneficial plant compounds. Eating strawberries, even in a dessert format, helps contribute to your daily fruit intake, providing dietary fiber which aids in digestion and helps regulate blood sugar levels, mitigating the impact of the added sugars.
Dairy (Cream Cheese, Cream, Sour Cream): Calcium and Protein
The dairy components are the primary sources of calcium and protein in this dessert. Calcium is vital for bone health, muscle function, and nerve transmission. Full-fat dairy, while higher in calories, provides fat-soluble vitamins (like Vitamin A) and offers high satiety, meaning a small serving can feel very satisfying. The protein content helps with the structure and contributes to overall muscle maintenance.
Pound Cake and Sugars: Energy for Activity
While simple carbohydrates should be consumed in moderation, the sugars and flour in the pound cake and powdered sugar provide an immediate source of glucose, which the body converts into energy. This makes the Strawberry Cheesecake Trifle an excellent celebratory food, fueling activity and providing comfort.
Remember that this dish is designed for enjoyment and celebration. The fresh, vibrant taste of the strawberries, when combined with the creamy, satisfying texture of the cheesecake, provides sensory pleasure that contributes to overall well-being and satisfaction. Enjoy every layer of your homemade creation!
Frequently Asked Questions About Strawberry Cheesecake Trifle
To help ensure your dessert is perfect every time, we’ve compiled answers to the most common questions regarding the Strawberry Cheesecake Trifle recipe, utilizing SEO optimization via Schema markup for maximum visibility.
FAQs about the Strawberry Cheesecake Trifle
How far in advance can I make a Strawberry Cheesecake Trifle?
You can prepare the complete Strawberry Cheesecake Trifle up to 24 hours in advance. It requires a minimum of 4–8 hours of chilling time for the layers to set and the flavors to fully meld. Making it the day before your event ensures the pound cake is perfectly moist and the cheesecake filling is fully stabilized.
Why did my cheesecake filling turn out runny?
A runny cheesecake filling is usually due to two reasons: either the heavy whipping cream was not whipped to stiff peaks, or the whipped cream was folded too vigorously into the cream cheese, causing it to deflate. Ensure your cream cheese is fully softened before beating out lumps, and use a gentle cutting and folding motion when combining the airy components.
Can I use frozen strawberries instead of fresh ones for the trifle?
While fresh strawberries are highly recommended for the best texture, you can use frozen strawberries. Thaw them completely and drain off most of the excess liquid before proceeding with the maceration step. Be aware that the texture of frozen strawberries will be much softer once thawed, but they will still yield excellent syrup for moistening the pound cake base of the Strawberry Cheesecake Trifle.
What is the best alternative to pound cake for this recipe?
The best alternatives to pound cake include ladyfingers (savoiardi), which are classically used in trifles, or dense vanilla sponge cake. Shortbread cookies or vanilla wafers can also be used; simply layer them and ensure they are adequately drizzled with strawberry syrup or milk to soften them during the essential chilling period required for the Strawberry Cheesecake Trifle.
How should I store leftovers of the Strawberry Cheesecake Trifle?
The trifle should be stored loosely covered in the refrigerator for up to 3–4 days. After the first 24 hours, the cake layers will become very soft, but the flavor will remain excellent. Freezing is not recommended, as the delicate texture of the cream cheese filling and the thawed strawberries will be compromised upon defrosting.
Conclusion: The Definitive Layered Dessert
The Strawberry Cheesecake Trifle stands as a testament to the idea that the most visually stunning desserts are often the easiest to make. This recipe beautifully marries the best qualities of a classic layered trifle the satisfying contrast of textures with the irresistible tang and richness of a no-bake cheesecake. From the moment the strawberries begin their aromatic maceration to the final, critical hours of chilling, every step in this process is designed for maximum flavor impact with minimal effort.
We’ve emphasized the importance of high-quality ingredients, specifically the temperature-sensitive dairy, and the technical steps of whipping cream and folding, which collectively ensure a stable, yet irresistibly light, cheesecake filling. The generous layers of moisture-rich pound cake, infused with the vibrant strawberry syrup, provide the perfect foundation for this towering dessert. The required overnight rest is crucial; it’s the quiet time when the layers unify, transforming into a cohesive, sliceable (or scoopable) masterpiece that is even better than the sum of its parts.
Whether you choose the classic preparation or opt for variations like the bright lemon-berry twist or the deep chocolate iteration, this Strawberry Cheesecake Trifle is a guaranteed crowd-pleaser. It offers a spectacular centerpiece presentation, requires no oven time, and is the perfect make-ahead option for any host. Do not shy away from the joy of assembling this stunning creation. Gather your ingredients, prepare your trifle bowl, and get ready to indulge in the ultimate summer dessert experience.
If you loved this recipe, please share it with friends and family, and don’t forget to leave a comment below letting us know how your Strawberry Cheesecake Trifle turned out! Happy layering!
Strawberry Cheesecake Trifle (Easy No-Bake)
Ingredients
Equipment
Method
- Prepare the Macerated Strawberries: In a medium bowl, combine the sliced strawberries, 1/2 cup of granulated sugar, and the lemon juice (if using). Gently toss until coated. Set aside at room temperature for at least 30 to 45 minutes until a sweet syrup has formed.
- Prepare the Whipped Cream: Pour the cold heavy whipping cream into a mixing bowl. Begin whipping on medium speed until soft peaks form. Gradually add the 1/2 cup of powdered sugar and continue whipping until stiff peaks form. Reserve 1 1/2 cups of this whipped cream for the top layer and decoration.
- Make the Cheesecake Filling: In a separate large bowl, beat the softened cream cheese until completely smooth and fluffy. Add the 1 1/2 cups of sifted powdered sugar and vanilla extract; beat until light and airy. Mix in the 1/4 cup of sour cream until just combined. Gently fold the remaining whipped cream (the amount not reserved for topping) into the cream cheese mixture using a rubber spatula. This completes your cheesecake filling.
- Prepare the Pound Cake: Slice the thawed pound cake into 3/4-inch thick slices, or cut the cake into bite-sized cubes. Line the bottom of a large, clear glass trifle bowl with the cake pieces, trimming them as needed. Optional: Drizzle or brush the cake layer lightly with a tablespoon or two of heavy cream or milk for extra moisture.
- First Layer: Spread half of the cheesecake filling evenly over the top of the pound cake base.
- Second Layer: Spoon half of the macerated strawberries, including the generous amount of syrup, over the top of the cheesecake layer.
- Third & Fourth Layers: Add a second layer of pound cake slices or cubes over the strawberries. Carefully spread the remaining half of the cheesecake filling over the second cake layer.
- Final Layers: Top the remaining cheesecake filling with the rest of the strawberries and their juices. Spread the 1 1/2 cups of reserved whipped cream evenly over the top, or pipe it for a decorative finish. Garnish with whole fresh strawberries.
- Cover the trifle loosely and refrigerate for a minimum of 4 hours, but preferably 8 hours or overnight. This allows the layers to set and the cake to fully absorb the strawberry and cheesecake moisture, ensuring the perfect texture.
- Serve chilled directly from the trifle bowl.