Welcome to the pinnacle of party snacks the legendary Jalapeño Popper Cheese Ball. This isn’t just a simple dip; it’s a creamy, smoky, spicy, and utterly addictive centerpiece guaranteed to vanish the moment it hits the serving platter. Taking all the best elements of your favorite pub appetizer the heat of the jalapeño, the richness of cream cheese, and the salty crunch of bacon we’ve rolled it into a magnificent, make-ahead ball of glory.
Whether you’re gearing up for game day, hosting a festive holiday gathering, or simply need an impressive, yet shockingly simple, appetizer, this recipe delivers. The key to its success lies in its ease. With minimal active prep time and a crucial chilling period, the result is a firm, flavorful, and perfectly rollable cheese ball encased in a crispy, bright green coating of toasted panko and fresh chives. Say goodbye to messy deep frying and hello to the easiest, creamiest, and most satisfying way to enjoy the classic jalapeño popper flavor. Get ready to impress your guests with this fantastic Jalapeño Popper Cheese Ball.
Why You’ll Fall Head Over Heels for This Jalapeño Popper Cheese Ball Recipe
In the vast world of appetizers, the cheese ball often reigns supreme for its sheer crowd-pleasing ability, but this specific version elevates the classic concept exponentially. If you are a fan of bold flavors, contrasting textures, and dishes that allow you to relax on party day, this Jalapeño Popper Cheese Ball is about to become your signature contribution to every potluck.
One of the primary reasons to love this recipe is the incredible complexity achieved with minimal effort. You have the foundation of creamy, tangy cheese a blend of two full blocks of cream cheese, sharp cheddar, and nutty Parmesan. This luxurious base is then contrasted by the inclusions that bring the “popper” aspect to life. We use real, crispy bacon pieces and finely diced jalapeños, ensuring every bite contains a perfect balance of heat and savory smoke. Unlike recipes that only use seasonings to mimic the flavor, this cheese ball uses the actual ingredients, resulting in an authentic and intense flavor profile.
The texture is another massive selling point. A well-made cheese ball should be soft and spreadable, but firm enough to hold its shape. Our careful measurement of ingredients and the mandatory, lengthy chilling time ensures this perfect consistency. But what truly sets this Jalapeño Popper Cheese Ball apart is the crunchy coating. We don’t just use nuts; we employ toasted panko breadcrumbs, giving the exterior an unparalleled crispness reminiscent of the fried popper shell. When combined with fresh, bright green chives and reserved bacon crumbles, the coating offers a textural counterpoint that keeps guests coming back for more.
Furthermore, this recipe is a logistical dream for hosts. It is designed almost entirely as a make-ahead appetizer. You can prepare the mixture, shape the ball, and let it firm up in the refrigerator for hours or even a day before your event. This means the stressful, last-minute kitchen chaos is eliminated. You simply pull it out, roll it in the coating (which can also be prepped ahead of time), and serve. It is a true testament to easy entertaining, proving that sophisticated appetizers don’t require complicated techniques.
Finally, the presentation of the Jalapeño Popper Cheese Ball is naturally spectacular. Served on a simple platter with colorful crackers and vegetables, the large, round sphere, flecked with bright chives and golden bacon, makes a stunning visual statement. It’s comforting, spicy, salty, and totally satisfying the ultimate combination for any gathering.
Why You Should Try Making This Creamy Jalapeño Popper Cheese Ball Today
If you’ve been searching for an appetizer that moves beyond the predictable chips and dip, but doesn’t require complex culinary skills, your search ends here. Trying this Jalapeño Popper Cheese Ball recipe offers several practical advantages, especially for home entertainers who prioritize both quality and convenience.
The Perfect Make-Ahead Marvel
The single greatest reason to try this recipe immediately is its phenomenal make-ahead capability. Unlike hot appetizers that require precise timing in the oven or on the stovetop, the Jalapeño Popper Cheese Ball actually improves with time in the fridge. Preparing it one or even two days in advance allows the flavors of the bacon, jalapeños, and spices (garlic powder and onion powder) to fully meld into the cream cheese base. This flavor fusion results in a deeper, more robust taste when serving time arrives. This feature is especially valuable during busy holiday seasons when oven space is limited and time is precious. If you’re planning a large event, pair this easy cold appetizer with other simple recipes like our Cranberry Jalapeño Dip for a delightful contrast of sweet and savory heat.
Customizable Heat Level
The “popper” element implies heat, but this recipe is wonderfully adaptable to different palates. While the recipe calls for diced jarred jalapeños (which are generally milder than fresh due to processing), you have full control. For those who prefer a gentler warmth, you can easily substitute Pepper Jack cheese for some of the cheddar, adding flavor without overwhelming heat. For the spice seekers, you can increase the jalapeño quantity or even mix in a teaspoon of the drained jalapeño brine for an extra zing. This adaptability ensures that everyone, from the spice enthusiast to the cautious eater, can enjoy the bold flavor of the Jalapeño Popper Cheese Ball.
Cost-Effective and Highly Impressive
This appetizer utilizes relatively inexpensive, readily available ingredients primarily various cheeses, mayonnaise, and bacon. Despite its low cost of production, the resulting cheese ball looks incredibly sophisticated and decadent. It offers a high reward-to-effort ratio, making it an excellent choice for budget-conscious hosts who still want to serve something spectacular. The large yield (one large cheese ball) serves a substantial crowd, easily feeding 15–20 people when paired with various dippers. It is the perfect centerpiece for a Halloween party alongside something fun like our Halloween Taco Dip.
Mastering the Art of Appetizers
Learning to make a classic cheese ball is a foundational skill for any home cook. This recipe provides a solid framework that can be endlessly customized once you understand the basic ratios of cream cheese base to mix-ins. Mastering this specific Jalapeño Popper Cheese Ball ensures you have a reliable, celebrated recipe in your repertoire that transcends seasonal limitations, fitting in just as well during a summer barbecue as it does during a formal Christmas cocktail party. The combination of crispy bacon, spicy peppers, and creamy cheese is simply irresistible, guaranteeing it will be requested again and again.
The Essential Ingredients and Tools for the Perfect Jalapeño Popper Cheese Ball
Success in making a perfectly textured and flavorful cheese ball starts with selecting high-quality ingredients and ensuring they are prepared correctly. Below is a detailed breakdown of the components and the necessary tools for this recipe.
📋 Ingredients Overview
FOR THE CHEESE BALL BASE:
- 2 (8-ounce) blocks cream cheese: This is the foundation. It is absolutely crucial that the cream cheese is completely softened to room temperature. Cold cream cheese will result in a lumpy, overworked base. If you can easily press your finger into it, it’s ready.
- 2 cups shredded sharp cheddar cheese: We divide this amount. Sharp cheddar provides the robust, classic tang essential for a savory cheese ball. Alternatively, using Pepper Jack can enhance the spice factor immediately.
- 1/2 cup grated Parmesan cheese: Parmesan adds a necessary layer of umami and saltiness that deepens the overall cheese flavor profile.
- 1/2 cup mayonnaise or sour cream: This acts as a binder and adds much-needed moisture and tang, ensuring the final product is spreadable, not crumbly. Mayonnaise tends to offer a richer texture, while sour cream provides a brighter, lighter tang.
- 1/2 cup crispy cooked bacon, crumbled: Use high-quality bacon. It needs to be very crispy so it maintains its texture within the soft cream cheese. We reserve 2 tablespoons for the coating don’t forget this!
- 1/4 cup finely diced jarred or canned jalapeños: Prep is everything here. These must be drained very well and patted dry. Excess moisture from the jarred peppers is the enemy of a firm cheese ball. Use a paper towel to remove as much liquid as possible.
- Seasonings: 1 teaspoon garlic powder, 1/2 teaspoon onion powder, 1/2 teaspoon black pepper, and 1/4 teaspoon salt. Adjust the salt based on how salty your bacon is; taste the mixture before adding extra.
FOR THE CRUNCHY COATING:
- 1 cup panko breadcrumbs: Panko (Japanese breadcrumbs) are larger and flakier than standard breadcrumbs, which is why they produce such a satisfying crunch when toasted.
- 2 tablespoons butter, melted (optional): Used specifically for toasting the panko, adding a golden color and rich, nutty flavor to the exterior.
- 1/4 cup fresh chives, finely chopped: Chives provide a fresh, mild onion flavor and crucial visual appeal, contrasting the white cheese ball with vibrant green.
- Remaining 2 tablespoons crispy bacon crumbles: This ensures the coating is as flavorful as the interior.
🛠️ Recommended Kitchen Utensils and Tools
While this is a straightforward recipe, using the right equipment ensures a smooth mixing process and a perfectly shaped Jalapeño Popper Cheese Ball.
Mixing and Preparation Tools:
- Electric Hand Mixer or Stand Mixer: This is highly recommended for achieving the “light and fluffy” texture in Step 1. While you can mix by hand, an electric mixer is essential for thoroughly creaming the cold cheddar and the softening cream cheese together quickly without overworking the mixture.
- Large Mixing Bowl: Necessary to contain the base mixture and allow for easy incorporation of fillings.
- Rubber Spatula: Ideal for gently folding in the bacon and jalapeños in Step 2. Using a spatula prevents overmixing, which can break down the cheese too much.
- Shallow Dish or Pie Plate: This will be used in the final step for rolling the firm cheese ball in the coating. A shallow plate ensures even coverage.
Specialized Items:
- Plastic Wrap: Absolutely non-negotiable for shaping and chilling the Jalapeño Popper Cheese Ball. It must be wrapped tightly to maintain its sphere and prevent a dry exterior.
- Small Skillet (Optional): Needed if you choose to toast the panko breadcrumbs in butter, which is highly encouraged for superior flavor and crunch.
Remember, the success of your Jalapeño Popper Cheese Ball hinges on preparation. Take the time to soften the cream cheese, drain those jalapeños completely, and toast your panko for that ultimate crispy texture. For more fantastic appetizers and serving ideas, be sure to check out my appetizer board on Pinterest: Liana’s Appetizer Recipes on Pinterest.
Detailed Instructions: Crafting Your Creamy Jalapeño Popper Cheese Ball
This recipe is separated into five distinct, easy-to-follow steps. Paying close attention to the chilling time is the secret to a perfectly structured and highly impressive Jalapeño Popper Cheese Ball.
STEP 1: PREPARE THE CHEESE BASE (The Creamy Foundation)
- Combine the Cheeses and Wet Binders: Place the completely softened cream cheese blocks, the Parmesan cheese, and 1 1/2 cups of the shredded cheddar cheese into your large mixing bowl. Remember to reserve the final 1/2 cup of shredded cheddar this will add textural pockets later.
- Add Flavorings: Pour in the mayonnaise (or sour cream), garlic powder, onion powder, salt, and pepper.
- Beat Until Fluffy: Using an electric hand mixer or a stand mixer fitted with the paddle attachment, beat the mixture on medium speed. The goal here is aeration. You want the mixture to be completely smooth, light, and fluffy. This typically takes 2 to 3 minutes. Stop frequently to scrape down the sides and bottom of the bowl to ensure no lumps of unmixed cream cheese remain. Tip: Achieving this smooth texture is impossible if your cream cheese is even slightly cold.
STEP 2: FOLD IN THE FILLINGS (The Popper Core)
- Prepare Inclusions: Ensure your jalapeños are meticulously drained and patted dry. Having soggy fillings will introduce too much moisture, preventing the cheese ball from firming up later.
- Gentle Folding: Using a rubber spatula, gently fold the prepared, drained jalapeños, the 1/2 cup of crumbled bacon, and the remaining 1/2 cup of reserved shredded cheddar cheese into the cream cheese base.
- Mix Just Enough: Mix just until the inclusions are evenly distributed throughout the cheese mixture. Avoid overmixing! Overmixing will make the mixture overly soft and harder to shape and can also smear the cheddar cheese, losing those beautiful pockets of sharper flavor.
STEP 3: SHAPE AND CHILL THE BALL (The Critical Step)
- Set Up for Shaping: Lay a large sheet of plastic wrap directly onto your clean counter surface. Ensure the sheet is large enough to completely encase the entire mixture.
- Spoon and Gather: Spoon the entire Jalapeño Popper Cheese Ball mixture onto the center of the plastic wrap.
- Shape the Sphere: Use the edges of the plastic wrap to help you gather the mixture together. Twist the plastic wrap tightly at the top to compress the mixture and mold it into a uniform, tight sphere. Try to eliminate any air pockets as you twist.
- Chill: Once tightly wrapped, place the cheese ball in the refrigerator. The chilling step is absolutely crucial. It needs to firm up for at least 2 hours, but preferably 3 to 4 hours. A firm cheese ball is necessary for the coating step to work successfully. If you attempt to roll a soft cheese ball, it will stick to the coating and lose its shape. This is the perfect time to prep other easy party snacks, like a batch of Easy Chocolate Fudge for dessert.
STEP 4: PREPARE THE CRUNCHY COATING
- Toast the Panko (Optional but Highly Recommended): While the cheese ball is chilling, prepare the crunchy coating. In a small skillet, melt 2 tablespoons of butter over medium heat. Add the panko breadcrumbs and toast, stirring constantly, until they turn a beautiful golden brown and become fragrant (usually 3–5 minutes). Remove the panko immediately from the pan and allow it to cool completely. If the panko is warm, it will melt the exterior of the cheese ball upon contact. (If skipping this step, use plain, raw panko.)
- Mix the Coating: In a shallow dish or pie plate, combine the cooled panko breadcrumbs, the finely chopped fresh chives, and the remaining 2 tablespoons of reserved crispy bacon crumbles. Mix these coating ingredients thoroughly to ensure an even distribution.
STEP 5: COAT AND SERVE
- Unwrap: Remove the well-chilled Jalapeño Popper Cheese Ball from the refrigerator and unwrap the plastic. It should feel quite firm to the touch.
- Roll and Press: Place the firm cheese ball into the shallow dish containing the coating mixture. Gently roll the ball, using your hands to firmly press the coating onto the surface. Continue rolling and pressing until the entire sphere is evenly and thoroughly covered.
- Final Chill (Optional): The Jalapeño Popper Cheese Ball can be served immediately, but if you want the coating to adhere perfectly, you can refrigerate it for another 30 minutes.
- Serve: Present the finished cheese ball with sturdy crackers (like pita or rye crackers), toasted baguette slices, pretzel thins, or fresh vegetable sticks (carrots, celery, bell peppers).
Tips, Troubleshooting, and Delicious Variations
To ensure your Jalapeño Popper Cheese Ball is a success every single time, here are crucial tips and creative variations to customize the recipe.
Addressing Common Mistakes
-
Mistake: The Cheese Ball is Too Soft.
- Solution: This almost always means insufficient chilling time or too much liquid in the mixture. Ensure your cream cheese is mixed until fluffy, but do not overmix after adding the inclusions. Most importantly, ensure the jalapeños were thoroughly dried. If it feels too soft after the required 2 hours, chill it for 2 more hours. If it remains soft, you can try adding a tablespoon of cornstarch (or finely grated parmesan) to the base before the final chill to help bind the excess moisture, though this changes the texture slightly.
-
Mistake: The Coating Won’t Stick.
- Solution: The cheese ball must be very cold and firm. If it has started to warm up, put it back in the freezer for 15 minutes. Use the plastic wrap from Step 3 to help you apply pressure as you roll, ensuring the panko is pressed deeply into the cheese surface.
-
Mistake: The Flavor is Bland.
- Solution: Did you skip the resting time? The long chill is essential for flavor development. If you taste it immediately after mixing, it might taste muted. If serving immediately, add a dash of Worcestershire sauce or a teaspoon of liquid smoke to the cream cheese base for an instant depth boost.
Flavor and Ingredient Variations
The classic Jalapeño Popper Cheese Ball flavor is perfect, but don’t hesitate to experiment:
- Spice it Up: For serious heat, replace the jarred jalapeños with 1 tablespoon of finely minced, deseeded fresh serrano pepper. Alternatively, mix a few drops of hot sauce (like Tabasco) into the cream cheese base.
- Smoky & Savory: Substitute sharp cheddar entirely with smoked Gouda or Pepper Jack cheese. You can also add a 1/2 teaspoon of smoked paprika to the seasoning blend to enhance the depth of the bacon flavor.
- Nutty Coating Alternative: If you prefer nuts over panko, mix the chives and bacon with 1 cup of finely chopped pecans or walnuts for a traditional nutty coating.
-
Vegetarian/Vegan Option:
- Vegetarian: Simply omit the bacon. To replace the savory umami, use sun-dried tomatoes (drained and dried) and a pinch of nutritional yeast in the mixture.
- Vegan: Substitute cream cheese with high-quality vegan cream cheese blocks (ensure they are the firm, block style, not the tub style). Use vegan cheddar shreds, and omit the bacon entirely or use a vegan bacon substitute. The chilling time may need to be slightly longer, as vegan cheeses sometimes have a higher moisture content.
- Gluten-Free Option: Easily achieved by replacing the panko breadcrumbs with finely crushed gluten-free corn chips (like Fritos) or a mix of chopped nuts and gluten-free breadcrumbs.
Storage and Shelf Life
This Jalapeño Popper Cheese Ball is an excellent dish for preparing ahead.
- Uncoated Storage: The cheese ball mixture can be shaped and stored tightly wrapped in the refrigerator for up to 4 days. Wait to coat it until 1 day before serving.
- Coated Storage: Once coated, the cheese ball can be refrigerated for 2 days. After this time, the panko coating may begin to soften slightly, losing some of its desired crunch.
- Freezing: You can freeze the uncoated cheese ball for up to 1 month. Wrap it tightly in several layers of plastic wrap and then foil. Thaw it overnight in the refrigerator before rolling it in the coating and serving.
Nutritional Breakdown and Ingredient Benefits
When discussing the Jalapeño Popper Cheese Ball, it’s important to acknowledge its position as a hearty, decadent appetizer. This is a comfort food meant for celebratory occasions, rich in dairy, fat, and protein providing significant energy and satiety.
General Nutritional Profile
Given the core ingredients cream cheese, cheddar, Parmesan, and bacon this appetizer is highly energy-dense.
- Fats (High): The majority of the calories come from high-quality dairy fats and the unsaturated and saturated fats in the bacon. Fats are essential for flavor transport and texture in a recipe like this, providing the signature richness.
- Protein (Moderate/High): Cheese and bacon are excellent sources of protein. Protein helps slow digestion and contributes significantly to the satisfying quality of the cheese ball.
- Carbohydrates (Low): The main source of carbohydrates comes from the small amount in the cream cheese and the panko coating. This recipe is naturally low-carb before considering the crackers or dippers used for serving. This makes it easily adaptable for those following a Keto or low-carb lifestyle by choosing nut coatings and vegetable sticks for dipping.
- Sodium: Due to the nature of the ingredients (cured bacon, salted cheese, and added seasoning), this recipe is moderately high in sodium. We recommend tasting before adding the specified 1/4 teaspoon of salt to ensure the balance is right for your preference.
Disclaimer: Nutritional information varies based on specific brands of cheese, mayonnaise, and bacon fat content. Please use these values as a general guide. For precise macro counting, run the recipe through a dedicated nutrition calculator.
Ingredient Highlights and Benefits
While the Jalapeño Popper Cheese Ball is primarily an indulgent treat, some of the components offer noteworthy benefits:
The Power of Dairy
The copious amounts of cheddar and Parmesan cheese provide excellent levels of calcium and phosphorus, vital minerals for bone health. Cheese is also a fermented food, rich in vitamin B12 and essential amino acids, contributing to overall dietary protein intake.
Benefits of Jalapeños
Jalapeños, even in their jarred form, contain capsaicin, the compound responsible for their heat. Capsaicin is a potent antioxidant. Studies suggest that capsaicin can temporarily boost metabolism and may have mild pain-relieving properties. Furthermore, jalapeños contain Vitamin C and Vitamin A, supporting immune function and vision health. Incorporating this natural heat source into the creamy base not only adds flavor but also a subtle health benefit.
Fresh Chives
The fresh chives used in the coating are more than just decoration. They belong to the Allium family (like garlic and onions) and contain beneficial compounds that may help reduce inflammation and are high in Vitamin K, which plays a critical role in blood clotting and bone maintenance. The addition of fresh herbs brightens the entire flavor profile of the rich Jalapeño Popper Cheese Ball.
FAQs About the Jalapeño Popper Cheese Ball
How far in advance can I make a Jalapeno Popper Cheese Ball?
You can prepare the cheese ball mixture, shape it, and keep it tightly wrapped in the refrigerator for up to 4 days before serving. This extensive make-ahead time is one of the greatest benefits of the Jalapeno Popper Cheese Ball. Wait until the day of your event to roll it in the crunchy panko and chive coating for the best texture.
Why did my cheese ball not hold its shape or is too soft?
A soft cheese ball usually results from insufficient chilling time or too much moisture from the fillings. Ensure the mixture chills for at least 2 to 4 hours, which is vital for firming the fats. Crucially, you must thoroughly drain and pat dry the diced jalapeños before mixing them in, as excess water will prevent the cheese ball from setting properly.
Can I use fresh jalapeños instead of jarred for the Jalapeno Popper Cheese Ball?
Yes, you can use fresh jalapeños, but they are significantly hotter than jarred. If using fresh, make sure to wear gloves and meticulously remove all the seeds and white membranes (where most of the heat resides). Dice them very finely and lightly sauté them for a few minutes to soften their texture before adding them to the cheese mixture.
What are the best things to serve with this creamy appetizer?
The Jalapeno Popper Cheese Ball pairs best with sturdy dippers that can handle its density and bold flavor. Excellent choices include sturdy rye crackers, Triscuits, baked pita chips, toasted baguette slices, or pretzel thins. For a low-carb option, serve with carrot sticks, celery stalks, cucumber slices, or bell pepper wedges.
Is it better to toast the panko for the coating?
Yes, toasting the panko is highly recommended. It transforms the texture, making the coating incredibly crunchy and crisp, which mimics the fried exterior of an actual jalapeño popper. Toasting in butter also adds a deep, savory, and golden color that enhances the presentation of the Jalapeno Popper Cheese Ball.
Conclusion: Your New Favorite Jalapeño Popper Cheese Ball Recipe
This extensive guide to making the ultimate Jalapeño Popper Cheese Ball ensures that you have all the knowledge needed to create a show-stopping appetizer that marries convenience with incredible flavor. We’ve covered everything from the necessity of room temperature cream cheese to the importance of draining those jalapeños and achieving that perfect crunchy, toasted panko crust. This is more than just a recipe; it’s a technique for guaranteed entertaining success.
The blend of creamy, rich cheeses, the salty depth of bacon, and the satisfying punch of jalapeño heat is simply unmatched. Best of all, by implementing the make-ahead strategy, you can enjoy your own party without stressing over appetizers. Simply mix, chill, roll, and serve. Whether it’s football season, a major holiday, or just a weekend gathering, this creamy, smoky, and spicy Jalapeño Popper Cheese Ball will be the first thing devoured.
We encourage you to try this recipe for your next event. Don’t forget to customize the heat to your liking! If you loved this savory snack, we have many other delicious and comforting recipes to explore, such as our rich Creamy White Sauce Pasta for a perfect weeknight dinner. Let us know in the comments below how your cheese ball turned out and what serving dippers were the biggest hit!
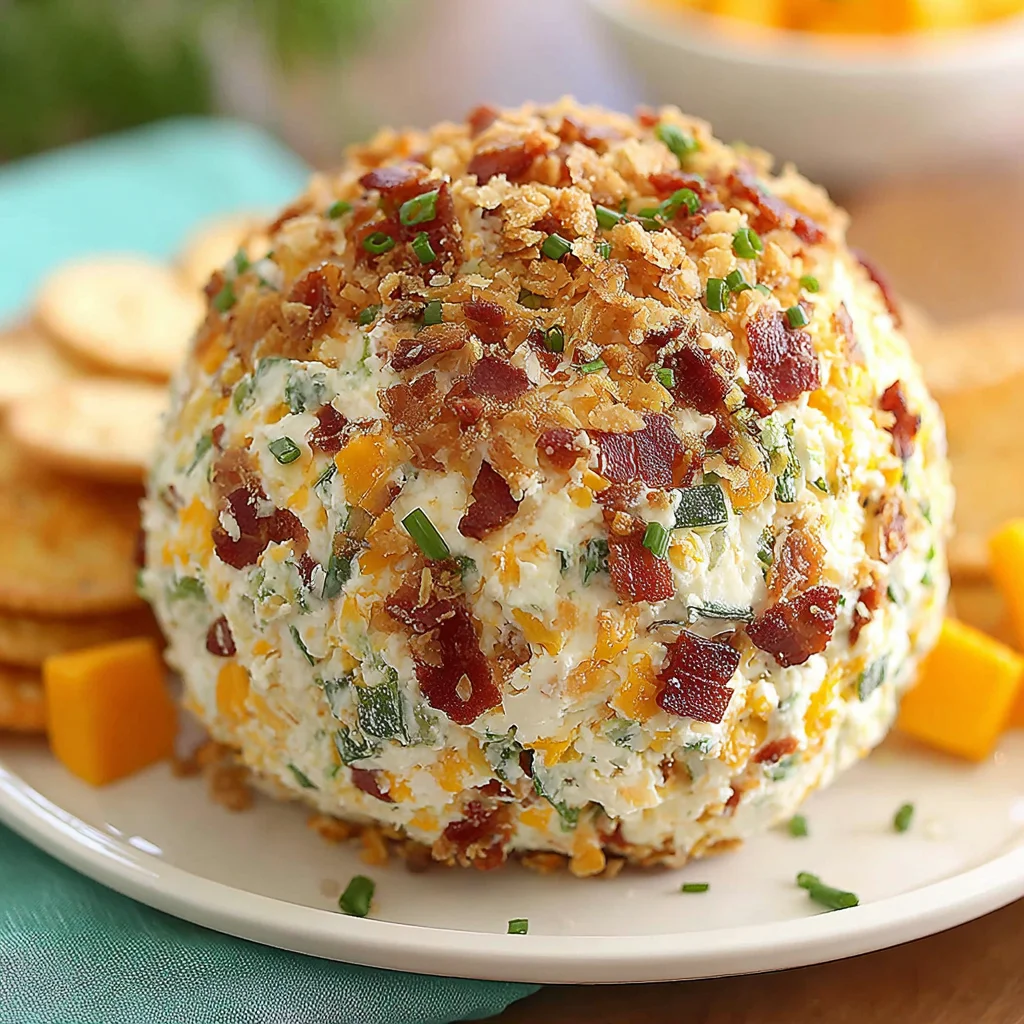
Spicy Jalapeño Popper Cheese Ball with Crispy Panko Coating
Ingredients
Equipment
Method
- Place the completely softened cream cheese, Parmesan cheese, and 1 1/2 cups of the shredded cheddar cheese (reserving the final 1/2 cup) into a large mixing bowl. Add the mayonnaise (or sour cream), garlic powder, onion powder, salt, and pepper.
- Using an electric hand mixer or a stand mixer fitted with the paddle attachment, beat the mixture on medium speed until all ingredients are completely smooth, light, and fluffy, scraping down the sides of the bowl as needed (2 to 3 minutes).
- Using a rubber spatula, gently fold the drained and patted-dry jalapeños, the 1/2 cup of crumbled bacon, and the remaining 1/2 cup of reserved shredded cheddar cheese into the cream cheese mixture. Mix just until the inclusions are evenly distributed throughout the cheese mixture. Avoid overmixing.
- Lay a large sheet of plastic wrap on your counter surface. Spoon the entire cheese mixture onto the center of the plastic wrap.
- Use the plastic wrap to help you gather and shape the mixture into a uniform, tight sphere. Once shaped, wrap the cheese ball tightly, ensuring there are no air pockets.
- Place the wrapped cheese ball in the refrigerator to chill and firm up for at least 2 hours, or preferably up to 4 hours. This chilling step is essential for the final structure.
- Optional Step for Extra Crunch: In a small skillet, melt 2 tablespoons of butter over medium heat. Add the panko breadcrumbs and toast, stirring frequently, until they are golden brown and fragrant (about 3–5 minutes). Remove from heat and allow to cool completely. (If skipping this step, use plain raw panko.)
- In a shallow dish or pie plate, combine the cooled panko breadcrumbs, the chopped fresh chives, and the remaining 2 tablespoons of reserved crispy bacon crumbles. Mix the coating ingredients well.
- Remove the chilled cheese ball from the refrigerator and unwrap the plastic wrap.
- Place the firm cheese ball into the shallow dish containing the coating mixture. Gently roll the cheese ball, pressing the coating onto the surface firmly with your hands until the entire ball is evenly and thoroughly covered.
- Serve immediately with sturdy crackers, toasted baguette slices, pretzel thins, or fresh vegetable sticks. If preparing ahead, refrigerate for up to 2 days before serving.